The Intelligent Contact Routing (ICR) tool is an advanced yet easy to use mechanism that injects situational decision-making to handling customers or leads in multi-stage operations.
When your multi-stage operation requires you to transfer a contact from your agent to another group or company, ICR is there to automate the process. You configure decision-making parameters for ICR to analyze the conditions and determine where to transfer the call.
The ICR tool works in tandem with agent scripting. The call script facilitates information gathering, decision making and information sharing for an Intelligent Call Routing action to be effective.
In a common scenario, when an agent has qualified a lead (contact) on the phone and submits it, ICR analyzes your pre-configured rules and conditions and, based on that, transfers the contact to the telephone number that matches those conditions. ICR effectively puts routing decision in your hands rather than the individual agent.
ICR may require basic integration. The agent would be presented a form (e.g., a page/script) where relevant call and contact data is collected, with the ability to submit the contact for routing, effectively triggering Intelligent Contact Routing.
The ICR interface starts at the Dashboard, which shows you a tile for each active Routing Rule in the selected time period, and a graph of the number of related calls for each Routing Rule selected to be displayed.
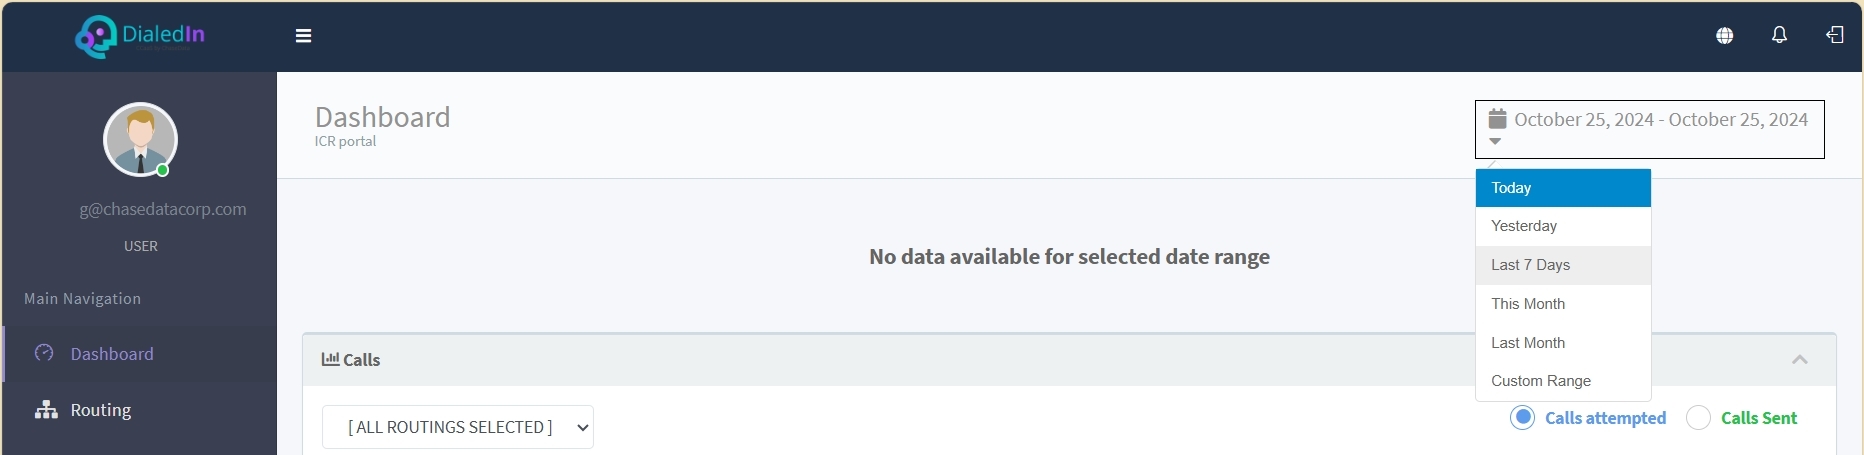
You are able to select the time period to graph, including the current day (Today), the previous day (Yesterday), the Last 7 Days, This Month, Last Month, and a Custom Range of dates.
Refer to the following pictures.
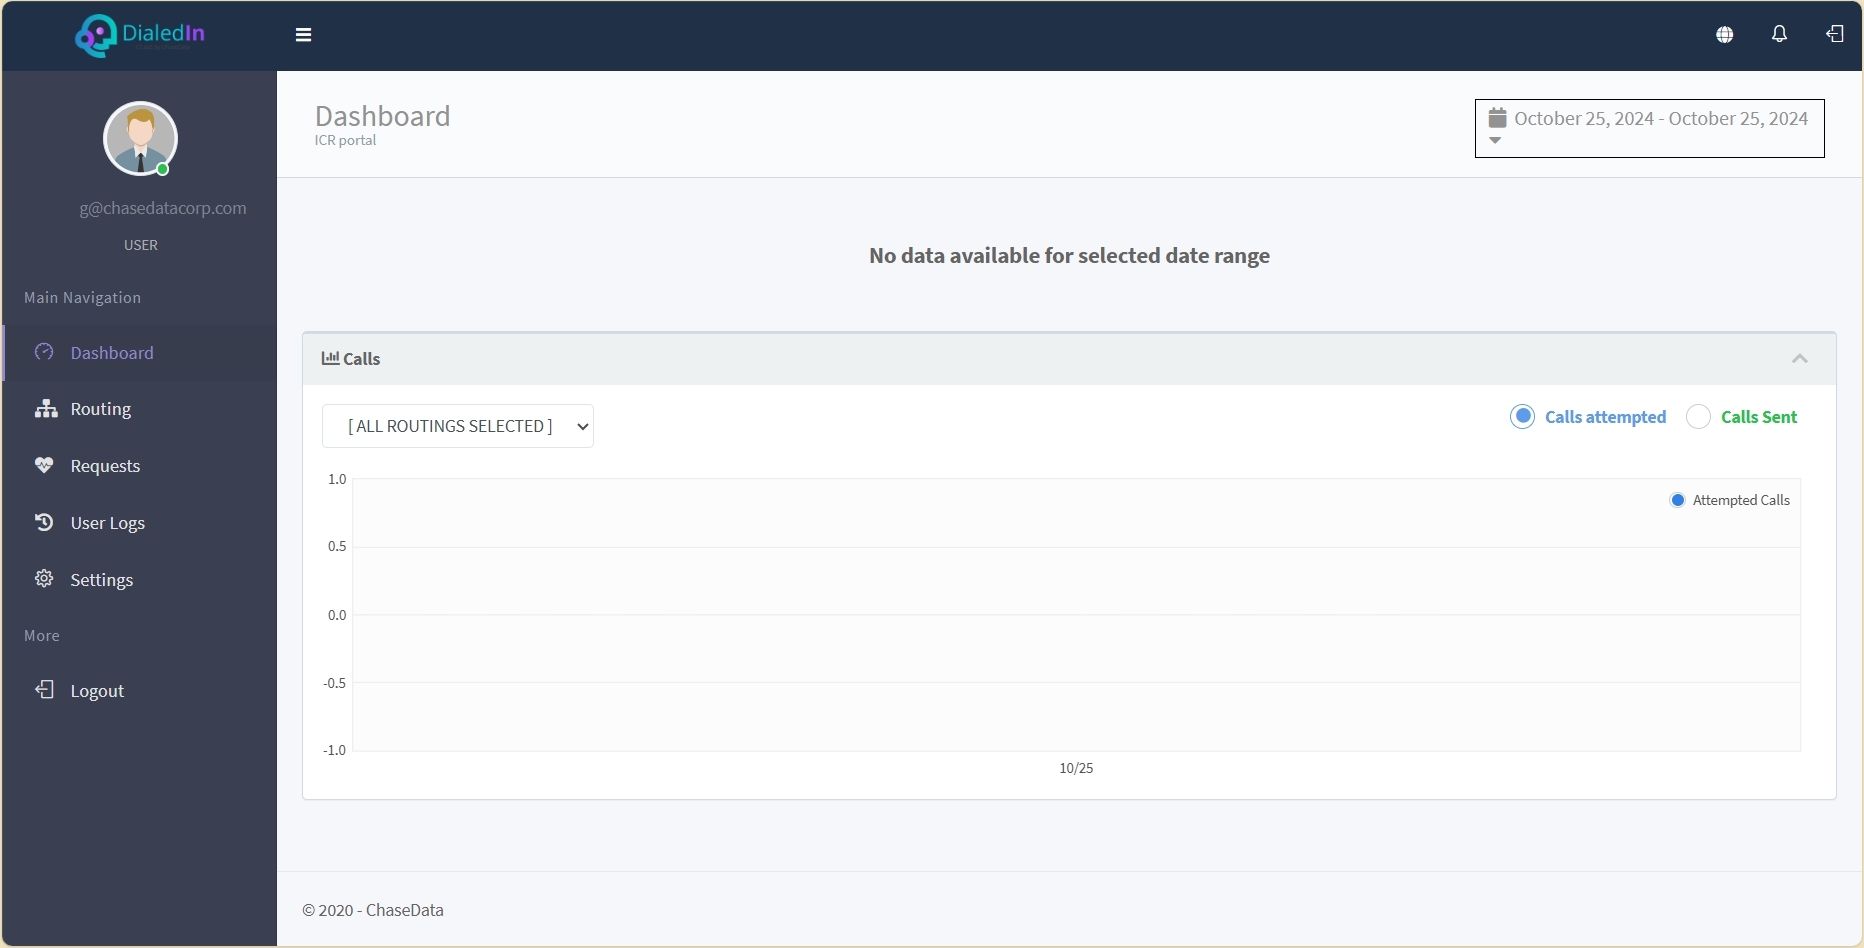
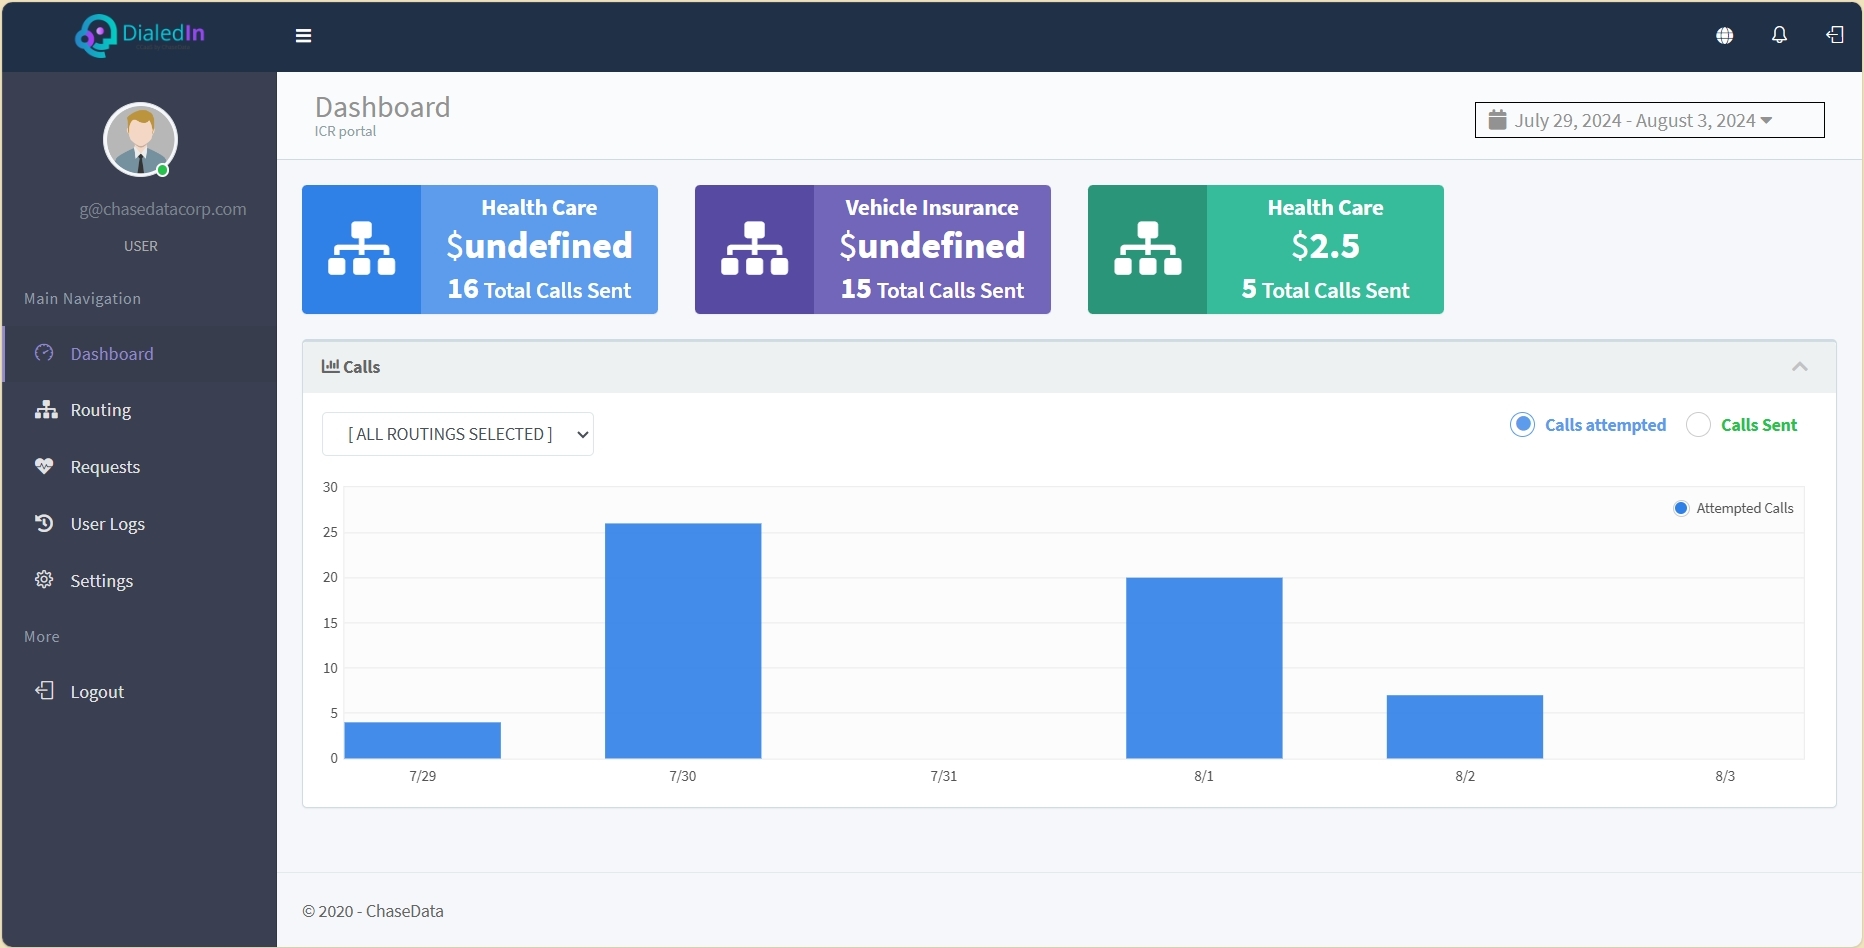
You can select to graph Calls Attempted or Calls Sent, or Both.
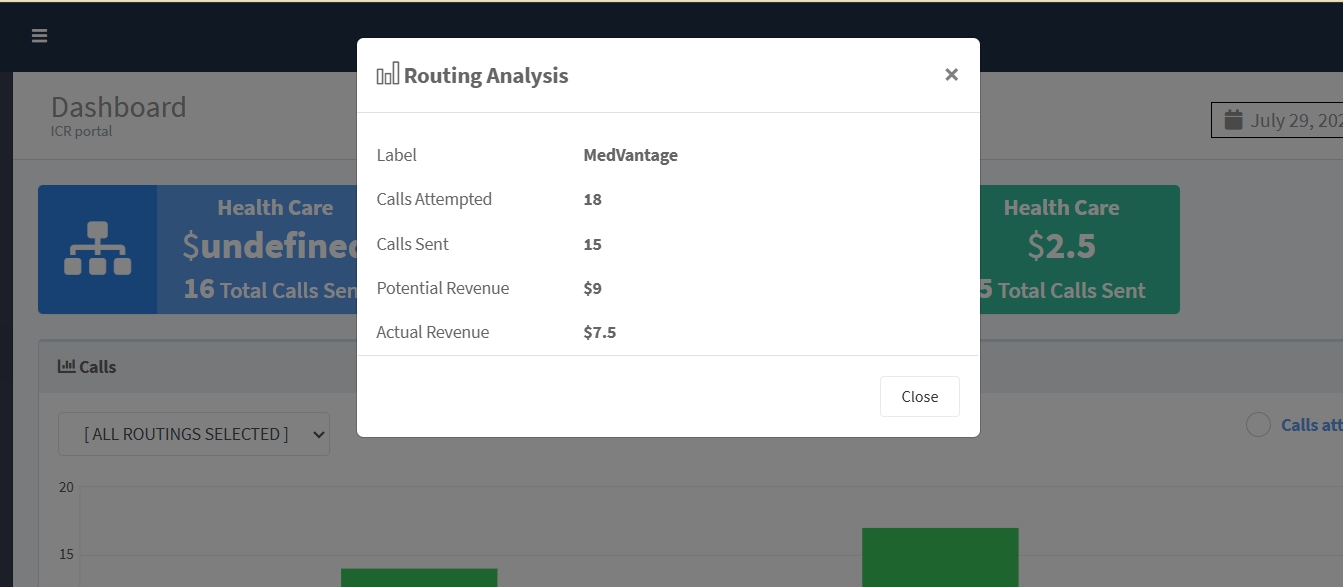
If you click on a Routing Rule tile, a window pops up with call status for each routing scenario or option for that rule (identified by its Label). It includes number of Calls Attempted, number of Calls Sent, and revenue references.
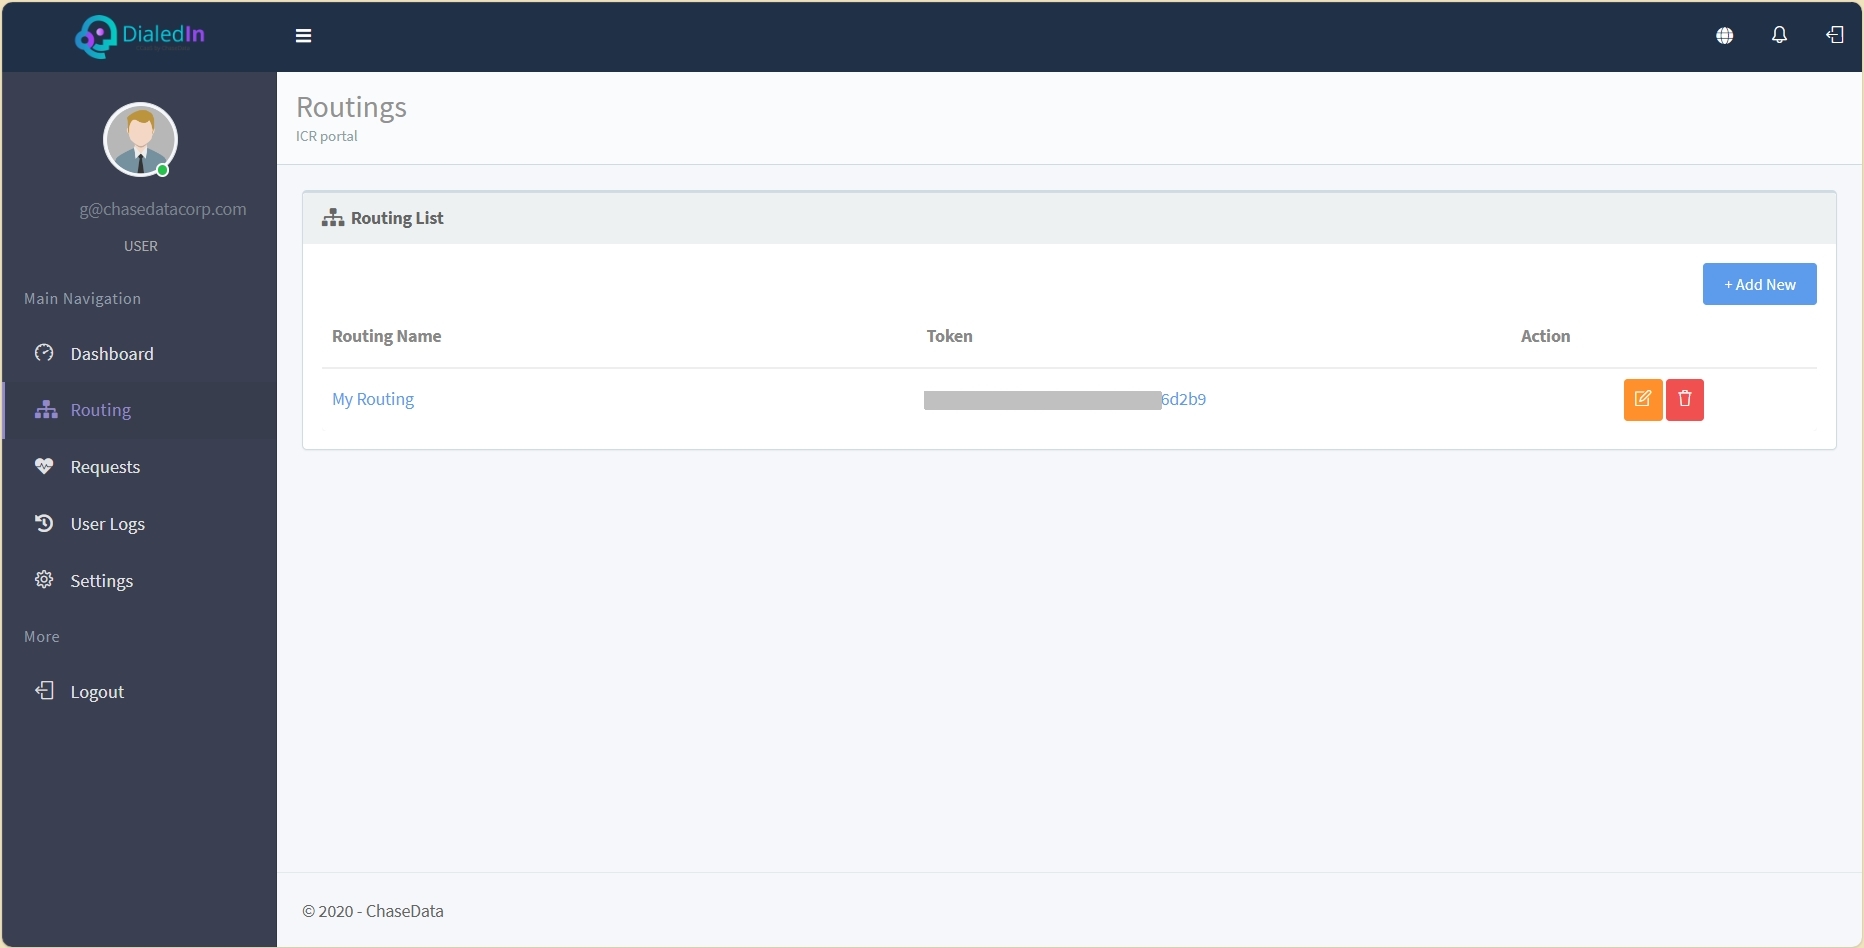
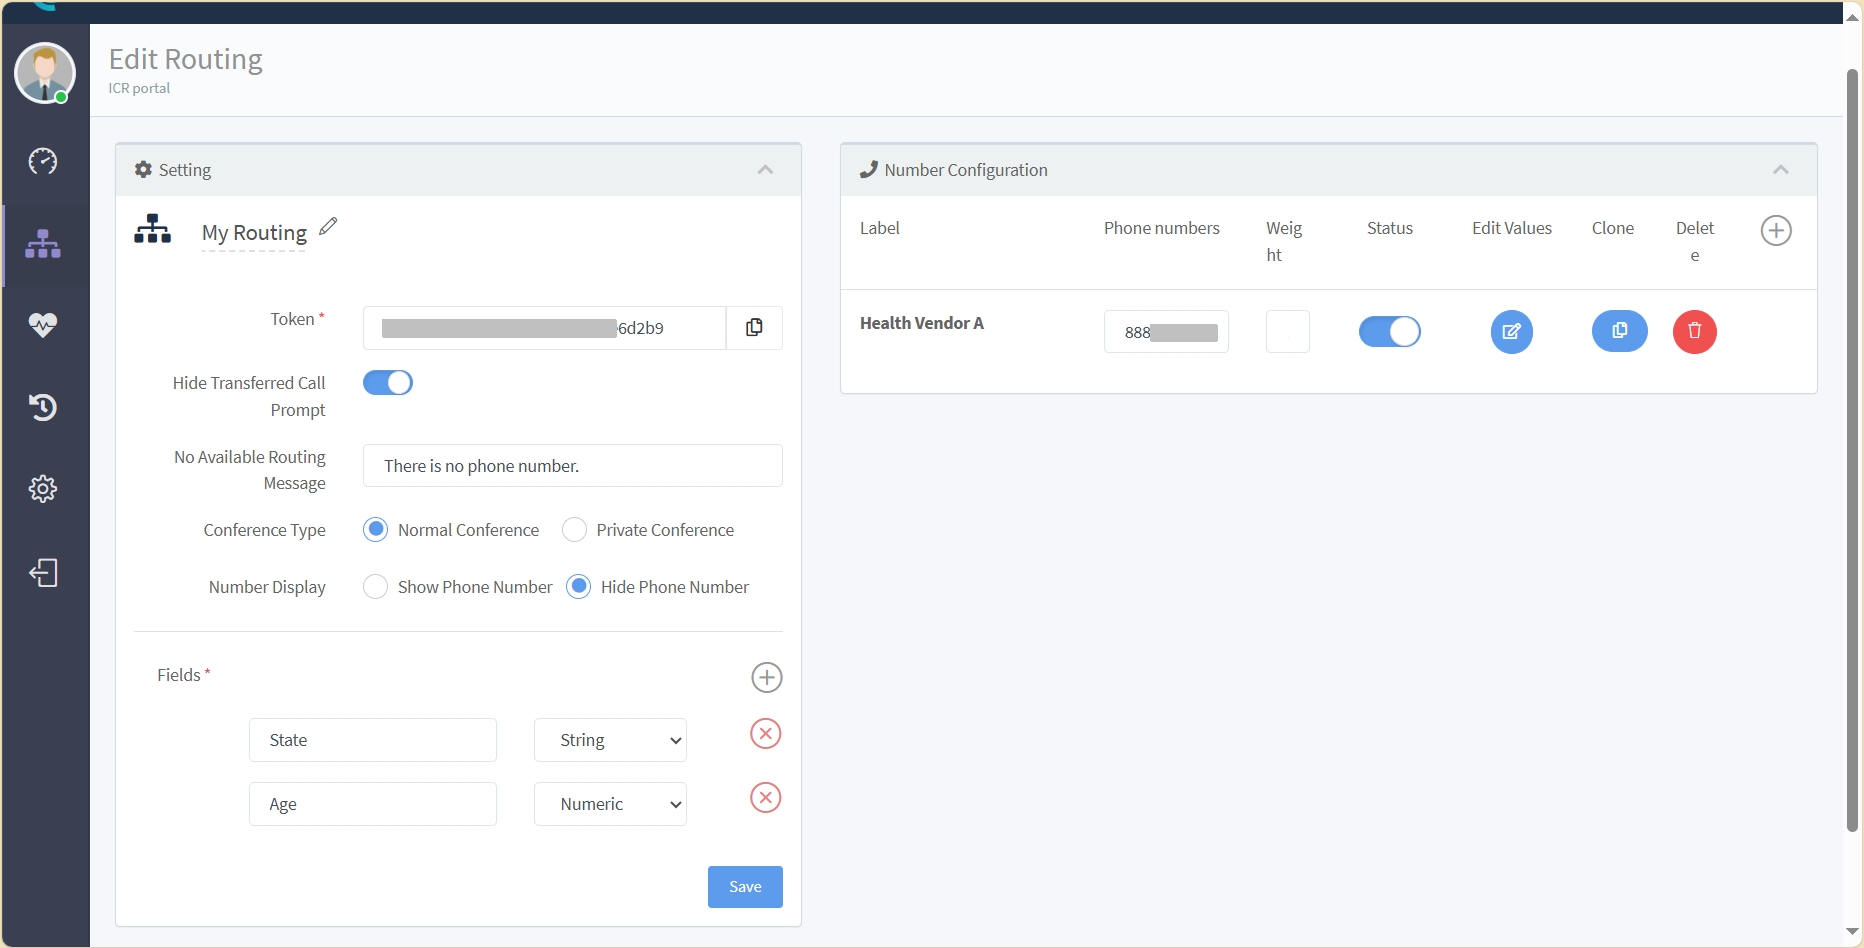
If you select Routingin the main menu area on the left, you are presented with a Routing List, with a row for every Routing Rule defined. Here, you can Add New rules or edit, remove, clone or view logs for existing ones by clicking on the correspoding icon.
When you click on an existing rule, or Add New ones, a new window appears with all the necessary elements to configure.
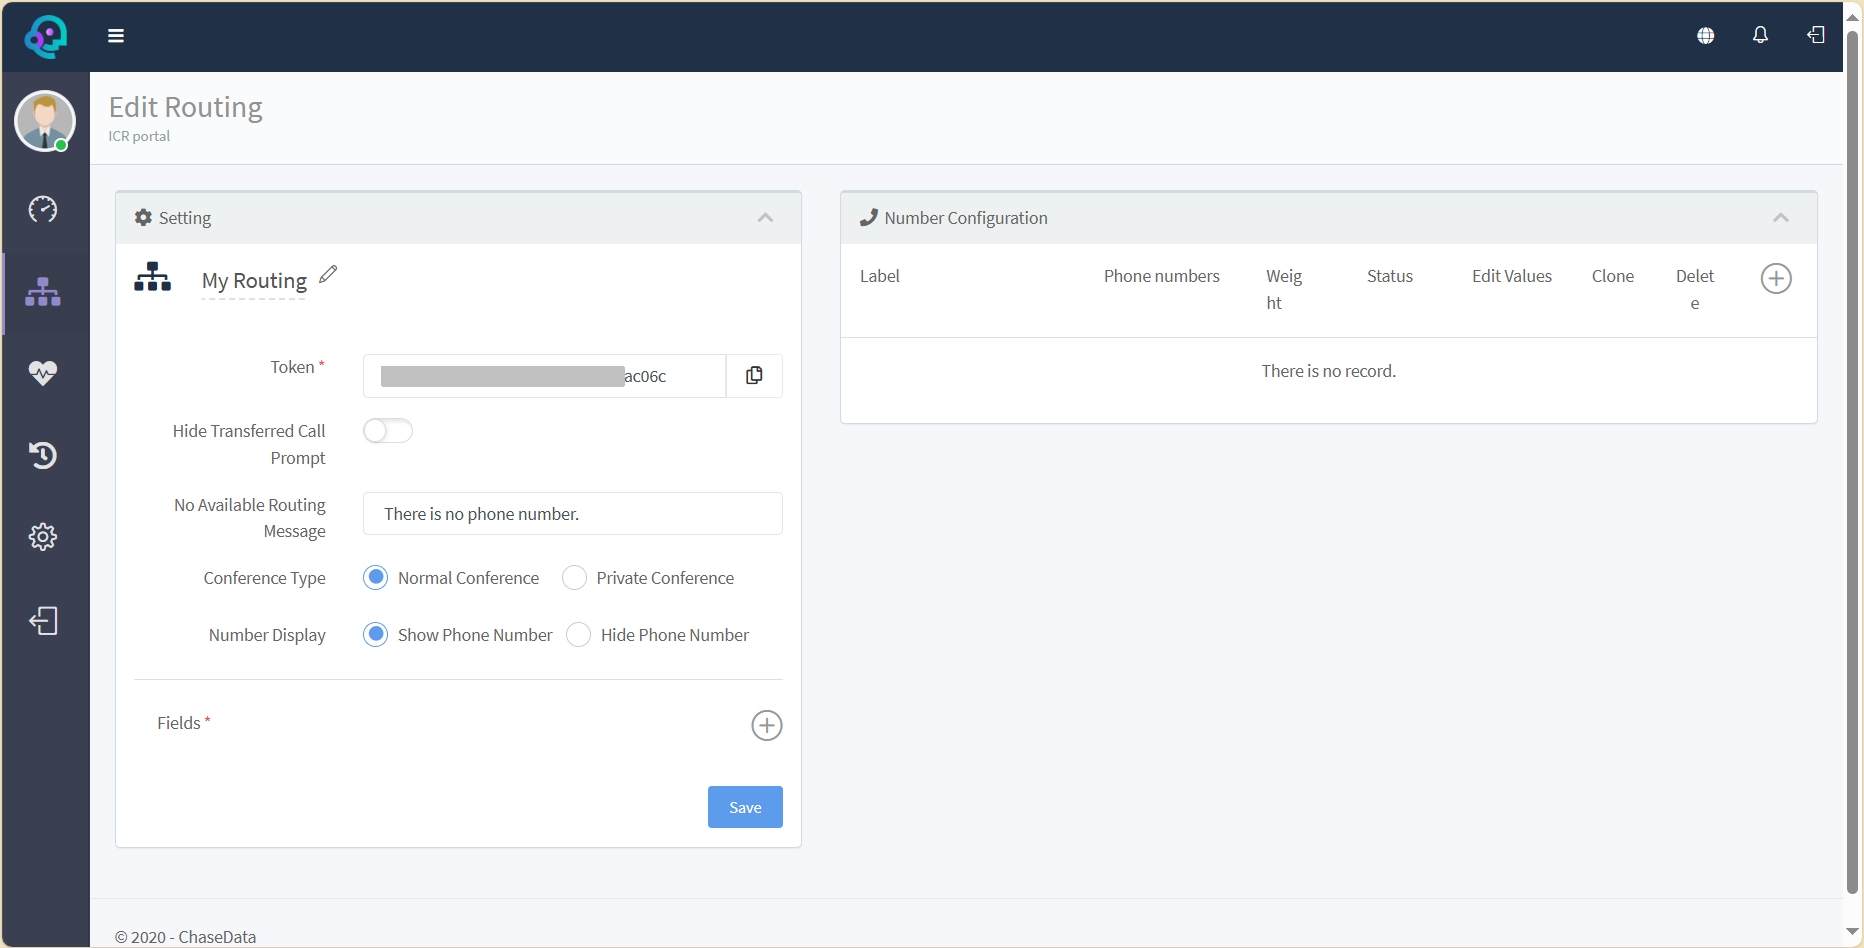
That includes the Settings and the Number Configuration panels.
In this example, "My Routing" is the label or name that you assign to this workflow. The token is system-generated and is used when putting together communications with an endpoint related to the call transfer activity; you typically copy the token and add it to a relevant script.
In Settings you give it a name (Label), and define the basic behavior of the call transfer attempt, including what message to display to the transfering agent if routing was not possible (No Available Routing Message), whether to include the lead or contact in the transfer process (Conference Type), and whether to show him/her the number to be transfered to (Number Display).
Logging is usually enabled so we can see keep track of requests, and decide whether to Track All Attempts or just those that fall within the configured call caps.
Even Distribution indicates whether requests related to numbers with the same weight are done in a random or distributed manner.
Under typical scenarios, you set it to automatically transfer or conference the call when the agent lands in the relevant script page, but can also add a delay, or just disable Auto Conference all together.
You can configure a No Available Routing Message for the agent when there's no phone number in the workflow that matches the call transfer conditions.
For a Normal Conference Type all parties can hear each other. For a Private Conference the lead or customer is on hold while the transfering and transfered agent talk to each other. With a Blind Transfer the transferring agent just passes the call to the closer without the need to stay on it. These three modes are mutually exclusive.
You can also configure whether to Show Phone Number to the agent, or Hide Phone Number.
The second part of the Settings panel allows you to define the fields on your Script that can be used to define the conditions for each possible Routing scenario or option. Fields are database fields to catch for mapping out during the operation.
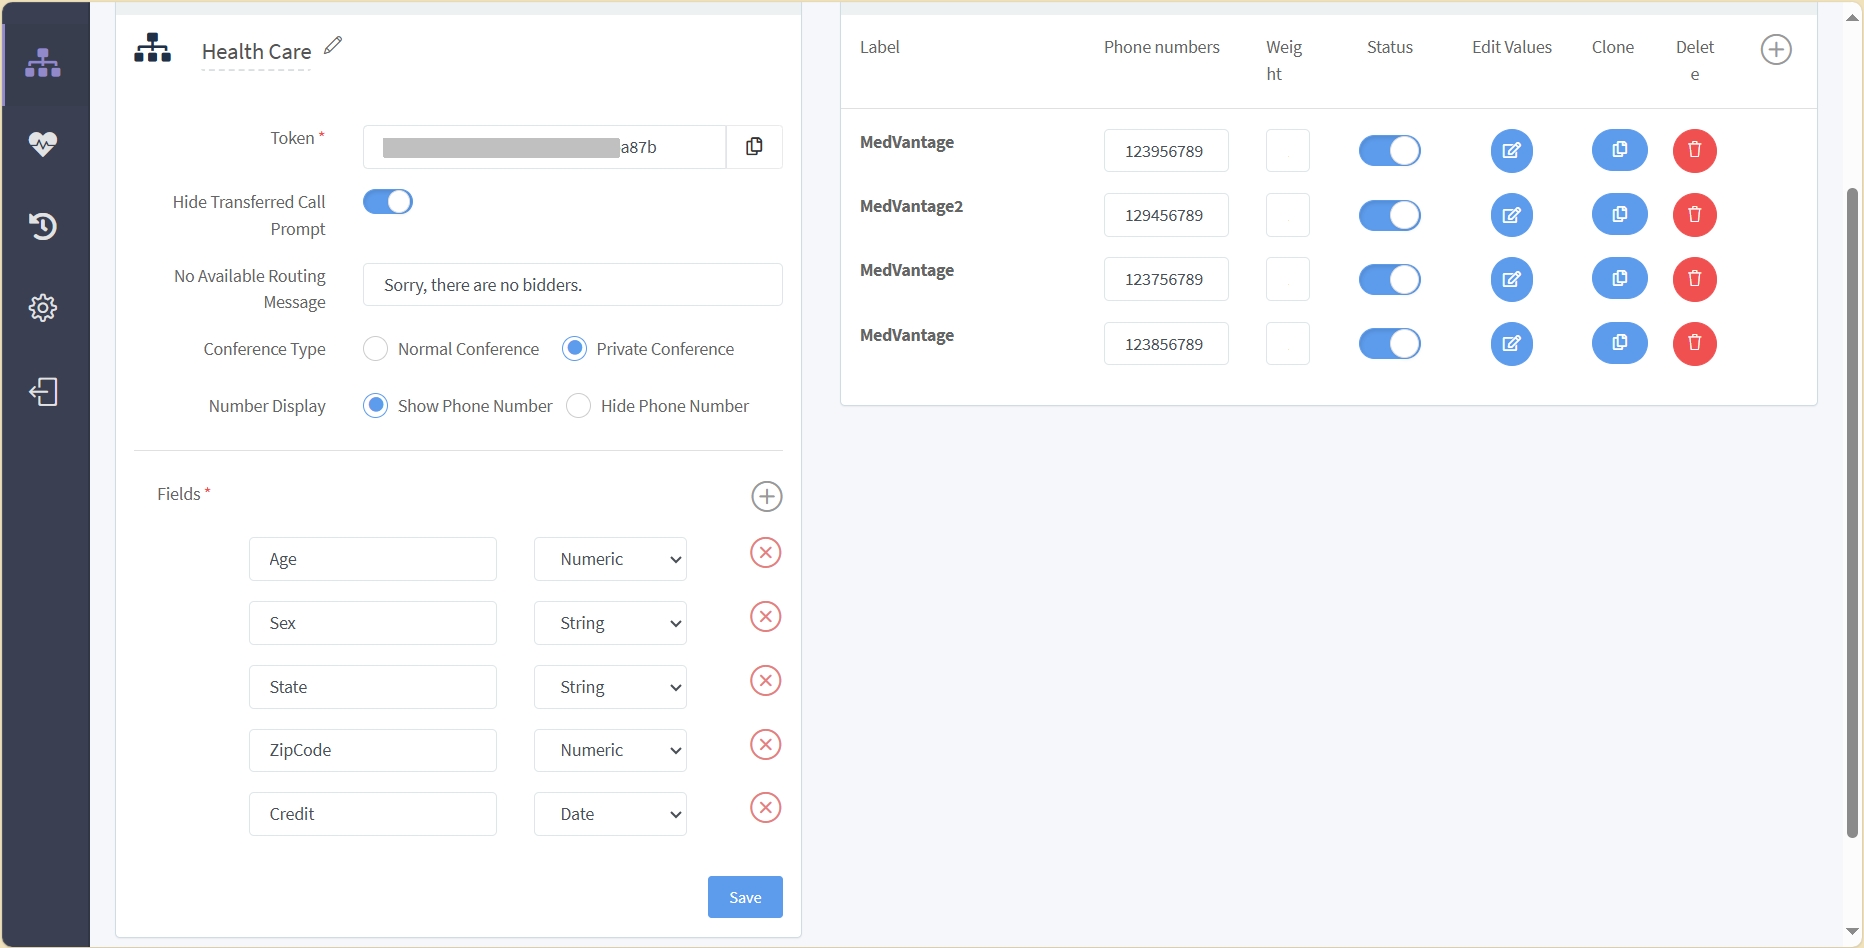
Number Configuration is where you configure the candidate destinations of your transfers, usually a closer organization, and often and external one. The key details shown in this panel are the name or Label for the destination, the corresponding Phone number, or DID, and the Weight that you want to assign to transfering to that number.
Here you create the conditions for each routing scenario. To review or edit rule details, click on the icon under Edit Values for the corresponding scenario, which will pop up the Phone Number Detail panel.
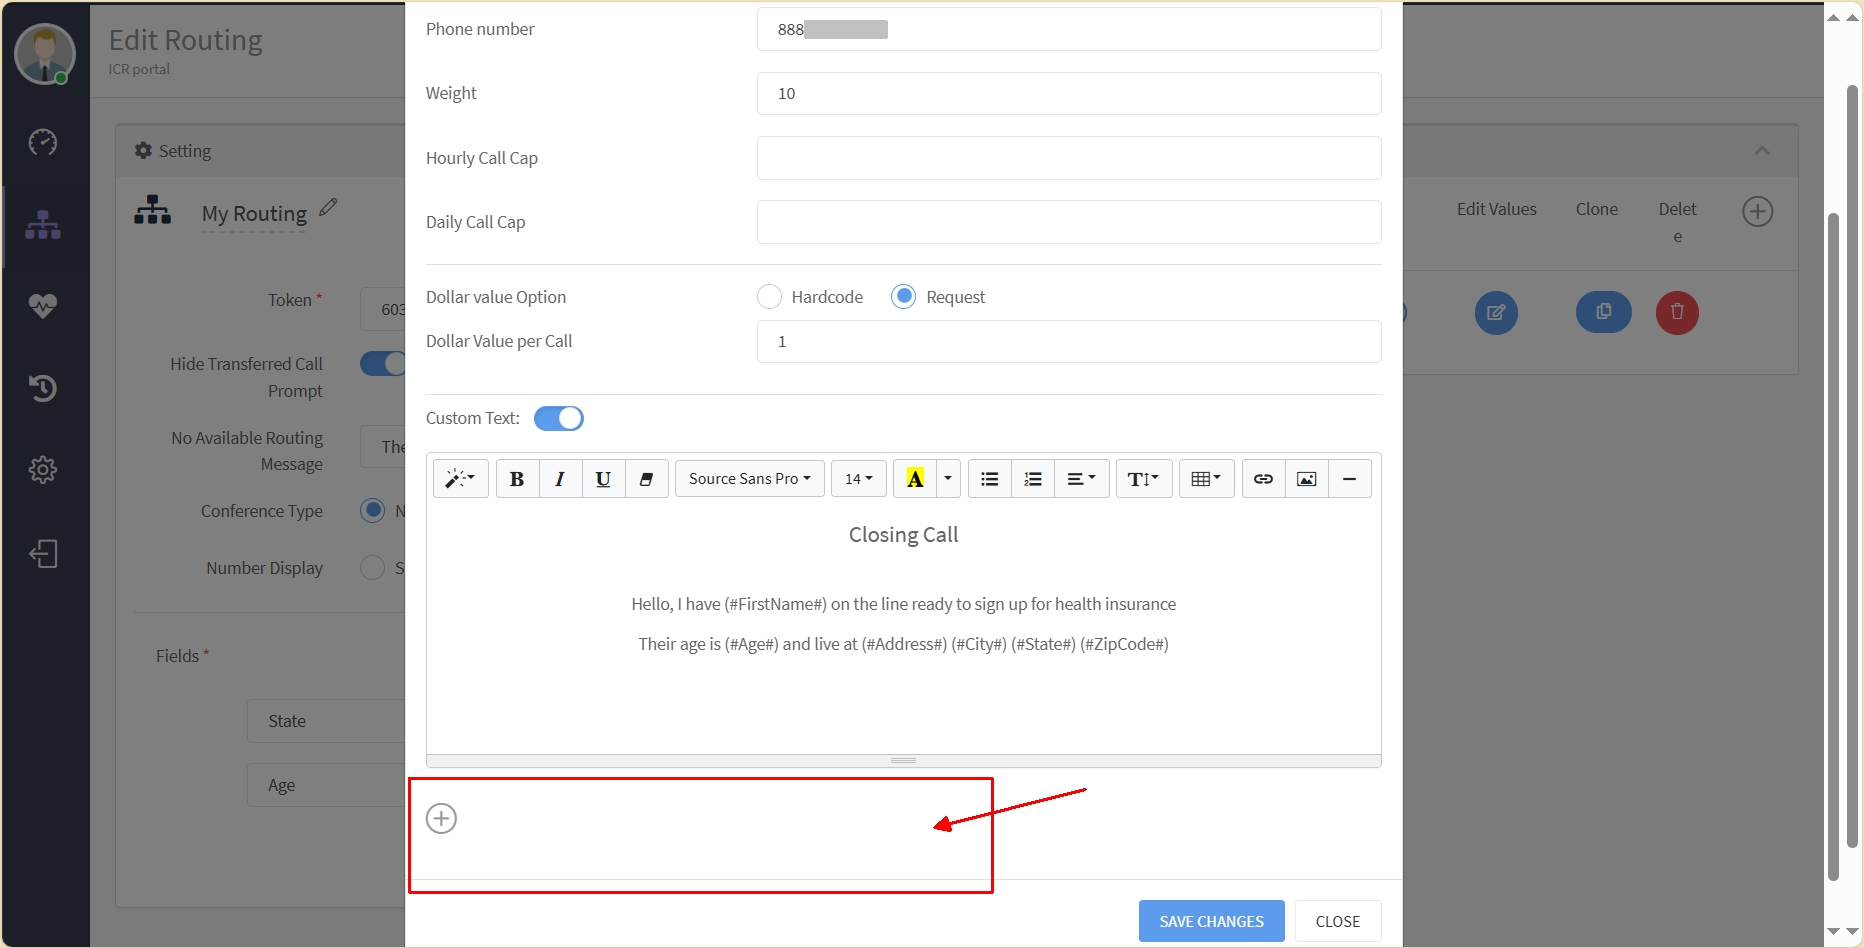
This panel includes three tabs: Settings, Schedule, and Webhooks. The Settings area is where we configure most of the routing decision for this particular routing scenario or option.
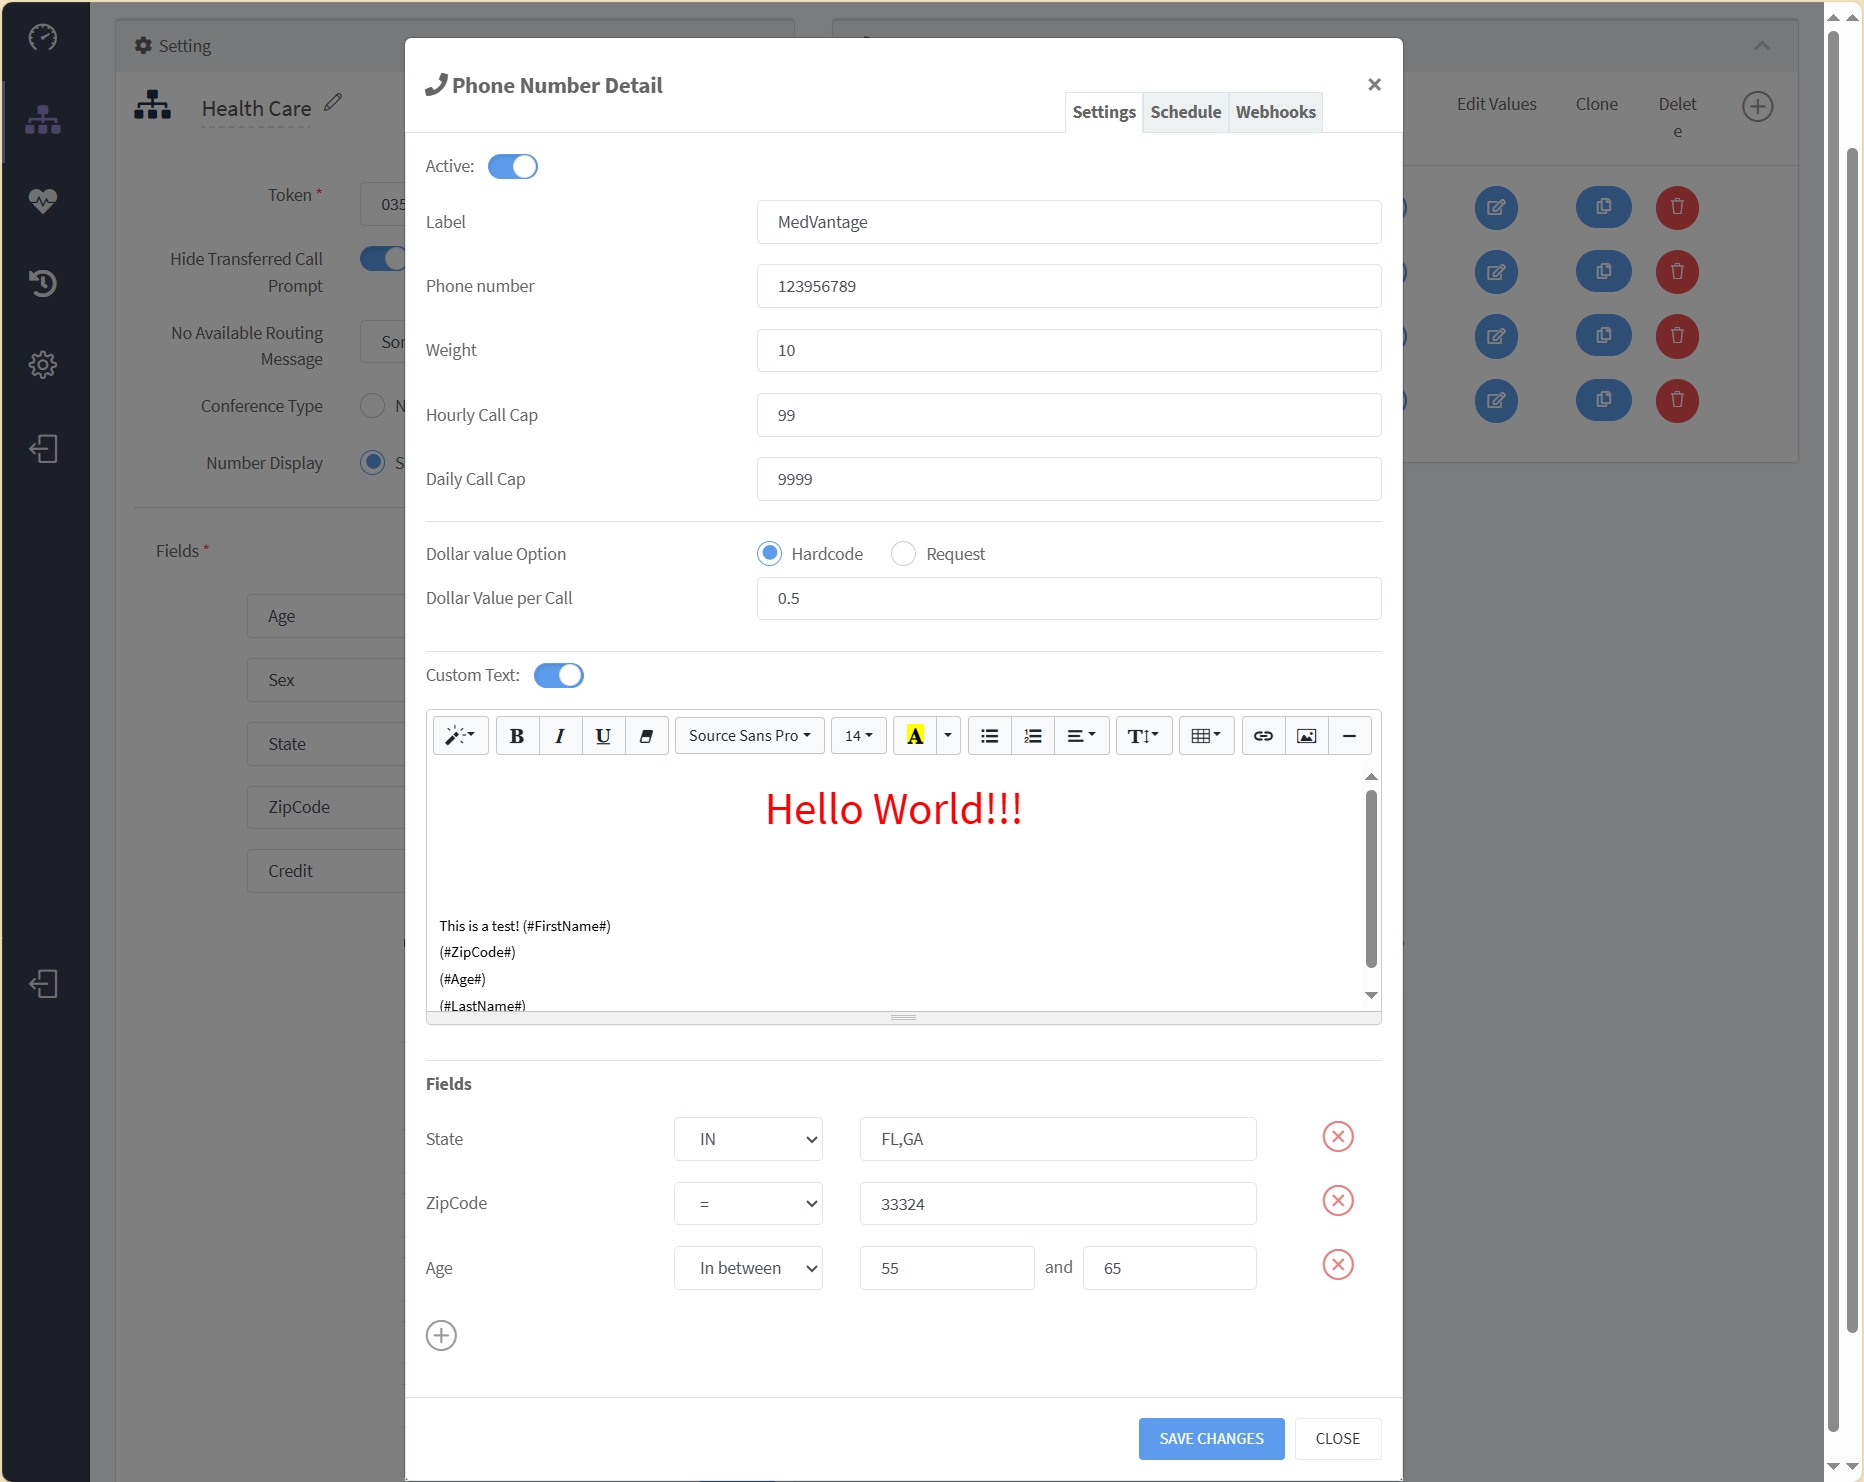
A key setting, of course, is the Phone number where this routing scenario would attempt to route the call to.
The Weight provides a way to prioritize a number under similar conditions; a higher weight has higher priority. In the case that the same weight is given to multiple numbers, the first one added to the list gets higher priority (the list order corresponds to that).
The Hourly Call Cap and the Daily Call Cap limit how many calls that number should handle every hour and every day, respectively. These help you define another level of distribution of call transfers, or to keep transfers to a capacity or contractual level.
You can include revenue references by assigning a dollar value to each call. If you set the Dollar Value Option to Hardcode, set the appropriate value with Dollar Value per Call; if, instead, you set it to Request, that value should be included in the integration message. These numbers will be used to calculate Potential Revenue (all call attempts) and Actual Revenue (actual calls sent) in the Routing Analysis.
Custom Text can be used to display for the agent to use as part of the call transfer. It can be built with variables whose values are obtained from the lead's record fields. Via call script integration, the agent would be able to load or sets values associated with those fields so to use them when evaluating the routing condition based on field values.
You can use Fields to set conditions for this number to be used for a call transfer. But you also have the option to not use Custom Text, in which case you just need to add (+) Fields that are to be displayed to and set by the agent, when appropriate, and the conditions to be evaluated, for ICR to use in routing decisions. The Fields pull-down menu will show those previously added in the Setting area of the parent Routing Rule.
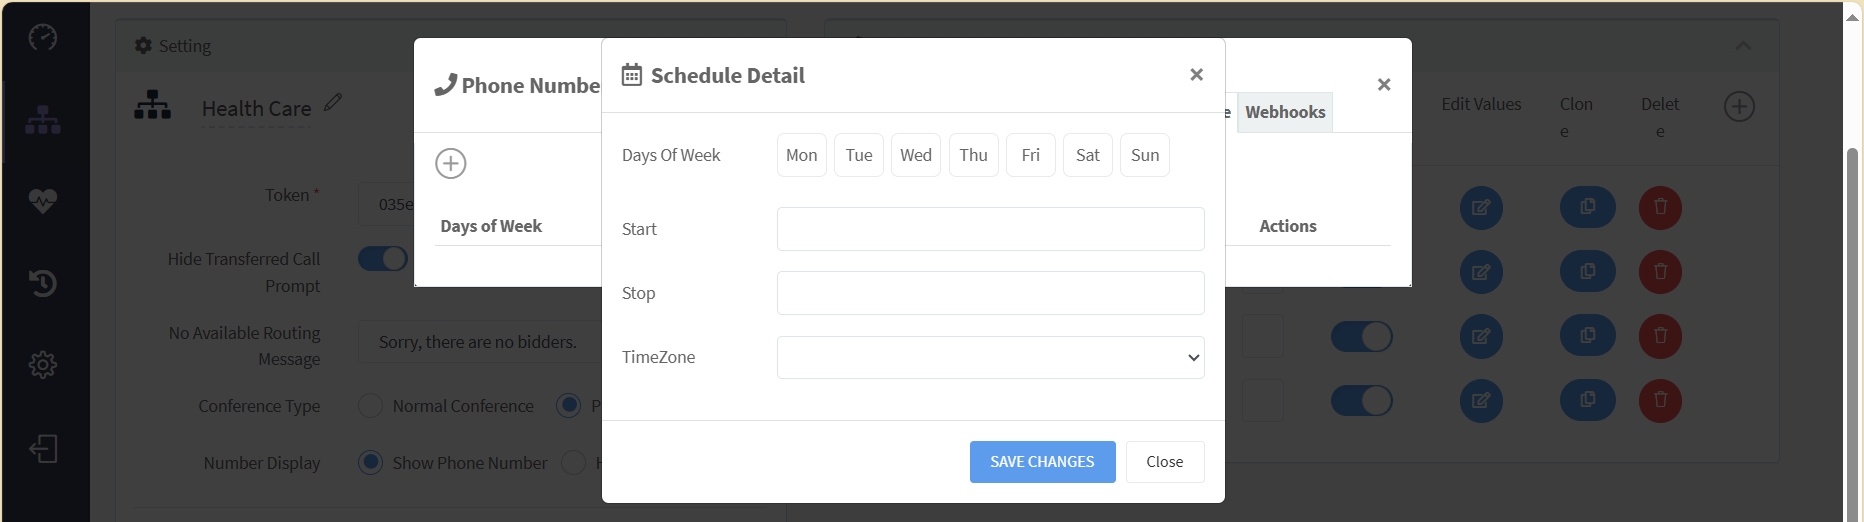
The Schedule tab of the Number Configuration panel allows setting a schedule for this Routing Rule number scenario.
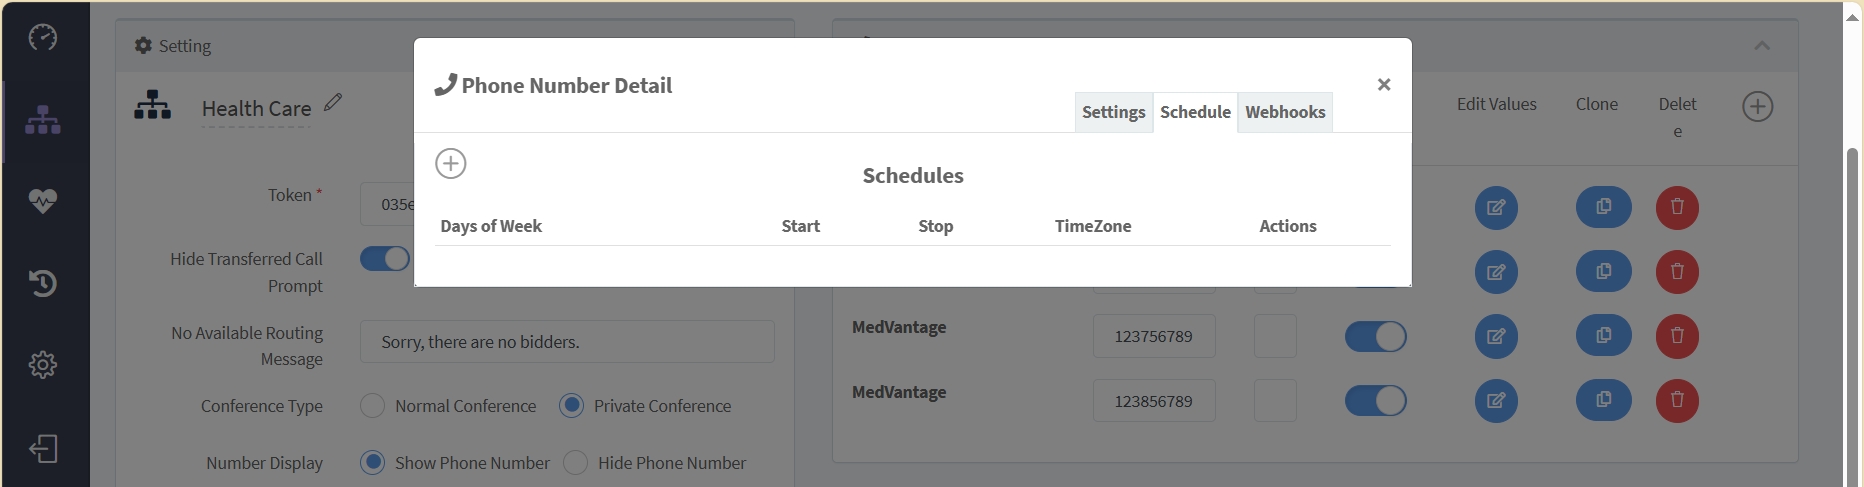
For every schedule item that you create, you can select one or more Days Of the Week that should follow a specific Start and Stop timeframe. You can create multiple schedule items if some Days Of the Week need to use different timeframes.
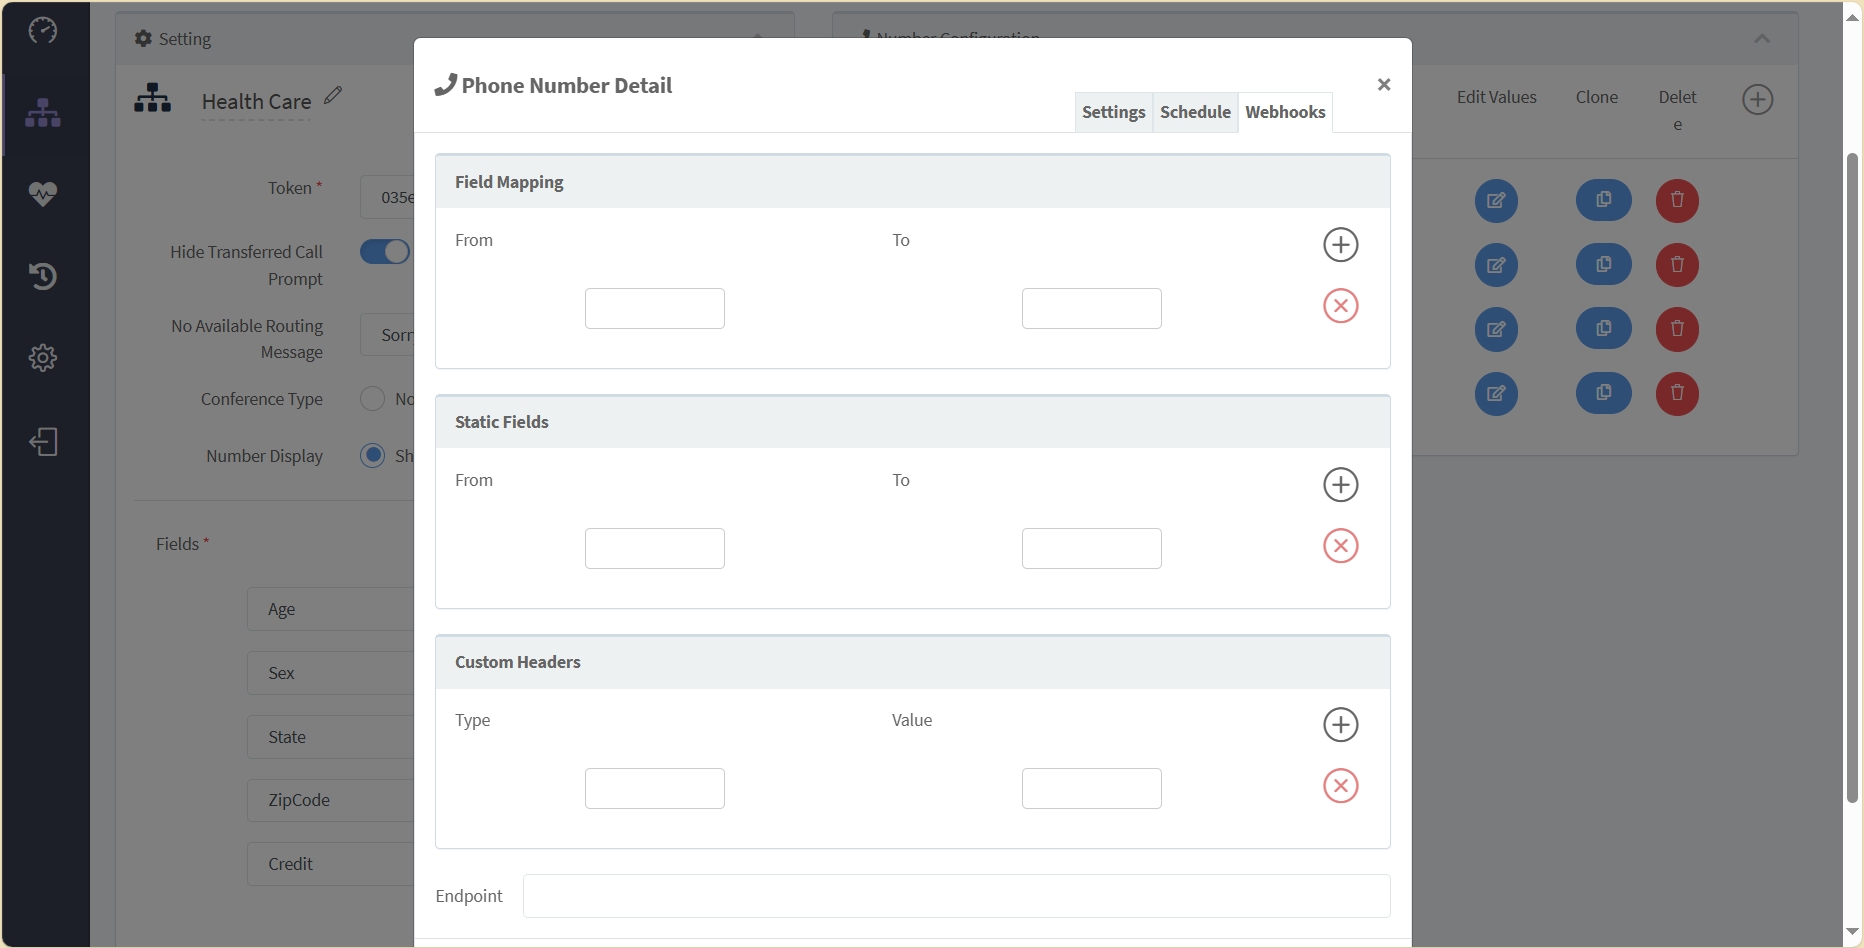
The Webhooks tab of the Number Configuration panel allows us to configure the parameters needed to post the lead/contact record to an external system when the call is transferred (the webhook is triggered just before the transfer/conference call is established). It allows setting up the integration to an endpoint that may have been provided, passing along any of the fields that have been made available to the workflow. This allows the receiving party to have any necessary information to properly handle the transferred call.
Webhooks are used with your specific integration and should be consulted with your DialedIn Support representatives.
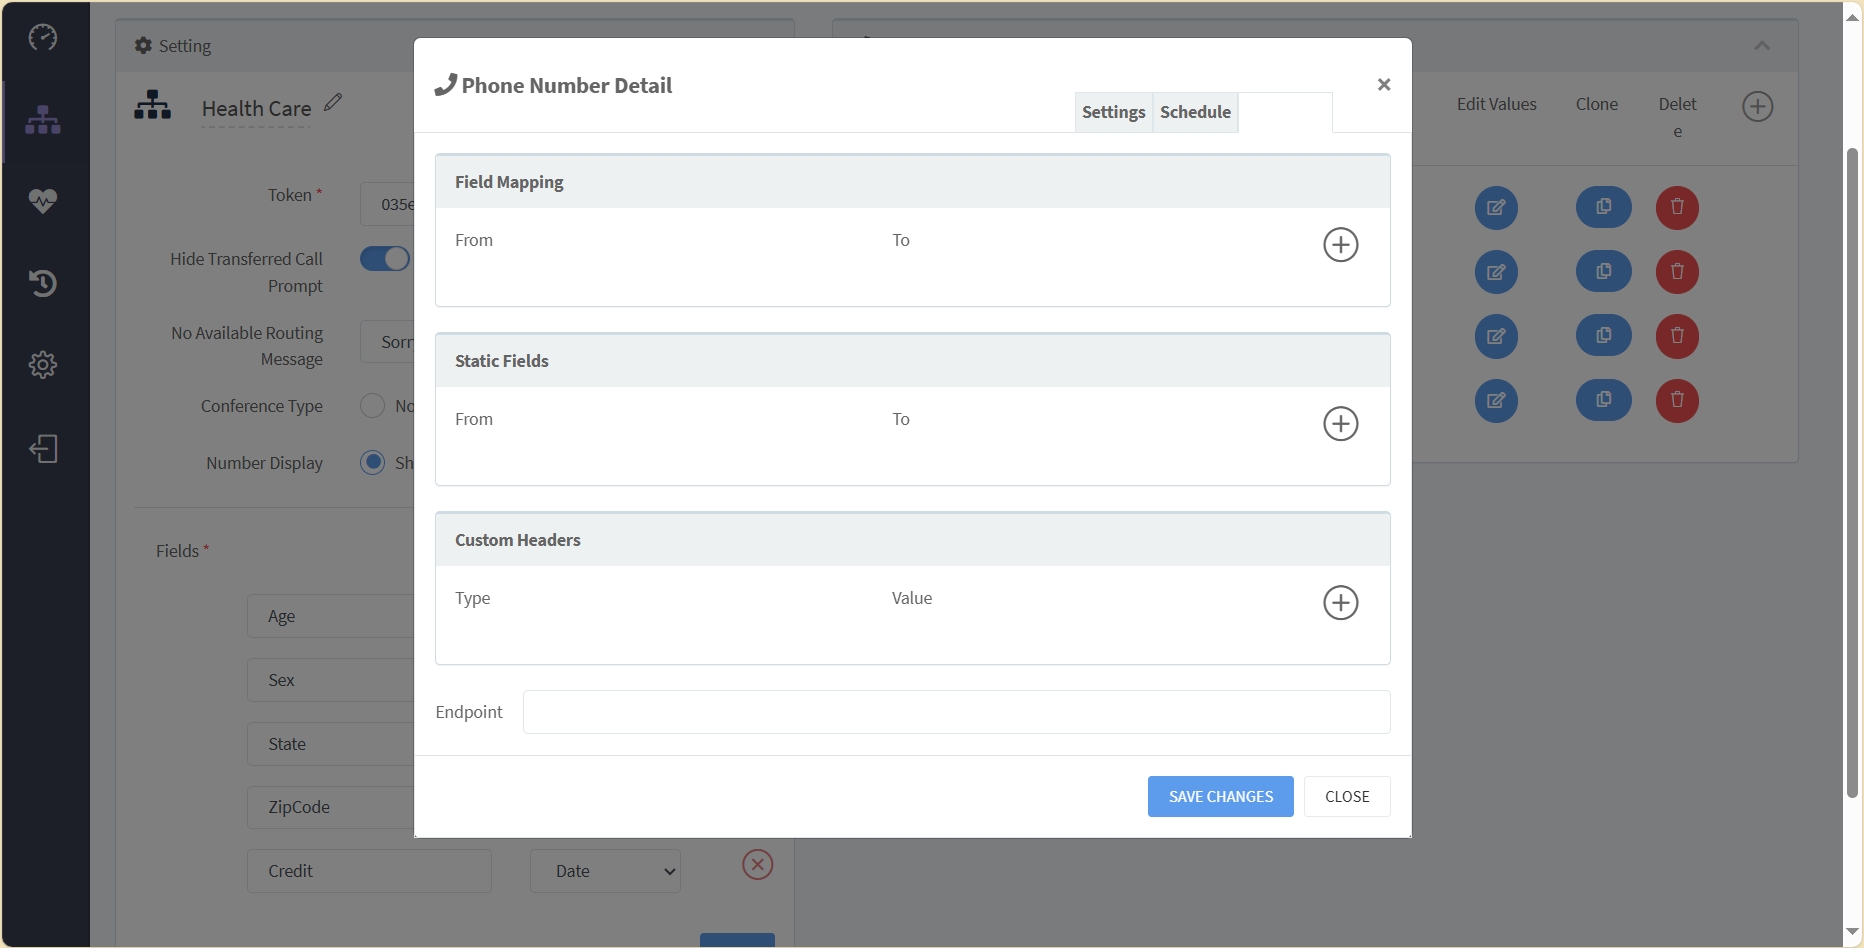
Field Mapping provides a way to map DialedIn lead/contact record fields to external fields, when posting to an external system as part of the call transfer.
Static Fields allows passing additional information to the external system, for example, an authorization token, or anything else that may be needed.
Custom Headers provides a way to specify custom HTTP headers, like Content-Type. See the following links for reference:https://developer.mozilla.org/en-US/docs/Web/HTTP/Headershttps://developer.mozilla.org/en-US/docs/Web/HTTP/Headers/Content-Type
Endpoint is the actual hook URL to be used.
ICR also allows configuring and performing an Availability Check on the receiving organization, or closer, before the transfer is attempted. This is done to an endpoint provided by posting relevant data and evaluating the response. This is done in the Webhook Condition Configuration tab that is opened.
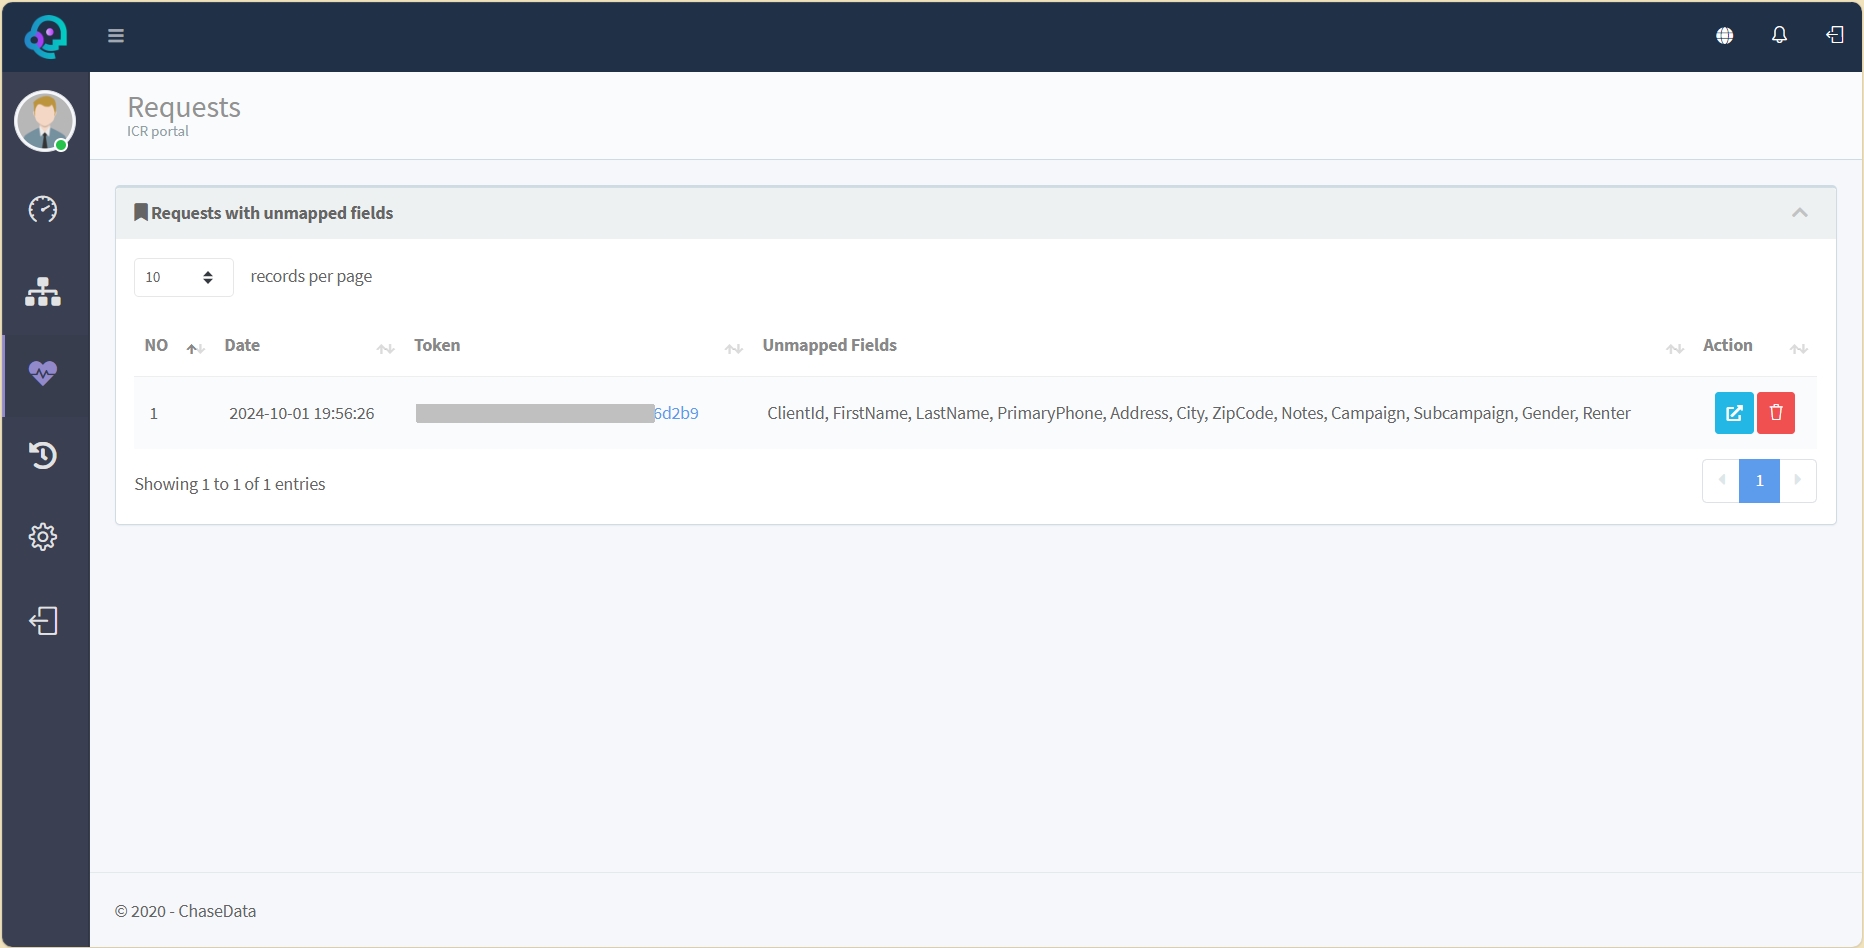
If you select Requestsin the main menu area on the left, you are presented with a list of Requests with unmapped fields. There's one row for every instance, showing the Date and time of the instance, the integration Token identifying it, and a list of Unmapped Fields.
When a field is made available by a Routing Rule, and a script/form is submitted with the same field but is not included as matching criterion for a corresponding Routing Number scenario, the field is considered an Unmapped Field. Reporting these fields here helps you easily identify fields that you included in the Routing Rule but not in a corresponding Routing Number scenario, whether intentionally or unintentionally.
Clicking on the view Action icon takes you to the configuration area for the corresponding Routing Rule so you can review your list of fields and whether you unintentionally missed adding a condition check for the rule.
If you select User Logsin the main menu area on the left, you are presented with a list of activities performed on the ICR tool. The type and amount of information presented in these logs may be dependent on the user that logged in, but, in general, there's a row for each action, starting with logins and any other relevant actions deemed important for tracking.
Information includes the Client IP adress from where the tool was ran, the User identifier (usually an email address), the Type of action that took place, the User Agent used (typically, the type of browser), additional Detail or action sub-type, and the Date & Time when the action was executed.
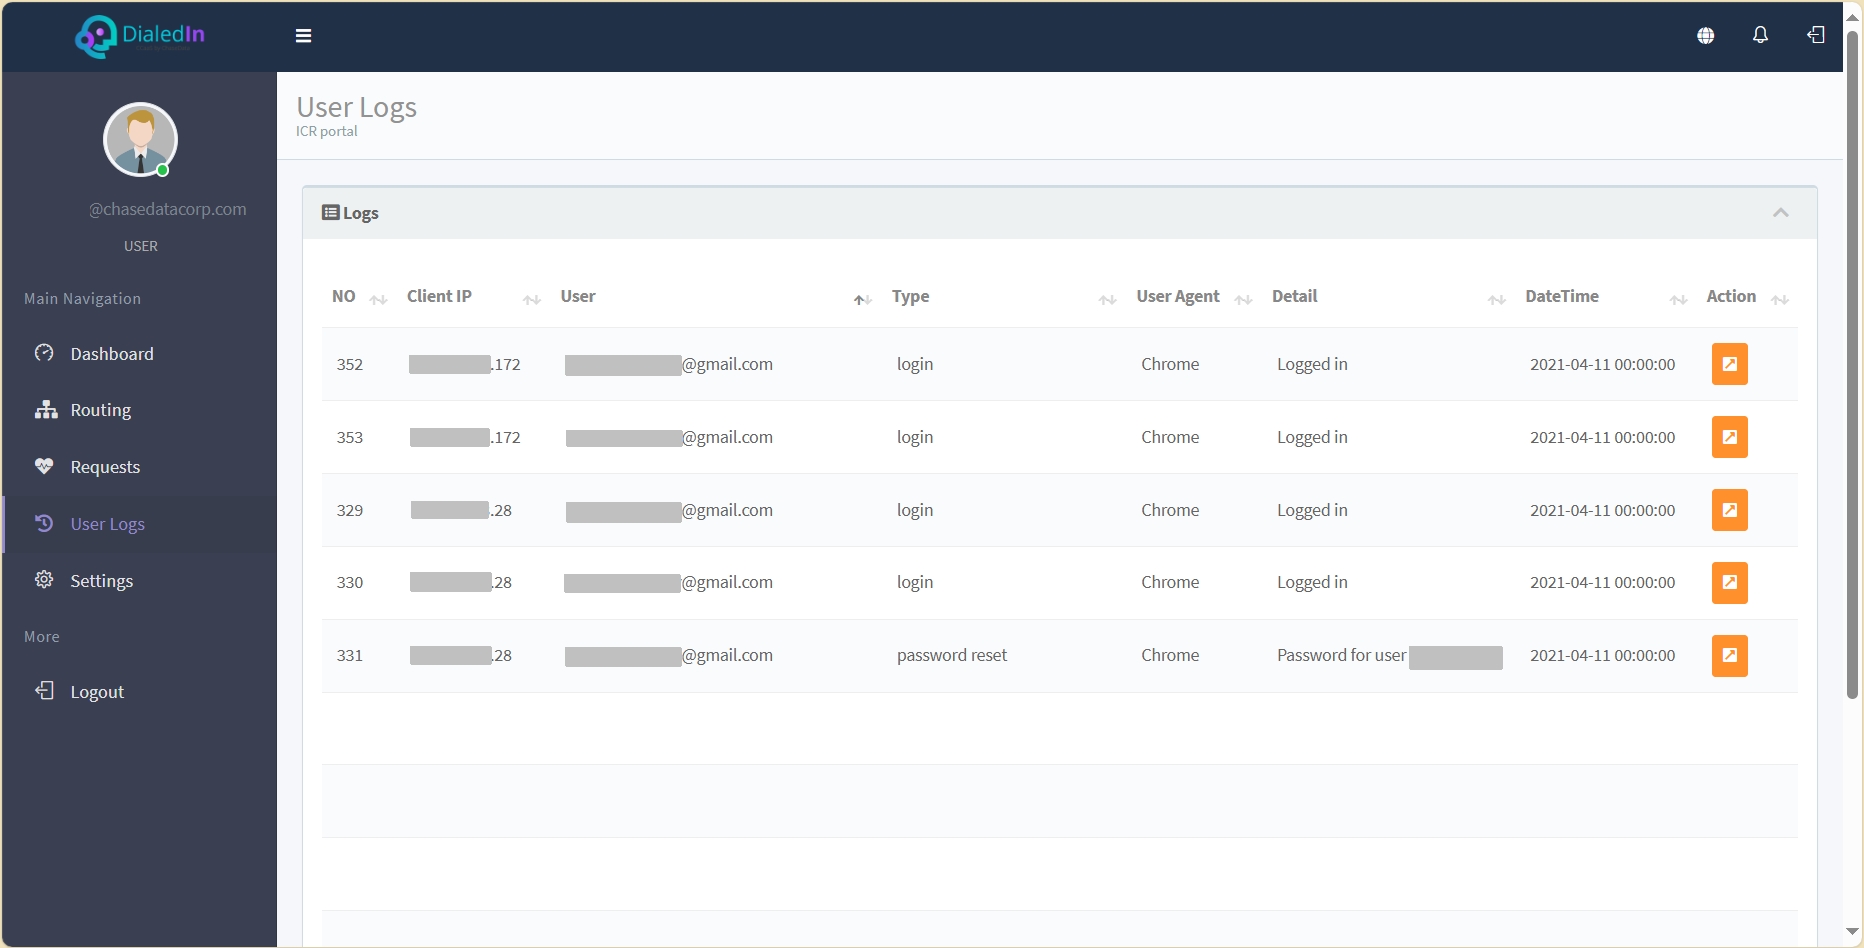
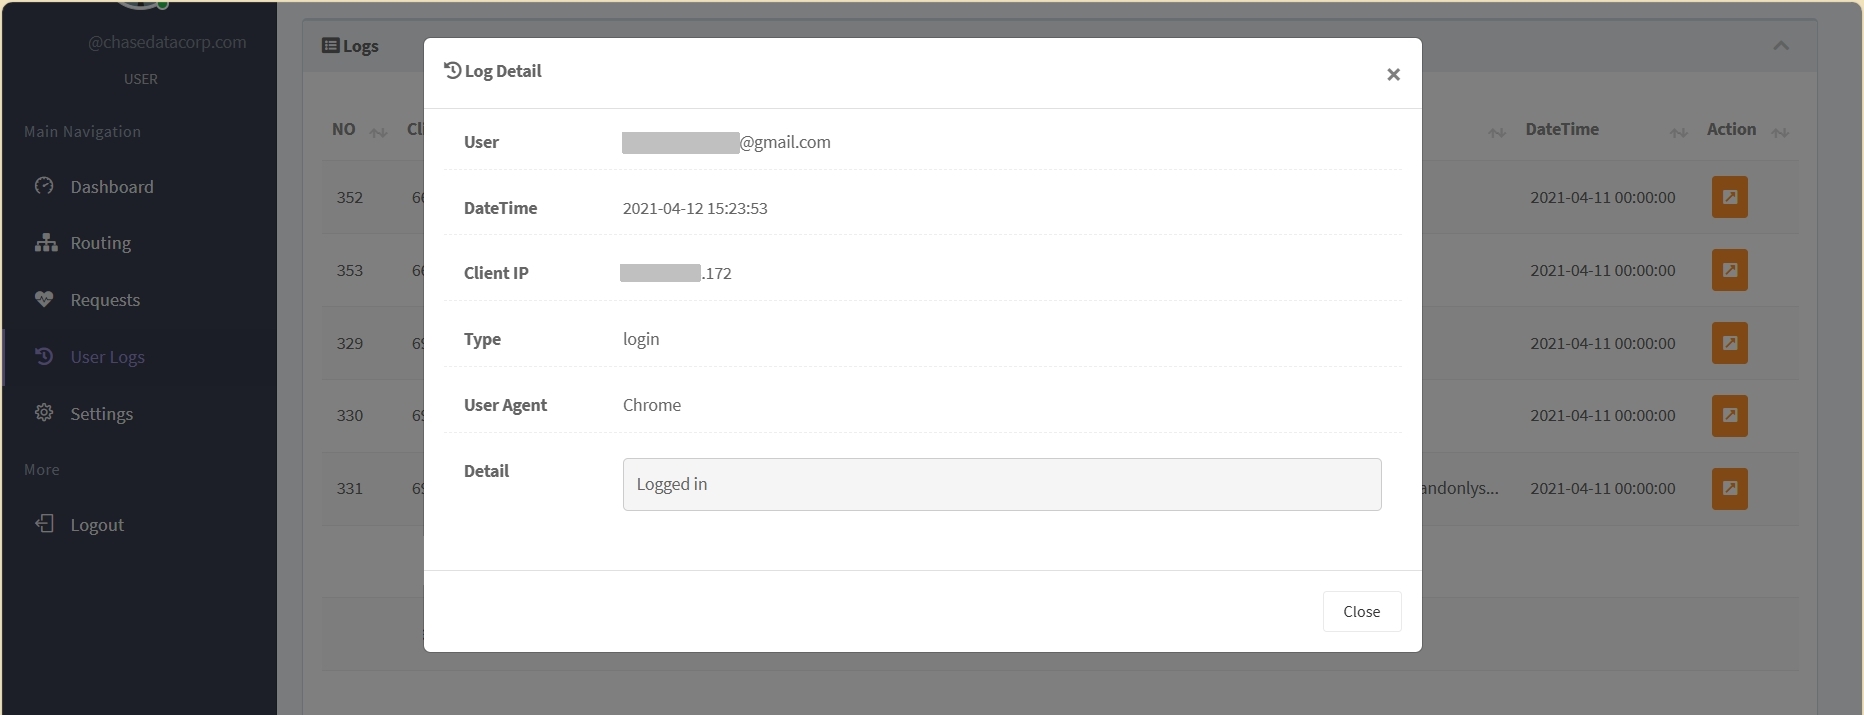
You can click on the details Action icon to open a panel with full details.
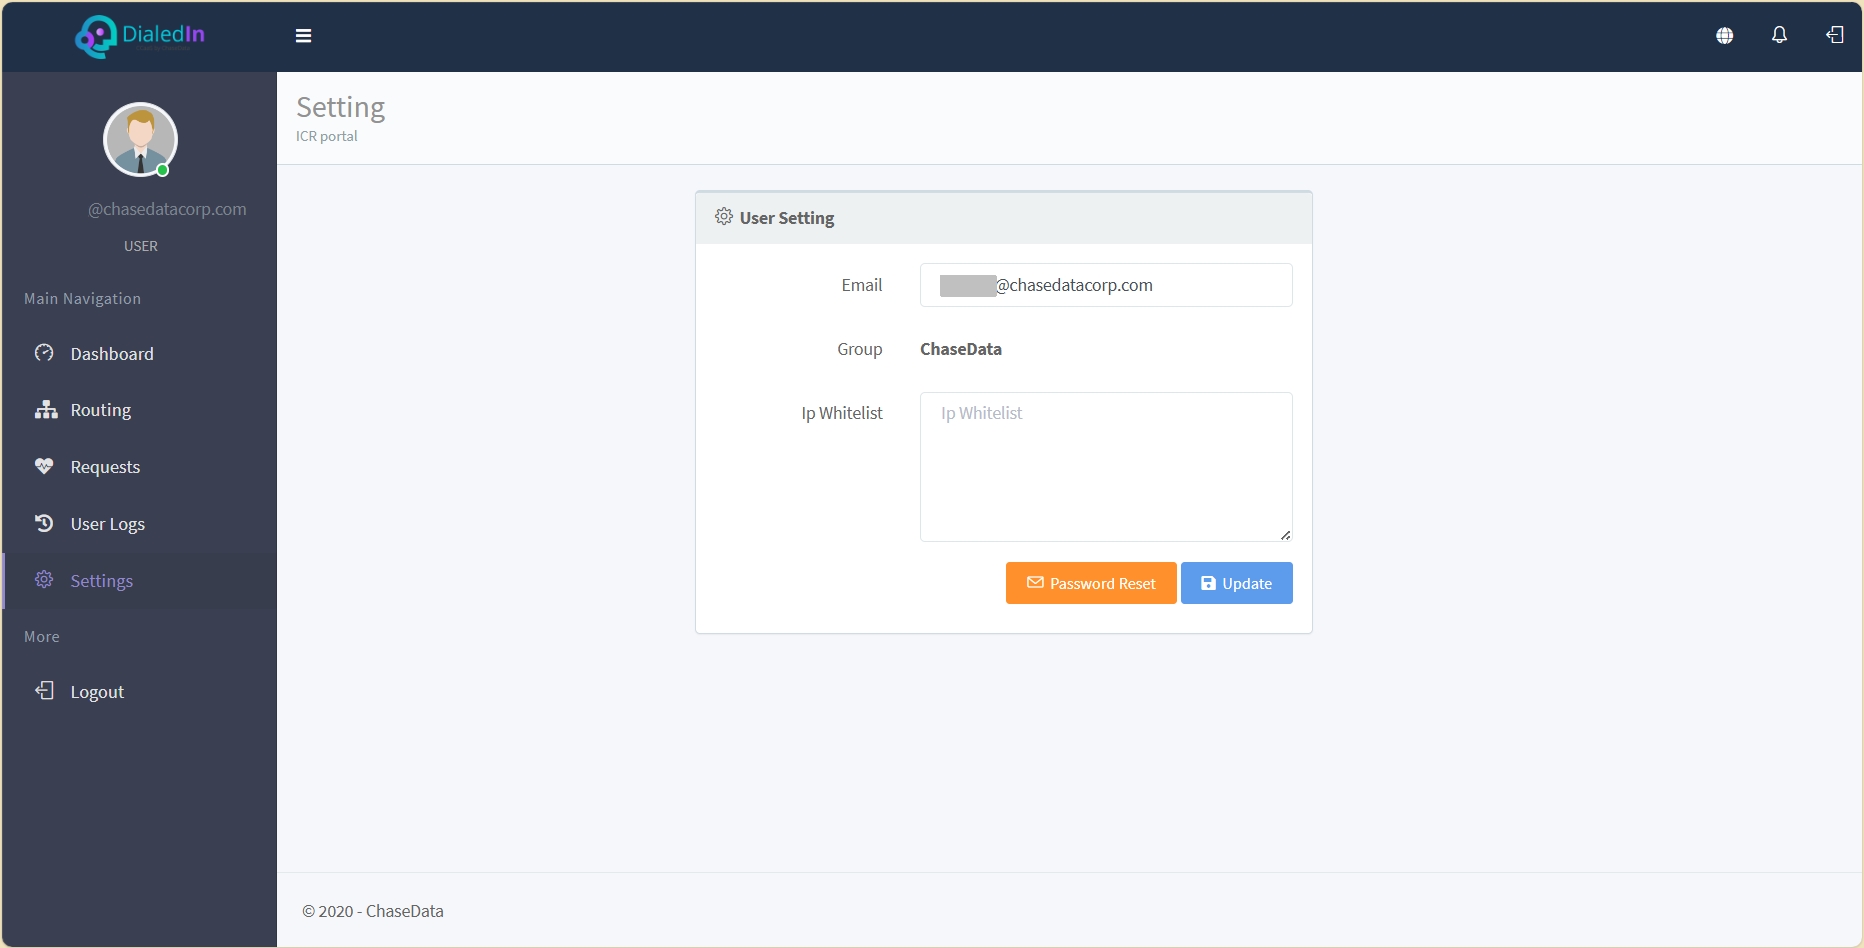
If you select Settingsin the main menu area on the left, you are presented with key parameters of the logged in user.
Email is the user identifier, while Group identifies the company or group where the user belongs. The user can also configure an IP Whitelist that tells the system the IP addresses from where the user is allowed to log in.