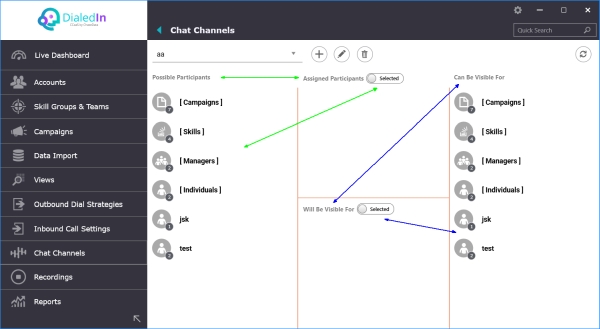
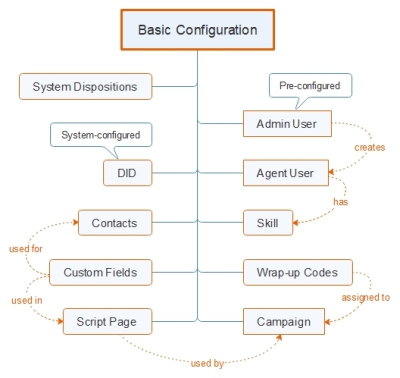
Admin Accounts
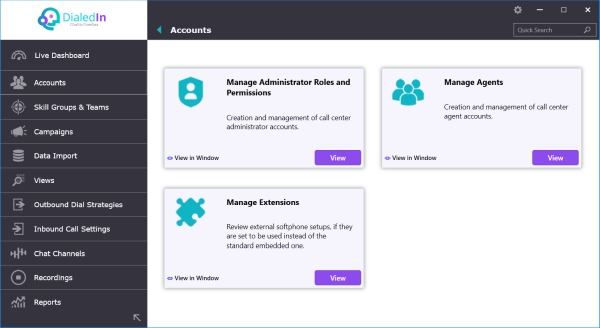
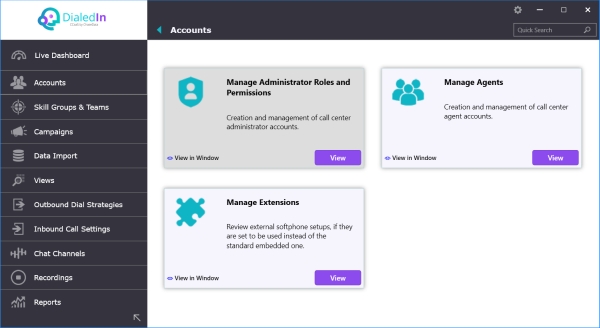
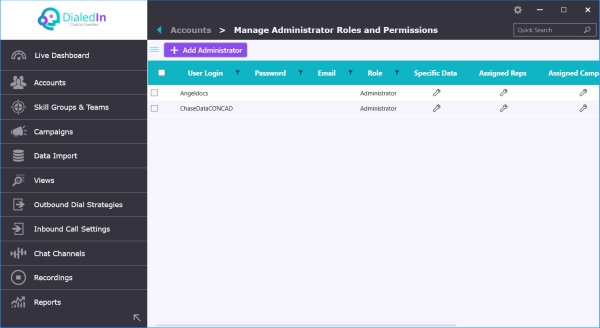
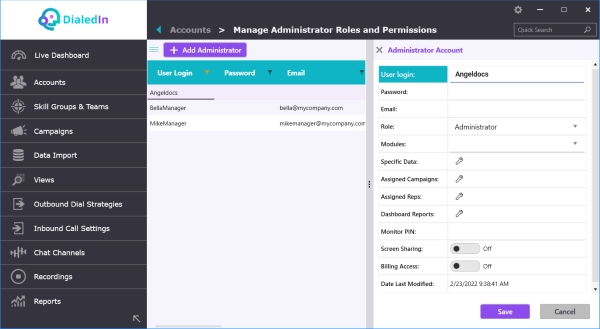
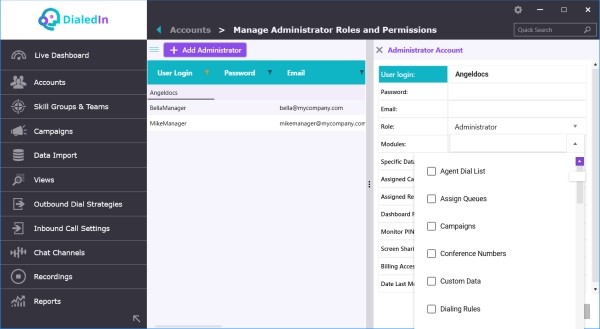
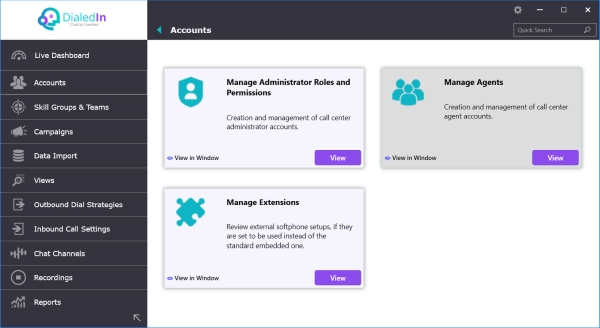
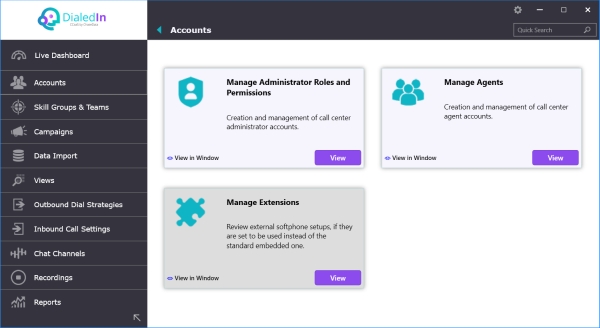
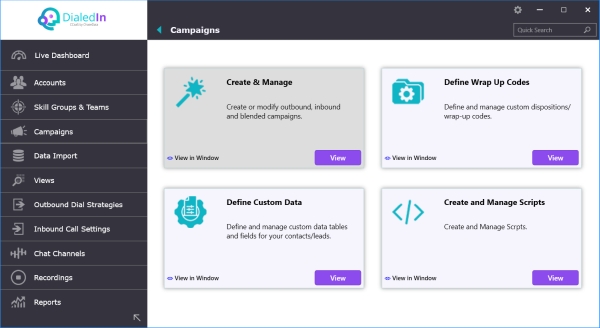
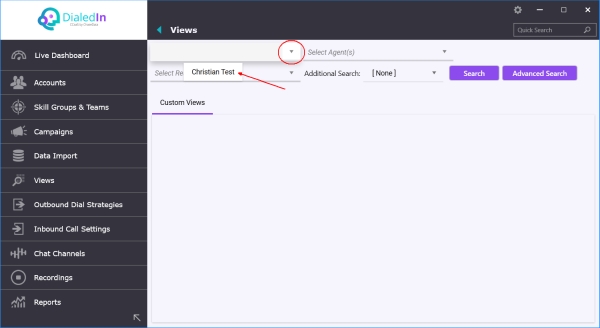
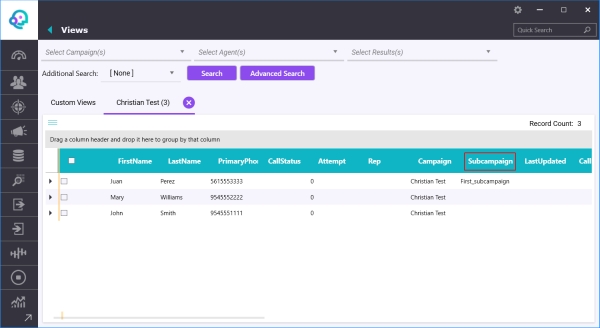
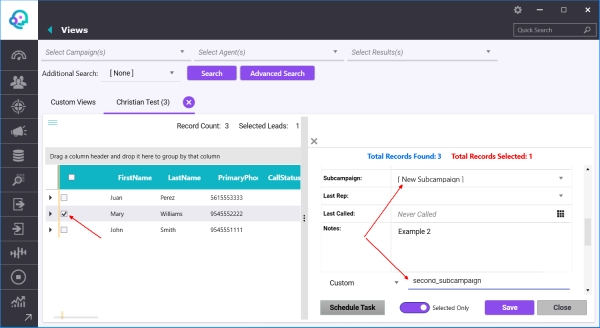
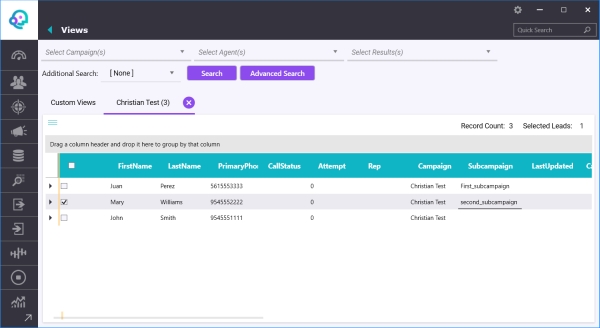
To create or modify an Admin account go to the main menu area on the left and click on Accounts. On the right, click View in the selection box for Manage Administrator Roles and Permissions. After the list of accounts is presented, you may Add Administrator or select an item to open the corresponding details pane where you can review and modify as needed. Refer to the following picture.
Admin Parameters
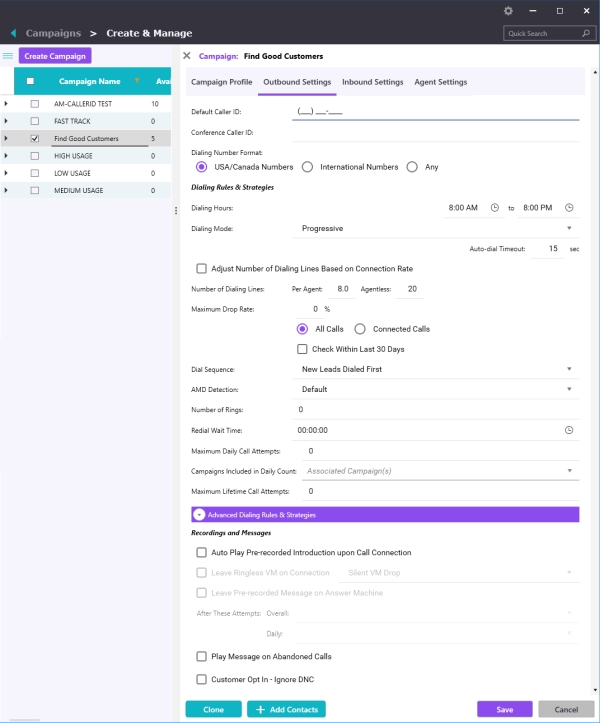
An Admin account has the following configurable characteristics:
| User Login |
Case‐sensitive name or identifier for the account |
| Password |
Case-sensitive login password |
| Email |
User email |
| Role |
Type of Admin account that defines the extent of access and permissions. See descriptions further in this section. |
| Modules |
Allows overriding role-based access permissions by selecting specific ones. |
| Specific Data |
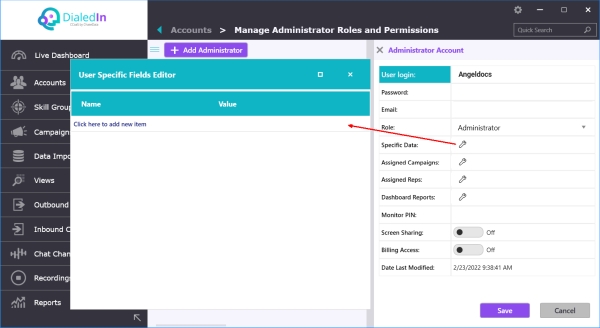
Custom fields (name‐value pairs) that can be referenced in other places, such as screen scripts |
| Assigned Campaigns |
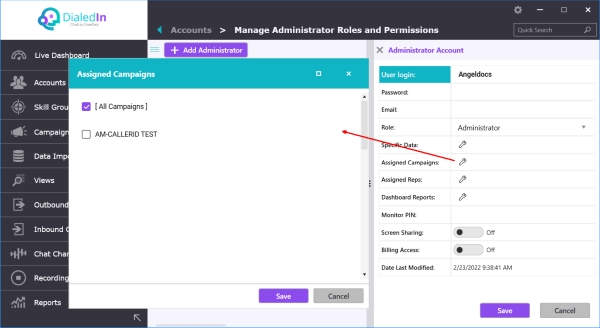
Campaigns to which the user has access to in their reports and on Live Dashboard; if Assigned Reps are assigned, this must be set to All Campaigns |
| Assigned Reps |
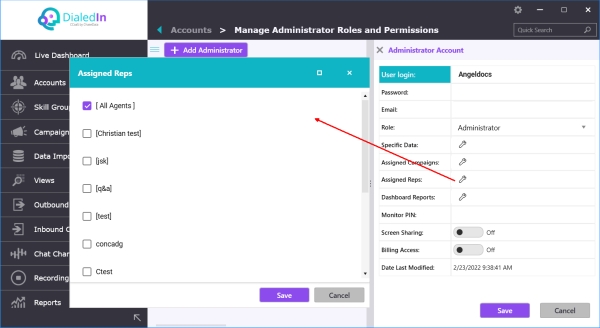
Agents to which the user has access to; if Assigned Campaigns are assigned, this must be set to All Agents |
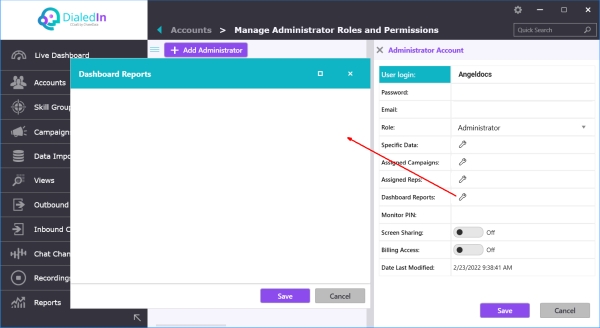
| Dashboard Reports |
Pops up a window listing any Custom Reports available to be docked into the Dashboard (refer to picture below) |
| Monitor PIN |
A PIN that the system requests and uses to authorize an Admin to listen/coach/barge from a landline or mobile phone; this is done by calling the number assigned to the server and entering the PIN when requested. The following monitoring codes are available after being connected:
Listen: 77 + extension
Coach: 88 + extension
Barge: 99 + extension
Stop monitoring: 0
Monitoring via PIN requires that the agent extension is properly configured and marked as Fixed (see Extensions)
|
| Screen Sharing |
Allow the Admin user to view Agents screens (this is usually done by right-clicking on an Agent name from Live Dashboard) |
| Billing Access |
Allow the Admin user to access DialedIn billing information |
| Date Last Modified |
Creation/modification date (automatically generated and not modifiable) |
Admin Roles
Following is a list of the different Admin account Roles available, together with what each can access:
| Administrator |
Access to everything; can export and delete campaigns and leads; can create other Admin accounts |
| Manager |
Live Dashboard; Accounts (Agents); Campaigns; Data Import (Leads, DNC); Outbound; Search; Inbound; Recordings; Reports; Scripts; Skills; Settings; Tools (all); Appointment Manager; Support |
| Junior Manager |
Live Dashboard; Accounts (Agents); Data Import (DNC); Outbound; Search; Recordings; Reports; Tools (Duplicate Check, DNC, Instant Message, Cell Scrubber); Appointment Manager; Support |
| Supervisor |
Live Dashboard; Data Import (DNC); Recordings; Reports; Tools (DNC, Instant Message, Cell Scrubber); Support |
| Junior Supervisor |
Live Dashboard; Reports; Tools (Instant Message); Support |
| Monitor |
Live Dashboard; Recordings; Tools (Instant Message); Support |
| Monitor-Agents |
Live Dashboard; Tools (Instant Message); Support |
| Salesman |
Live Dashboard; Tools (Instant Message); Appointment Manager; Support |
| Script Editor |
Limited to accessing Scripts, e.g. to create and edit them |
| Trainee |
Live Dashboard; Recordings; Tools (Instant Message); Support |
Apart from admin role, the admin user's access permission can be customized by selecting items in the Modules pull-down menu, which overrides default role permissions. To keep default permissions for the assigned role, none of these items should be selected. Refer to the following picture.
The list of customized permissions available in the Modules pull-down menu include the following:
| Agent Dial List |
| Assign Queues |
| Campaigns |
| Conference Numbers |
| Custom Data |
| Dialing Rules |
| DNC (Do Not Call) |
| Duplicate Check |
| Firewall |
| Greetings, Announcements, Call Routing |
| Import DNC |
| Import Leads |
| Integration |
| IVR Call Flows & Call Queues |
| List Priority |
| Live Dashboard |
| Manage Agents |
| Manage Users |
| My CallerID |
| Network Test |
| No Call States |
| Playlist |
| Recordings |
| Recycle |
| Reports |
| Route by Call Source |
| Scripts |
| Skill Groups & Teams |
| Skill Priority |
| System Info |
| Views |
| Voice Settings |
| VoIP Test |
| What's New |
| Wrap Up Codes |
The following pictures show the other items that can be configured, per previous explanations.
Agent Accounts
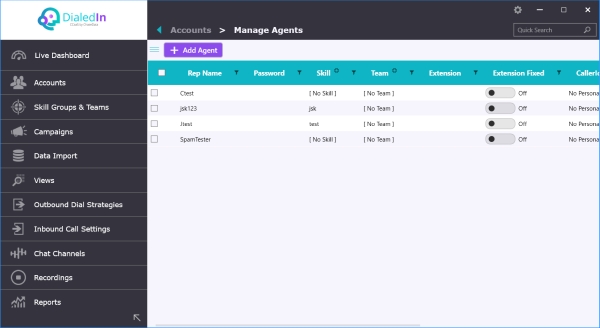
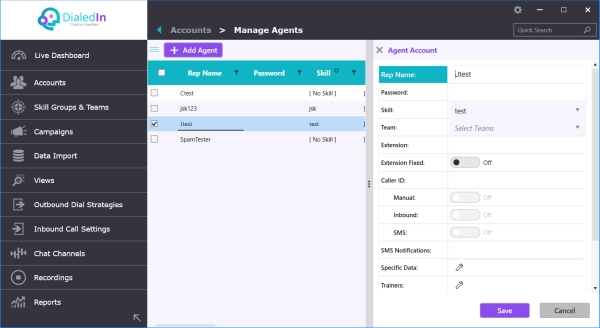
To create or modify an Agent account go to the main menu area on the left and click on Accounts. On the right, click View in the selection box for Manage Agents. After the list of accounts is presented, you may Add Agent or select an item to open the corresponding details pane where you can review and modify as needed. Refer to the following picture.
Agent Parameters
An Agent account has the following characteristics:
| Rep Name |
Case‐sensitive name or identifier for the account |
| Password |
Case‐sensitive login password |
| Skill |
Drop‐down menu selection of pre-defined and custom Skills as described in the Skills section; a Skill indicates access and action permissions |
| Team |
Optional Team assignment |
| Extension |
Optional 4‐digit unique call-center extension number |
| Extension Fixed |
Check field to activate the Extension above |
| CallerId |
Optional custom caller ID for this Agent; when editing this field, checkboxes are presented to enable each of the personal caller ID for Manual calls, Inbound calls, and SMS; when the corresponding checkbox is enabled, incoming calls and SMS for this number will be assigned to the Agent |
| SMS Notifications |
Optional telephone number where the Agent can receive SMS notifications; this is to support features such as VM Transcriptions |
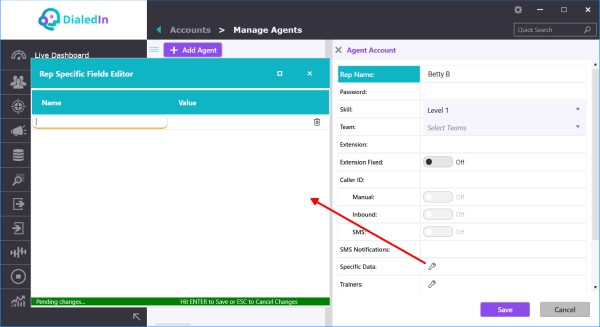
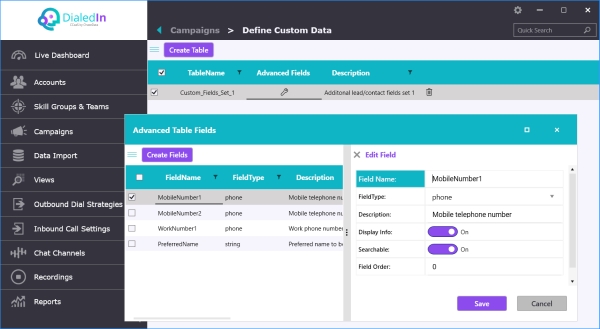
| Specific Data |
Custom fields (name-value pairs) that can be referenced in other places, such as screen scripts |
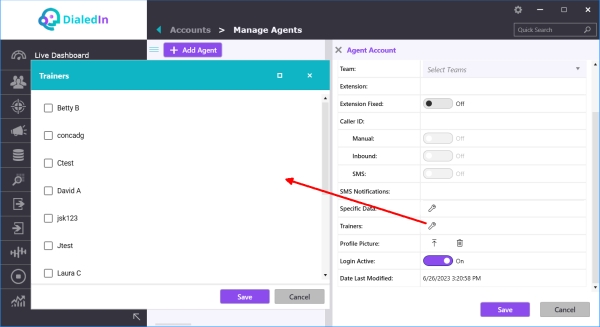
| Trainers |
Trainers for the agent; when clicking, a list of other Agents is displayed and for those selected, the Agent being configured will be allowed to listen to and to view the trainer Agent’s screen |
| Profile Pic |
Optional picture icon; after clicking on field, buttons are presented to either Load a graphic file, or to Remove the picture icon |
| Login Active |
Check‐box to set the Agents active; can also uncheck to deactivate an Agent without deleting it (and its history/statistics) |
| Date |
Creation/modification date (automatically generated and not modifiable) |
Teams
A Team allows you to group agents by Skill Group, so you can filter certain activities such as managing agents or their dial lists.
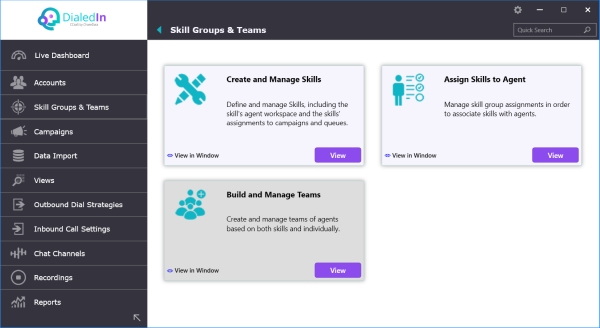
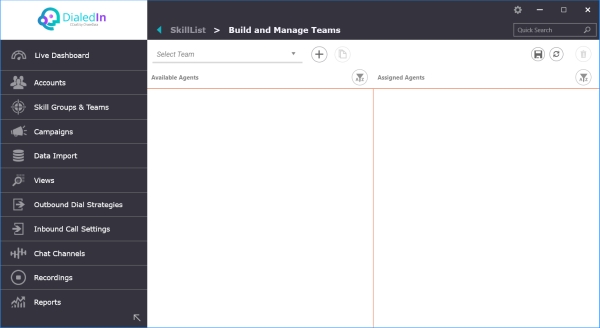
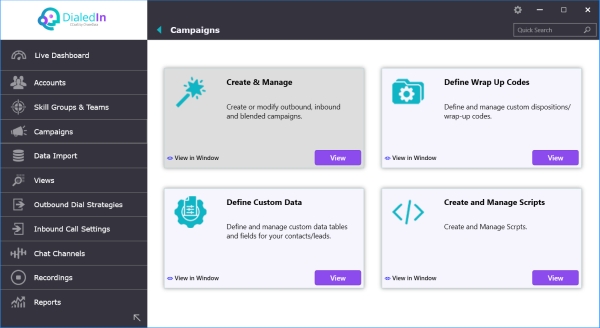
To create or modify Teams go to the main menu area on the left and click on Skill Groups & Teams. On the right, click View in the selection box for Build and Manage Teams.
Select an existing Team or create a new one. This will present you a list of Skill Groups, which can be expanded to see Agents assigned that Skill Group. You can then drag and drop Skill Groups from the Available side to the Assigned side, and vice versa. Refer to the following pictures.
Agent Skills
It is very important to define Agent Skills and Skill Groups and carefully consider each of the options, as they are a key tool for the system to determine how to assign, route, and distribute calls, as well as to decide what to display or make available to Agents.
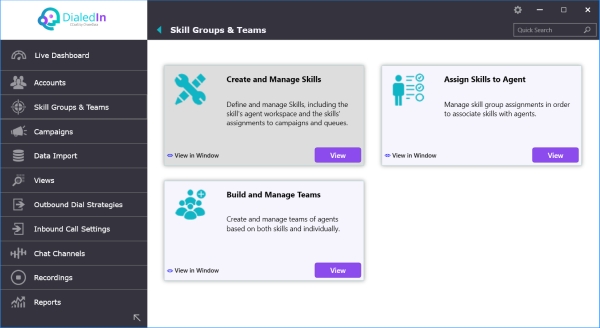
To create or modify Skills / Skill Groups go to the main menu area on the left and click on Skill Groups & Teams. On the right, click View in the selection box for Create and Manage Skills.
In addition, further below you can make Skill Groups active on a Campaign by selecting the Campaign from the Available list and move it to the Active list. That interface allows you to just scroll through the full list of available Campaigns, filter the list, or even search for a specific Campaign by typing a search string in the search field.
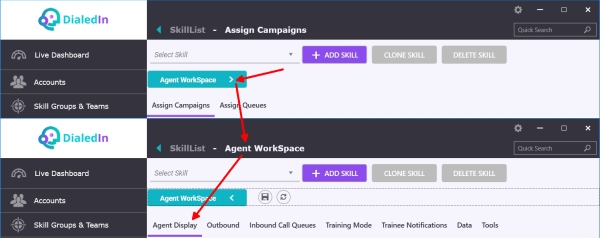
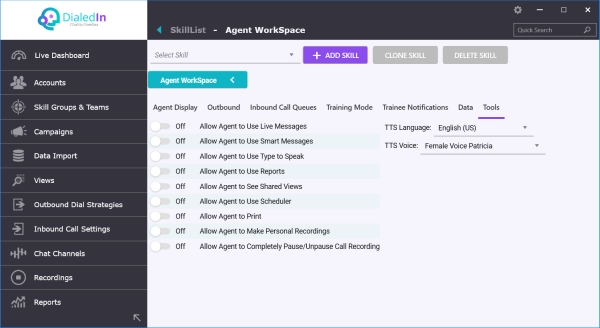
Let's start by switching to the Agent Workspace to assign roles and permissions to agents with a particular Skill. There’s an extensive set of capabilities that can be turned on and off for Agents via their assigned Skills. They’re grouped as follows: Agent Display, Outbound, Inbound Call Queues, Training Mode, Trainee Notifications, Data, and Tools. Let’s look at them one by one.
Refer to the following pictures.
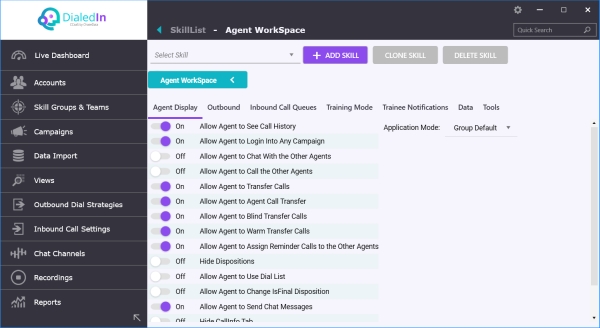
The first group is Agent Display; let's look at that.
Skill Display Options
Here's a description of each Agent Display option:
| Application Mode |
Pull‐down menu to select the look and feature extent of the Agent Client GUI, either the more inclusive Call Center GUI, or the (superseded) Telemarketing GUI; or you can just select Group Default so everyone in the organization uses the same mode.
Note: some options in the following lists are only available if the Application Mode is Call Center. |
| Dial Pad Location |
Checkbox to allow the agent to disposition a call directly on the Dial Pad, without having to use the disposition menu |
| Allow Agent to Disposition Using Dial Pad |
Drop‐down menu selection of pre-defined and custom Skills as described in the Skills section; a Skill indicates access and action permissions |
| Allow Agent to Make Call Using Floating Dial Pad |
Checkbox to bring up the floating dial pad for the agent to make calls |
| Allow Agent to See Call History |
Checkbox to enable displaying the lead/contact call history (pull-down menu) on Agent screen when receiving or making a call |
| Allow Agent to Login Into Any Campaign |
Checkbox to allow the agent to work with any campaigns, even if the Skill associated with a Campaign is a different one |
| Allow Agent to Chat With the Other Agents |
Checkbox to allow the agent to chat with other agents, and not just Supervisors |
| Allow Agent to Call the Other Agents |
Checkbox to allow the Agent to internally make calls to other agents |
| Allow Agent to Transfer Calls |
Checkbox to allow the Agent to transfer a call to another logged in agent, who gets a proper notification with the option to accept or reject the call |
| Allow Agent to Assign Reminder Calls to the Other Agents |
Checkbox to allow the Agent to set an agent-specific Callback and assign it to another agent |
| Hide Dispositions |
Checkbox to disable the ability for the Agent to set the disposition of a call (by hiding the mechanism to perform the action); this is typically done when a call disposition is to be performed via a Script, or through a third-party system (into the ChaseData system) |
| Allow Agent to Use Dial List |
Checkbox to allow the Agent to use a Dial List to perform calls; Dial Lists can be defined by a Manager or Administrator on the Management Console (see Agent Dial List under Outbound Call Management), or received through an API |
| Allow Agent to Change IsFinal Disposition |
Checkbox to reset the disposition of a Contact from one that has the attribute Final (which normally prevents further action) to another one; the Agent must be the one that had previously set the Final disposition |
| Allow Agent to Send Chat Messages |
Checkbox to enable the chat module for this Agent |
| Hide CallInfo Tab |
Checkbox to disable displaying the system-default Call Info tab |
| Allow Agent to Use Tools |
Check box to enable the agent access to the Tools menu. |
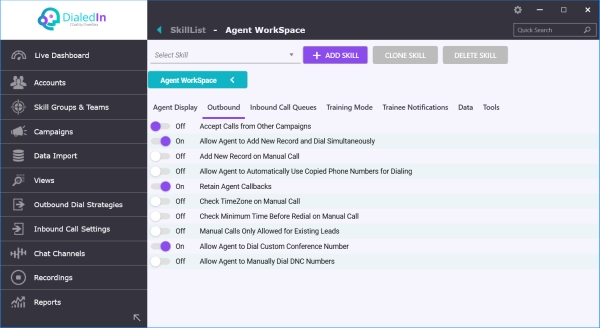
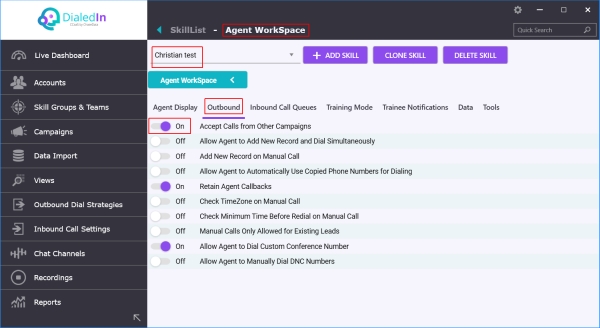
Now let’s go to the next tab to access the Outbound capabilities; refer to the following picture.
Skill Outbound Options
Here's a description of each Outbound option:
| Accept Calls from Other Campaigns |
Checkbox to enable the agent to accept calls from another campaign that has no agents available; instead of just dropping calls, that campaign looks for agents with this setting enabled.
It’s important to be aware that when an agent handles a call from another campaign, the agent will temporarily be working within the context of that other campaign (Contact record, Custom Fields, Wrap-Up Codes, etc.) |
| Allow Agent to Add New Record and Dial Simultaneously |
Checkbox to enable the agent the option to add a lead/contact record at the time that a number is being dialed manually, so to be able to save the call information (e.g. status, form-captured data) |
| Add New Record on Manual Call |
Similar to the previous one, except that instead of being an option, a new record is always added on a manual call |
| Allow Agent to Automatically Use Copied Phone Numbers for Dialing |
Checkbox to enable the agent to be able to paste a copied phone number (e.g. from a file or website), instead of having to dial it digit by digit on the pad |
| Retain Agent Callbacks |
Checkbox to set the system to retain the Callback status of a record when the Agent receives a call from, or makes a manual call to the corresponding number (otherwise those actions would have removed the Callback status of the record) |
| Check TimeZone on Manual Call |
Checkbox to set the system, on a manual call attempt by the Agent, to check the customer time zone and the Campaign, to make sure the call is within calling hours |
| Check Minimum Time Before Redial on Manual Call |
Checkbox to set the system, on a manual call attempt by the Agent, to check the corresponding record to make sure that the minimum time to redial that number has been met before allowing the call |
| Manual Calls Only Allowed for Existing Leads |
Checkbox to set the system, on a manual call attempt by the Agent, to check system-wide that a record already exists for that lead before allowing the call |
| Allow Agent to Dial Custom Conference Number |
Checkbox to allow the agent to use a number other than the default conference number |
| Allow Agent to Manually Dial DNC Numbers |
Checkbox to give discretion to the agent on whether to call a DNC number; you should follow all appropriate regulations, nevertheless. |
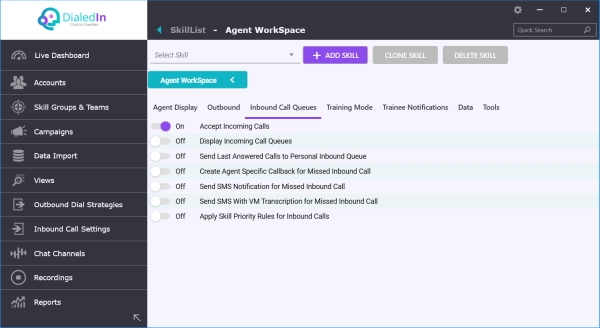
Next let’s go to the next tab to access the Inbound Call Queues capabilities; refer to the following picture.
Skill Inbound Options
Here's a description of each Inbound Call Queues option:
| Accept Incoming Calls |
Checkbox to enable the agent to handle Inbound calls; this is a Master setting -even if the Agent is associated with an inbound campaign, the agent must be enabled through this setting to be able to accept calls |
| Display Incoming Call Queues |
Checkbox to set the system to display the current inbound call queue (calls ringing) in a special area of the Agent screen (refer to Agent Client); the inbound calls are displayed until an Agent answers it |
| Send Last Answered Calls to Personal Inbound Queue |
Checkbox to set the system to assign an inbound call to the Agent’s personal queue if the Agent was the last one to answer a previous call from the same contact (record), then wait for this Agent to answer; note that there is a similar Campaign setting (last active agent), except that in that case the call is not moved to the personal queue (it will go to the next agent, if this agent is not available and doesn’t have this checkbox enabled) |
| Create Agent Specific Callback for Missed Inbound Call |
Checkbox to set the system to include this Agent as one that can be assigned Callbacks for abandoned calls; when this occurs, the system is to notify the assigned Agent of the new Callback so the Agent can initiate it (refer to Agent Client) |
| Send SMS Notification for Missed Inbound Call |
Checkbox to set the system to send an SMS notification to the Agent in the case of a missed inbound call, which includes both Hang Up and Voicemail cases; the Agent must have a valid telephone number configured for SMS Notifications (refer to Agent Accounts) |
| Send SMS With VM Transcription for Missed Inbound Call |
Checkbox to set the system to send an SMS notification to the Agent in the case of a missed inbound call generating a voicemail message; the notification includes the VM Transcription; the Agent must have a valid telephone number configured for SMS Notifications (refer to Agent Accounts); this applies only if Allow Customer to Access VM Transcription has been enabled by ChaseData. |
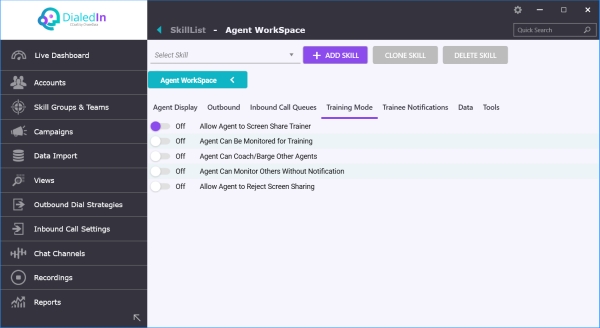
Next let’s go to the next tab to access the Training Mode capabilities; refer to the following picture.
Training Mode Options
Here's a description of each Training Mode option:
| Allow Agent to Screen Share Trainer |
Checkbox to enable the Agent to be able to view the shared screen of another agent that is set as trainer (and is allowing his/her screen to be shared) |
| Agent Can be Monitored for Training |
Checkbox to enable the (trainer) Agent‘s audio for monitoring; while a trainee Agent could view the trainer screen, the trainee Agent would not be able to hear the audio of the trainer unless this setting is enabled for that trainer Agent |
| Agent Can Coach/Barge Other Agents |
Checkbox to enable the Agent to be able not just to audio monitor another Agent, but also to participate with audio |
| Agent Can Monitor Others Without Notification |
Checkbox to enable the Agent to be able to monitor another agent without the need to notify and receive consent of the Agent to be monitored |
| Allow Agent to Reject Screen Sharing |
Checkbox to allow a trainer Agent to deny/block an attempt to get his/her screen shared. |
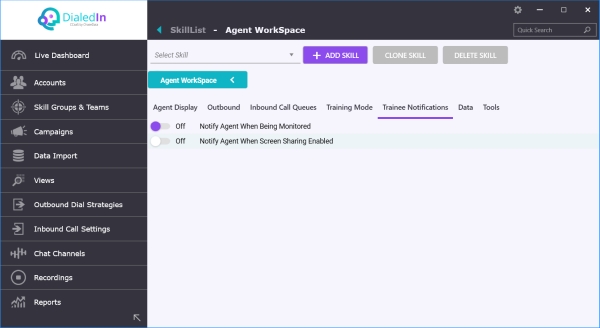
Next let’s go to the next tab to access the Trainee Notifications capabilities; refer to the following picture.
Trainee Notification Options
Here's a description of each Trainee Notifications option:
| Notify Agent When Being Monitored |
Checkbox to set the system to notify an Agent (trainer) that is going to be (audio) monitored |
| Notify Agent When Screen Sharing Enabled |
Checkbox to set the system to notify an Agent (trainer) that his/her screen is going to be shared. |
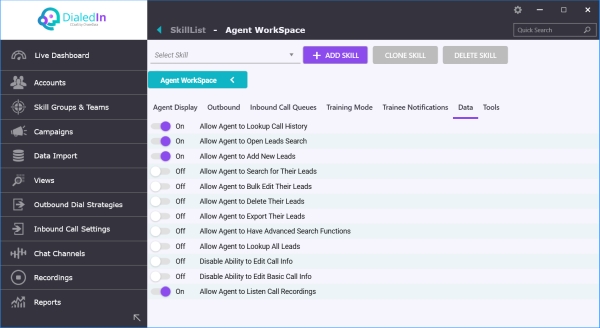
Next let’s go to the next tab to access the Data capabilities; refer to the following picture.
Skill Data Options
Here's a description of each Data option:
| Allow Agent to Lookup Call History |
Checkbox to allow the Agent to expand a searched & found record and therefore see the lead’s call history |
| Allow Agent to Open Leads Search |
Checkbox to enable the search tool for the Agent, so to be able to perform lead/contact searches |
| Allow Agent to Add New Leads |
Checkbox to enable the Agent to be able to create a new lead/contact without having to call the lead; otherwise when an Agent creates a new lead, it must immediately call the lead |
| Allow Agent to Search for Their Leads |
Checkbox to enable the Agent to be able to search for the lead/contact records most recently called/handled |
| Allow Agent to Bulk Edit Their Leads |
Checkbox to enable the Agent to be able to group-edit searched & found leads/contacts |
| Allow Agent to Delete Their Leads |
Checkbox to enable the Agent to be able to delete leads/contacts assigned to the Agent |
| Allow Agent to Export Their Leads |
Checkbox to enable the Agent to be able to export leads/contacts searched; export is to a local file (where the Agent App runs) |
| Allow Agent to Have Advanced Search Functions |
Checkbox to enable the Agent with the ability to use advanced search functions (beyond the normal basic search) |
| Allow Agent to Lookup All Leads |
Checkbox to enable the Agent to be able to perform system-wide lead/contact searches; otherwise, the search is restricted to leads assigned to the Agent |
| Disable Ability to Edit Call Info |
Checkbox to disable the Agent’s ability to update any of the call info displayed, whether built-in fields or custom fields; all fields will be read-only in this case |
| Disable Ability to Edit Basic Call Info |
Checkbox to disable the Agent’s ability to update the basic (built-in) call info displayed; built-in fields will be read-only, while custom fields will be read-write |
| Allow Agent to Listen Call Recordings |
Checkbox to enable the Agent to be able to access and listen to call recordings. |
Next let’s go to the next tab to access the Tools capabilities; refer to the following picture.
Skill Tool Options
Here's a description of each Tools option:
| TTS Language |
Pull‐down menu to set the language to be used for interpreting text and translating it to speech |
| TTS Voice |
Pull‐down menu to set the type of voice to be generated by TTS engine; depending on language, options may include different male and female voices with their own intonation characteristics |
| Allow Agent to Use Live Messages |
Checkbox to allow the Agent to use (on-the-fly selection and playback of) Live Messages (pre-recorded) |
| Allow Agent to Use Smart Messages |
Checkbox to allow the Agent to use Smart Messages (pre-recorded) to leave on answering machines |
| Allow Agent to Use Type to Speak |
Enable the Agent to use TTS making use of the TTS Language and TTS Voice configured in these settings; the Agent is therefore able to type a word or sentence for the TTS engine to convert it to speech |
| Allow Agent to Use Reports |
Checkbox to enable the Reports tool on the Agent screen |
| Allow Agent to See Shared Views |
Checkbox to allow the Agent to be able see a view shared by a Manager or Administrator during a search for Contacts |
| Allow Agent to Use Scheduler |
Checkbox to enable the Scheduler tool on the Agent screen |
| Allow Agent to Print |
Checkbox to enable the Print option in the Agent GUI |
| Allow Agent to Make Personal Recordings |
Checkbox to enable the Agent to record personal snippets of a call (enables the option in the GUI), in addition to the master recording always taking place |
| Allow Agent to Completely Pause/Unpause Call Recording |
Checkbox to enable the Agent to Pause and Resume the master recording of a call. |
Bucket Dialing Mode
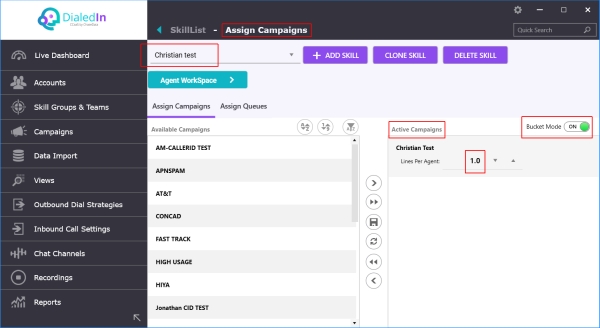
The DialedIn solution to provides the option to allow certain agents to be assigned outbound calls (dial out) from multiple Campaigns. This can be done by enabling the Bucket Mode option for a Skill Group.
If the Bucket Dialing option is not set, the agent will typically be assigned calls only from the Campaigns selected at log in time (or any campaign switched to thereon), i.e., from one single Campaigns.
Following are the conditions for and the effects of the Bucket Dialing option:
- Bucket Dialing is an option for a Skill Group and therefore affects any Agent with the corresponding Skill.
- For Bucket Dialing to take effect, each and all of these conditions must be met:
- Bucket Mode for the Skill must be set to ON.
- Active List of Campaigns for the Skill must not be empty.
- Campaigns in the Active List should have a value for Lines Per Agent greater than zero (0); at least one of them must.
- The Accept Calls from Other Campaigns option for the Skill must be selected.
- If all conditions are not met, Bucket Dialing does not affect dial out call assignment for Agents with the corresponding Skill.
- If all conditions are met, Agents with the corresponding Skill will get calls from Campaigns in the Active List.
- Bucket Dialing works along other dialing rules, such as Playlist Builder, Skill Priority, Dial Priority, and other rules applicable to multi-campaign dialing.
It should be noted that the benefits of Bucket Dialing go beyond the feature by itself. As we stated above, Bucket Dialing works along other features that may be configured individually for each Campaign or group of Sub-Campaigns thus offering a wealth of possibilities.
To give perspective to this flexibility, think about a Bucket Dialing setup that includes multiple Campaigns, where each one has its own Playlists and/or Dial Priorities. Or, even more interesting, when Skill Priority is involved, in which case some of the Campaign’s Sub-Campaigns will be affected by the priority corresponding to the Skill alongside the Bucket Dialing rules.
Keep in mind that flexibility usually adds complexity to a setup process, which in turn requires additional planning. Therefore, it is important to think over and plan the strategy carefully, so the end result of any rule combination is clearly understood and matches the intended result.
Setting up Bucket Dialing is done through Skill Group configuration, as shown in the following pictures.
My Extensions
The purpose here is to document information related to external soft phones that may be used instead of the embedded one (do note that this is being phased out, and current setups only use the embedded soft phone). The information here is read-only; if applicable, a DialedIn technician will populate in the system the relevant information that would be displayed here.
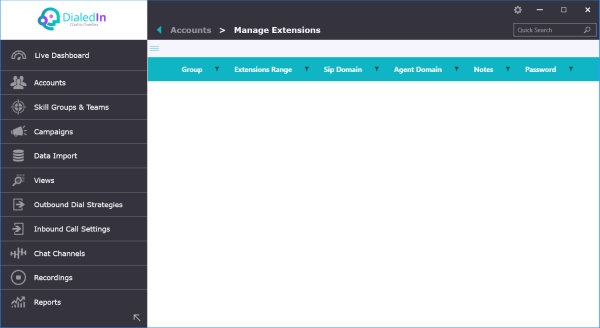
To create or modify Extensions go to the main menu area on the left and click on Accounts. On the right, click View in the selection box for Manage Extensions.
Dial Priority
Dial Priority is a mechanism to prioritize calls within a Campaign. It is based on Sub-campaigns; specifically, the active status of the sub-campaigns, the ordering of the active sub-campaigns, and the weight (percentage) of each active sub-campaign. Keep in mind that if a campaign doesn’t have sub-campaigns, or it has sub-campaigns, but none marked active, the system dials in random order from the full set.
Keep in mind that if Dial Priority is defined for a Campaign, all and every call for that Campaign, for every agent handling calls for that Campaign, will be bound by the Dial Priority. If you don’t want these rules to apply anymore, you must remove the corresponding Dial Priority.
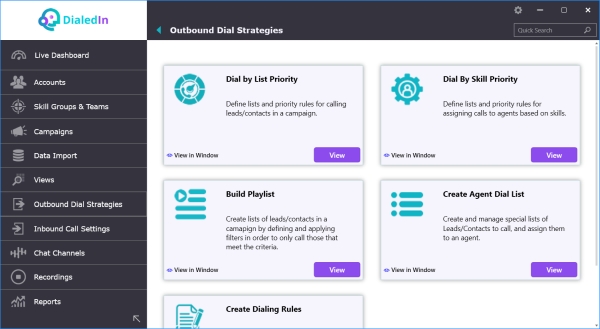
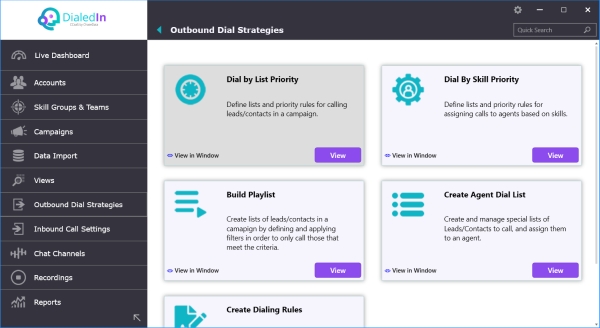
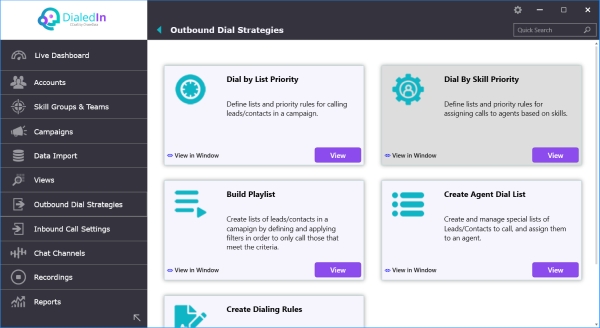
To configure dial priorities go to the main menu area on the left and click on Outbound Dial Strategies. On the right, click View in the selection box for Dial by List Priority.
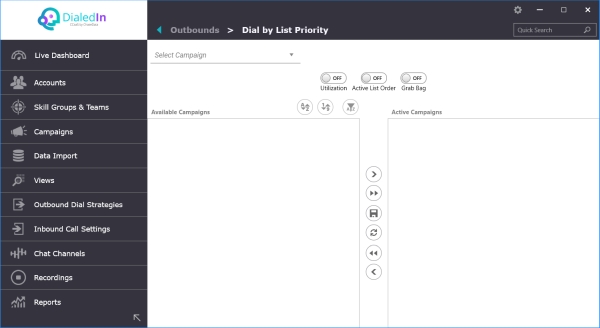
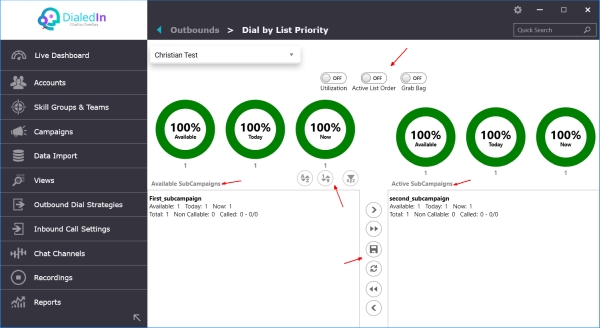
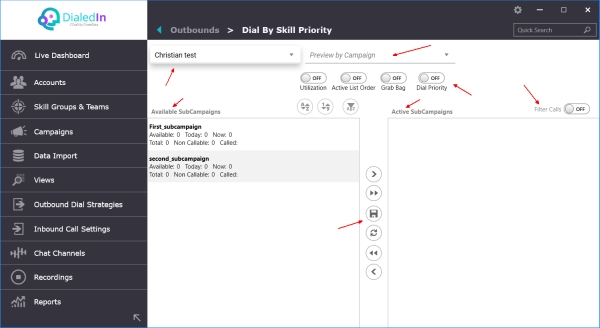
After selecting a campaign, its sub-campaigns appear split into two areas; the right area shows the Sub-campaigns that are selected to be active for this rule, while the left area shows those that have not, but still available for selection. You can click-and-drag sub-campaigns from one side to the other, or click-select (single or multiple) sub-campaigns and use the action item icons between the two panels; click on the icon to perform the corresponding action (Add, Add All, Save, Refresh, Remove All, Remove).
After saving (click on the Save icon), the system will be set to dial in random order from the active sub-campaigns (or the full set if no sub-campaigns or no active sub-campaigns); this assumes that all the switches in the top part of the window panel are in the OFF position (more about that later). Refer to the following picture.
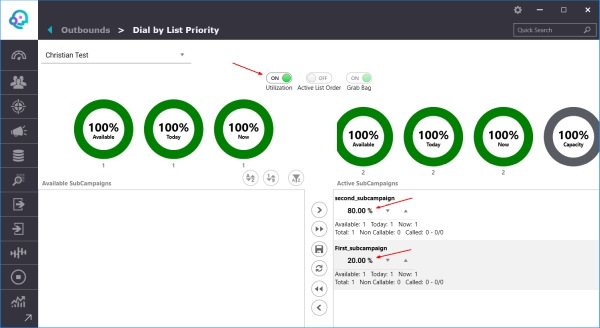
To assign a percentage of records to handle for each active sub-campaign, click on the Utilization switch button in the top area of the window panel. After that switch is set to the ON position, each sub-campaign in the active state is shown with a scroll-menu for you to set the percentage. Refer to the following picture.
When the Utilization switch is ON, each Active Sub-Campaign is presented with a percentage selector, which should add to 100%. Each allowed combination of the switches (Utilization, Active List Order, and Grab Bag) will produce a unique way of selecting and prioritizing records from the selected (Active) sub-campaigns, as explained in the ”Prioritization Mechanisms for Dial Priority and Skill Priority” sub-section.
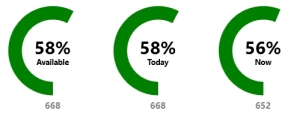
Note that the graph with percentages in the area above of the Available and Active sub-campaigns represent totals for all sub-campaigns, for both the Available side and the Active side. For example, if there were two sub-campaigns in the Available side, say S1 and S2, with S1t the total contacts in S1 and S1a the available contacts in S1, and similarly for S2, the graph for Available represents (S1a+S2a) / (S1t+S2t). The other graphs follow a similar logic.
Keep in mind, as well, that there are Campaign Settings, i.e. Dial Sequence, that affect how the system selects the records for each campaign/sub-campaign (e.g. New Leads Dialed First), within the percentages specified, according to the switch setting rules. Refer to Campaign Settings and to Prioritization Mechanisms for Dial Priority and Skill Priority”.
Skill Priority
Skill Priority allows performing skills-based dialing by defining outbound dialing priorities for a specific Skill; every agent assigned that Skill will get outbound calls according to the corresponding Skill Priority, bypassing the standard Campaign to which the Agent signs into. It works by defining priorities to a selected list of Sub-Campaigns; these Sub-Campaigns can be from any Campaign.
Keep in mind that if Skill Priority is defined for a Skill, all and every call related to that Skill, for every agent that has that Skill, will be bound by the Skill Priority. If you don’t want these rules to apply anymore, you must remove the corresponding Skill Priority.
Before we go any further, you should be aware that your version of the solution may have an enhancement that allows you to (1) use Skill Priority for inbound calls, as well, and/or (2) define Skill Priority for a full Campaign by just using the priority rules configured in a corresponding Dial Priority rule and/or a filter in a Playlist. We present both cases hereafter.
First, the original solution options.
To configure dial priorities go to the main menu area on the left and click on Outbound Dial Strategies. On the right, click View in the selection box for Dial by Skill Priority.
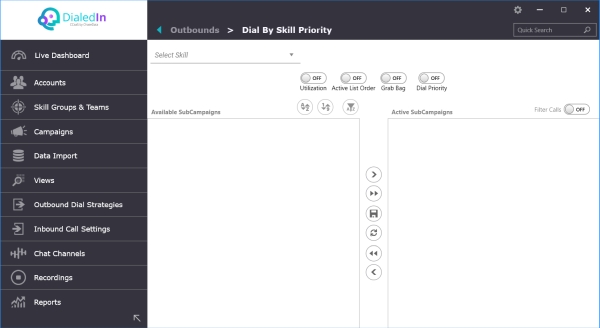
After selecting a skill, sub-campaigns from all campaigns appear split into two areas; the right area shows the Sub-campaigns that are selected to be active for this rule, while the left area shows those that have not, but still available for selection. You can click-and-drag sub-campaigns from one side to the other, or click-select (single or multiple) sub-campaigns and use the action item icons between the two panels; click on the icon to perform the corresponding action (Add, Add All, Save, Refresh, Remove All, Remove).
In essence, Skill Priority is allowing you to combine dialing records that belong to different Campaigns, but through their Sub-Campaigns (those in the Active list); all within a common “dialing cache” and prioritization rule. The Campaign rules applied to each call are those where the original record belongs (the Campaign under which the related Sub-Campaign belongs), irrespective to which Campaign the Agent is logged into.
Now, the enhanced solution options. In the enhanced solution, Skill Priority is expanded to include both outbound and inbound calls.
Let us first start with the end result of defining a Skill Priority rule, including the enhancements:
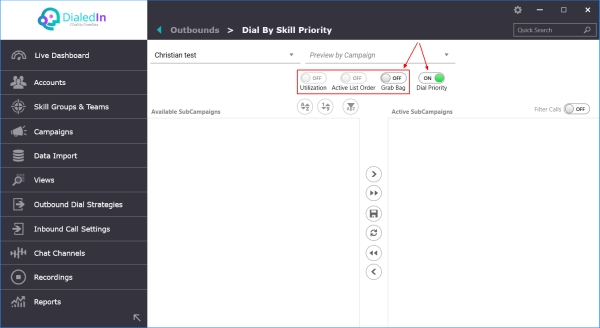
- Agents with a Skill that is associated with a Skill Priority rule are only assigned calls
- for Sub-campaigns set as Active for the Skill Priority rule, and
- However, if the Dial Priority switch is enabled, the lists and filters used are the ones
- defined in the Dial Priority rule for the corresponding Campaign (any lists and filters here would be overridden)
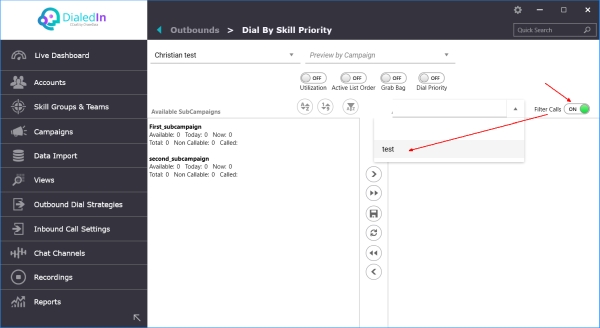
- If Filter Calls is enabled and a Playlist is selected, only calls that meet the playlist criteria are considered, whether there are Active sub-campaigns or not, and
- Calls for those Sub-campaigns and/or Filters are only assigned to Agents with the Skill associated with that Skill Priority rule.
Applying Skill Priority to inbound calls is an optional and additional step to outbound Skill Priority for the associated Skill. This is enabled on the Skill itself, by turning on an option to apply those Skill Priority rules to inbound calls, as well; in essence, the associated Skill Priority rules defined for outbound calls are also applied to inbound calls if the Skill is enabled.
In summary, the enhanced version of Skill Priority covers the following:
- A Skill can have an associated Skill Priority.
- A Skill Priority can be assigned a list of Sub-campaigns (i.e., Sub-campaigns are made active for that rule) with associated ordering and prioritization rules (in the case of outbound calls) for Contacts in those Sub-campaigns.
- Unless the Dial Priority switch is enabled, in which case the ordering and prioritization rules are those defined for the corresponding Dial Priority rule.
- The list of Sub-campaigns can be from any Campaign (i.e., not limited to a single Campaign).
- Unless the Dial Priority switch is enabled, in which case the list used is on a campaign basis, per the corresponding Dial Priority rule.
- The Skill Priority rule can also use a Playlist to filter the calls (Playlist is defined under Playlist Builder), whether there are active Sub-campaigns or not.
- Agents with the corresponding Skill are assigned calls according to the associated ordering and prioritization rules; refer to “Prioritization Mechanisms for Dial Priority and Skill Priority” for details.
- Each call is handled by the Agent in the context of the Campaign where the record resides.
- Each Skill may be associated with a different Skill Priority rule; a Sub-campaign can be active on more than one Skill Priority rule, in which case the Sub-campaign will be handled according to the ordering and prioritization rules specific to the Skill Priority applicable for each case (a Skill Priority dialing cache is in place as long as an Agent with the associated Skill is logged in).
It is important to understand what happens when Agents are no longer available and/or there are no more contacts available in the Skill Priority Sub-Campaign(s).
The following behavior cases should be taken into consideration. First, let’s make these simple assumptions for illustration purposes:
Skill Priority Rule 1 (SPR-1) includes Sub-Campaign AA (SCM-AA) and is activeSCM-AA resides in Campaign A (CM-A)Skill 1 (SK-1) is associated with SPR-1Agent 1 (AG-1) has SK-1 and is logged inAgent 9 (AG-9) has Skill Other (SK-Other), and SK-Other is not associated with any Skill Priority ruleAG-9 is logged into CM-ANo other agents are logged in
No-Agent Case – no more Agents with the associated Skill are logged in anymore:
At one point, AG-1 logs out with the following effect:
The dialing cache for SPR-1 is removed, which includes SCM-AA itemsThe items in SCM-AA, however, are still callable through its parent campaign, CM-AAG-9 is logged into CM-A and therefore SCM-AA may be assigned to AG-9 based on the campaigns dialing rules.
Empty/Exhausted Sub-Campaign Case – no more callable items in the Skill Priority rule Sub-Campaigns:
For simplicity, assume the only active Sub-Campaigns for SPR-1 is SCM-AAAt one point, SCM-AA does not have any more callable items resulting in the following:
Since SK-1 is associated with SPR-1, and AG-1 has SK-1, AG-1 can only get calls associated with SCM-ASince there are no more callable items in SCM-A, AG-1 becomes idle and gets no calls whatsoever.
Sub-Campaign active in multiple Skill Priority rules Case – a callable item is a candidate for loading in more than one Skill Priority dialing cache:
A callable item will not be permitted to be in more than one dialing cache at any given time in order to avoid calling it multiple times without meeting required wait times
After the callable item is added to a dialing cache, the dialing cache is active, and the item has not yet been dialed, the item is made unavailable for adding it to another dialing cache.
Refer to the following pictures.
Selection and prioritization of records from the selected (Active) sub-campaigns follow the same rules as in Dial Priority. Refer to “Prioritization Mechanisms for Dial Priority and Skill Priority” for details.
Next, we discuss Skill Priority on inbound calls.
The same Skill Priority rules for outbound calls can be applied to inbound calls, as well. To do so, the Skill itself has to be enabled, and that is all that is needed, to incorporate Skill Priority rules for inbound calls.
The way it works for inbound calls is as follows. The calling number from the inbound call is looked up in the system to determine whether it is part of a Sub-campaign and/or Playlist. If so and the Sub-campaign is active on a Skill Priority rule, or the Playlist enabled, then the associated Skill is also checked to determine if it is enabled to Apply Skill Priority Rules for Inbound Calls. If it is, it looks for an available Agent with that Skill (otherwise just continues with standard inbound call handling). If the Skill is enabled and an Agent with that Skill is available, it routes the call to the Agent, otherwise it treats the call as if No Agent is Available.
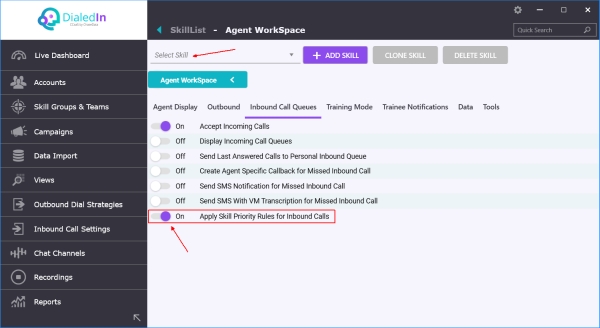
To configure a Skill for inbound Skill Priority, go to the main menu area on the left and click on Skill Groups & Teams. On the right, click View in the selection box for Create and Manage Skills, select the corresponding Skill, switch to the Agent Workspace, move to the Inbound Call Queues tab, and check the Apply Skill Priority Rules for Inbound Calls option. Refer to the following pictures.
Prioritization Mechanisms for Dial Priority and Skill Priority
In the previous sections we presented Dial Priority, which performs Contact (lead) record prioritization based on Sub-Campaigns from a single Campaign, and a similar capability, Skill Priority, which is rather based on all Sub-Campaigns and assigned to a Skill.
In this section we present guidelines about how Contact (lead) records are selected and ordered (i.e. prioritized) for dialing out, which apply to both Dial Priority and Skill Priority.
Campaign Settings
When Dial/Skill Priority is not taking place, Dial Sequence dictates how to prioritize Contact records in the Campaign as a whole. To be precise, Dial Sequence is actually a secondary criterion; the primary criterion happens under-the-hood (and not configurable) based on number of call attempts (records with the least call attempts go first). Following is an example.
Following are all the options available for Dial Sequence Criteria. Notice that only the Second Criterion is configurable; the First Criterion is implied and not visible, and is included in this explanation just for proper understanding of the applicable behavior.
The following table provides a reference of all possibilities that will be addressed here.
At a high level, the process of handling Dial/Skill Priority has two parts: (1) Select records from one or more Sub-Campaigns using a selection criterion, and (2) Prioritize/sort the selected records using a sorting criterion.
Part (1) itself consists of two steps: (a) determine how many records to get from each sub-campaign, and (b) determine which records to obtain from each sub-campaign (i.e. selection priorities).
For the only purpose of providing an explanation and presenting examples, in this section we use the terms Grab Prioritization and Bucket Prioritization with the intention to identify which criterion is used during each step. Let’s be clear that these terms are not used within the GUI but are just used to help in the explanations in this section. Grab Prioritization determines what to select, while Bucket Prioritization determines how to order the records selected.
With that in mind, refer to the following table.
Primary identifies the first criterion to use, while Secondary provides a tie breaker if it becomes necessary. To give an analogy, you could have a set of people to select from, and decide to use their last name as the primary criterion for selection, but if you have two names with the same last name, you could use the first name as secondary criterion.
GUI Priority Switches
The user interface for Dial Priority and Skill Priority present a set of switches whose ON/OFF setting determine the selection and prioritization mode to be applied. This section explains the modes corresponding to each allowed combination of these switches. Refer to the following picture.
Therefore, let us start by summarizing the allowed switch combinations and the resulting mode. Do note that the mode is just a short ‘description’ of what the switch combinations represent, just for the purpose of this section, and not an actually presented in the Management Console GUI.
The sub-sections that follow provide a description of the selection and ordering behavior for each of these allowed combinations.
CASE 1: Weighted Distribution / Random Order
This case occurs when the following switch settings are used:
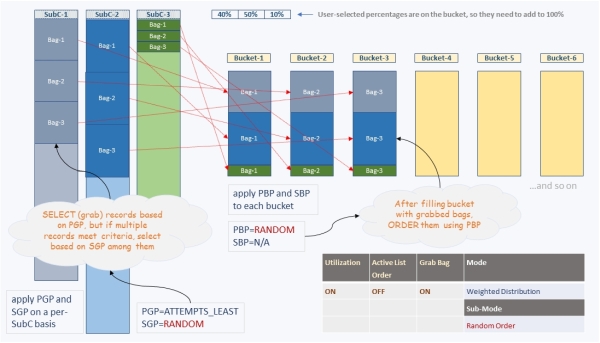
This case is about selecting chunks at a time of Contact records; we will call these chunks Buckets. We fill the bucket with Contact records from the specified Sub-Campaigns; the number of records that we grab from every campaign to fill a bucket is determined by the percentage (weight) assigned to each specified Sub-Campaign. Obviously, we should make sure that these percentages add to 100%.
The following priorities are applied:
As we have previously discussed, the first step is the selection process. The Primary Grab Priority (PGP) used in this step is to grab records with the lower number of call attempts (ATTEMPTS_LEAST); if more records than needed satisfy this criterion, the needed number of records is selected using the Secondary Grab Priority (SGP), which is set to be RANDOM (among those that satisfy the PGP).
After the bucket is filled with the selected Contact records, the records in the bucket are ordered (prioritized) using the Primary Bucket Priority (PBP), which in this case is set to be of a random order (RANDOM). Notice that since PBP is random, there is no need for a Secondary Bucket Priority (SBP).
This process is repeated one bucket at a time.
The following picture provides a pictorial example of how this case works.
CASE 2: Combined List / Random
This case occurs when the following switch settings are used:
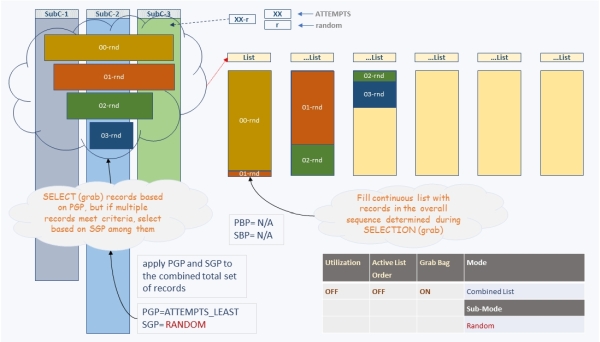
In this case, rather than thinking about buckets, we should think about a continuous list of records, even though this list may be split in pieces for performance purposes (but has no impact on the selection an ordering logic) as the example later in this section shows.
In this case, the selection criteria are applied to the combined set of all the Contact records from all the included Sub-Campaigns as a whole.
The following priorities are applied:
This case is all about the selection process. The Primary Grab Priority (PGP) used in this step is to grab records with the lower number of call attempts (ATTEMPTS_LEAST) from the combined list of all included Sub-Campaigns; records with the same number of call attempts are then ordered (prioritized) using the Secondary Grab Priority (SGP), which is set to be RANDOM.
The dialing list is then filled with the selected Contact records, which are already ordered (prioritized), hence there is no need to apply a Primary Bucket Priority (PBP) or a Secondary Bucket Priority (SBP) on the dialing list.
The following picture provides a pictorial example of how this case works.
CASE 3: List Order
This case occurs when the following switch settings are used:
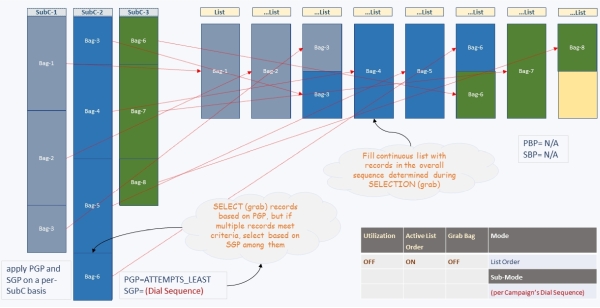
In this case, rather than thinking about buckets, we think about a continuous list of records, as well, even though this list may be split in pieces for performance purposes (but has no impact on the selection an ordering logic) as the example later in this section shows.
For this case, we work with one Sub-Campaign at a time; we select all the records from one Sub-Campaign before we move on to the next Sub-Campaign. The Sub-Campaign to be used first and which one follows is determined by the order in which they are arranged in the GUI by the user.
On a per Sub-Campaign basis, the selection criteria are applied to the complete set of Contact records from that Sub-Campaign.
The following priorities are applied:
Once again, this case is all about the selection process. The Primary Grab Priority (PGP) used in this step is to grab records with the lower number of call attempts (ATTEMPTS_LEAST) from the complete set in the Sub-Campaign whose turn is next; records with the same number of call attempts (which we refer to as Bags in the pictorial example) are then ordered (prioritized) using the Secondary Grab Priority (SGP), which is obtained from the corresponding Campaign’s Dial Sequence setting.
The dialing list is then filled with the selected Contact records, which are already ordered (prioritized), hence there is no need to apply a Primary Bucket Priority (PBP) or a Secondary Bucket Priority (SBP) on the dialing list.
The following picture provides a pictorial example of how this case works.
CASE 4: Combined List / Oldest First
This case occurs when the following switch settings are used:
In this case, again, rather than thinking about buckets, we think about a continuous list of records, even though this list may be split in pieces for performance purposes (but has no impact on the selection an ordering logic) as the example later in this section shows.
In this case, the selection criteria are applied to the combined set of all the Contact records from all the included Sub-Campaigns as a whole.
The following priorities are applied:
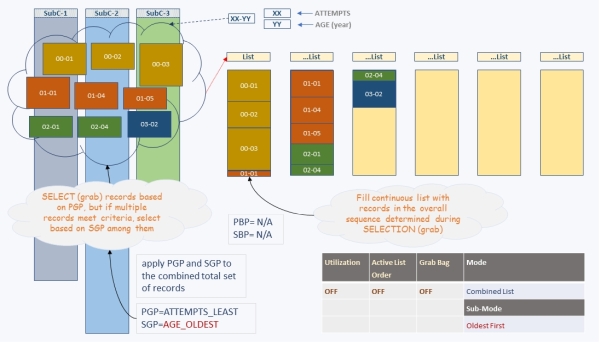
This case is all about the selection process, as well. The Primary Grab Priority (PGP) used in this step is to grab records with the lower number of call attempts (ATTEMPTS_LEAST) from the combined list of all included Sub-Campaigns; records with the same number of call attempts are then ordered (prioritized) using the Secondary Grab Priority (SGP), which is set to be AGE_OLDEST.
The dialing list is then filled with the selected Contact records, which are already ordered (prioritized), hence there is no need to apply a Primary Bucket Priority (PBP) or a Secondary Bucket Priority (SBP) on the dialing list.
The following picture provides a pictorial example of how this case works.
Playlist Builder
As previously mentioned, a Playlist is a mechanism that allows us to filter Contacts, or leads, for the purpose of discriminating among the complete set of Contacts in a Campaign, in order to execute focused calls. This could be useful when we want to keep all the Contacts in a Campaign, but at a given time only call a set of those Contacts that meet a more focused set of criteria; we build Playlists for that, using the Playlist Builder. These Playlists are to be assigned to Campaigns (refer to Campaign Profile) to put them into effect. Do note that a Playlist supersedes any Dial Priorities that may have been set up.
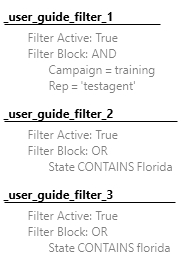
We tell the DialedIn CCaaS system how to build a Playlist through a Playlist Builder, by indicating how to select records using Filters applied on the records. For example, create a list from records identified with a specific ‘Campaign’ AND a specific ‘Rep’, AND where the Contact address is in a specific ‘State’. The following picture depicts such a filter set definition.
The previous example translates to the following:
_user_guide_filter_1 AND _user_guide_filter_2 OR _user_guide_filter_3
which resolves to:
_user_guide_filter_1 AND (_user_guide_filter_2 OR _user_guide_filter_3)
which effectively expands into:
((Campaign=training) AND (Rep=’testagent’))>AND>((State CONTAINS Florida) OR (State CONTAINS florida))>
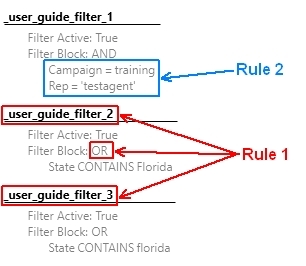
The rules are as follows:
- Rule 1: The logical operator defined for a filter block is applied between the current filter block and the filter block that follows it
- Rule 2: The logical operator for statements within a filter block is always AND.
Refer to the following picture.
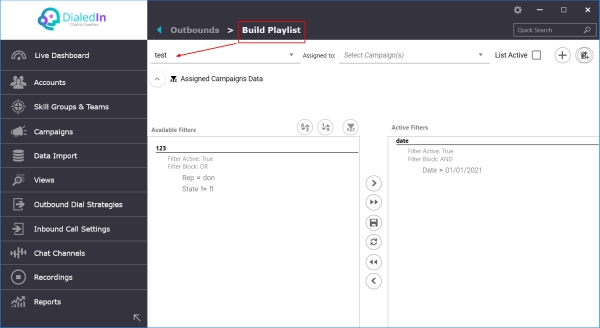
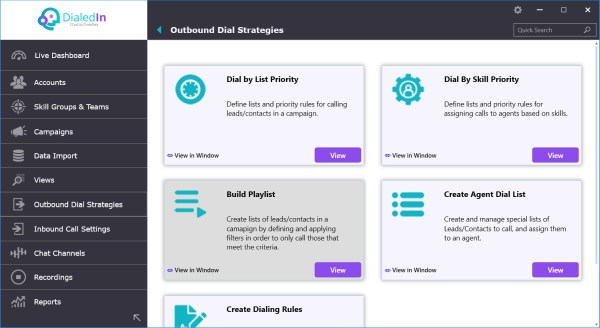
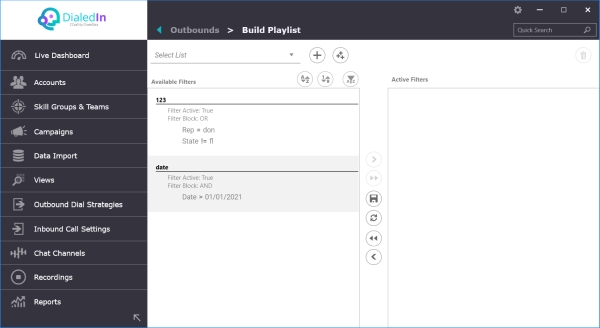
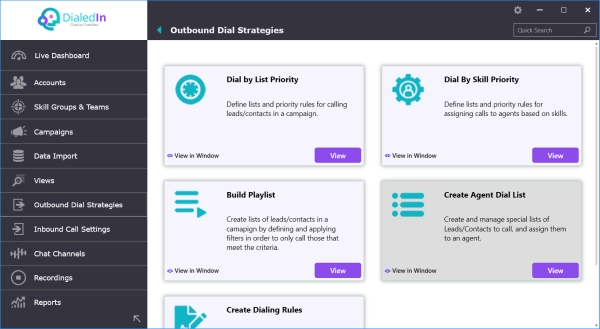
To configure a Playlist, go to the main menu area on the left and click on Outbound Dial Strategies. On the right, click View in the selection box for Build Playlist. Then select an existing list from the top-left pull-down menu or create a new list by clicking on the Add New Playlist button, or the Add New Filter, top right. Refer to the following pictures.
As you can see, we have a list of Available Filters on the left panel; when someone creates a Filter, they are made available for use in defining any Playlist. On the right panel we have a list of Active Filters, which represent those Filters that are part of the current Playlist.
You can move Filters between the Available Filters and the Active Filters areas, which effectively builds a Playlist; this can be done either by drag-and-drop or using the action icons between the two window panels.
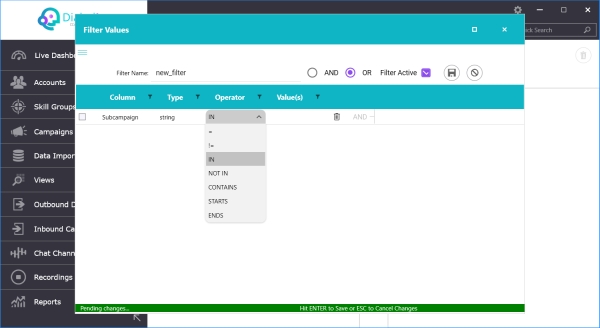
To add a new Filter, click on the Add Filter button, which pops up a new dialog window. Type the filter name, select the logical operator (AND, OR) to be used between this Filter block and the one that would follow; then create statement lines by clicking on the new item editing area and enter or select the appropriate values. Hit ENTER or click Update to apply changes. Refer to the picture below.
Each resulting Filter is a group of one or more conditional statements (lines) to which the AND logical operator is applied between each statement; if you have condition statements A, B, and D, your Filter would be interpreted as “A AND B AND C”.
Operators:
| = |
string, numeric, date |
The values on the left and right side of the operator match exactly |
| != |
string, numeric, date |
The values on the left and right side of the operator match exactly |
| IN |
string, numeric |
The value on the left side of the operator matches a value of a list of values on the right side of the operator |
| NOT IN |
string, numeric |
The value on the left side of the operator matches a value of a list of values on the right side of the operator |
| CONTAINS |
string |
The value on the left side of the operator can be found within (is a sub-string of) the value on the right side of the operator |
| STARTS |
string |
The value on the left side of the operator can be found at the beginning (is the first sub-string) of the value on the right side of the operator |
| ENDS |
string |
The value on the left side of the operator can be found at the beginning (is the first sub-string) of the value on the right side of the operator |
| < |
numeric, date |
The value on the left side of the operator is smaller than the value on the right side of the operator; for dates, smaller is equivalent to earlier |
| > |
numeric, date |
The value on the left side of the operator is larger than the value on the right side of the operator; for dates, larger is equivalent to more recent |
| ≤ |
numeric, date |
The value on the left side of the operator is smaller than or the same as the value on the right side of the operator; for dates, smaller is equivalent to earlier |
| ≥ |
numeric, date |
The value on the left side of the operator is larger than or the same as the value on the right side of the operator; for dates, larger is equivalent to more recent |
The following default formats need to be considered for the rules to be properly interpreted:
Date – should be in the following form: MM/DD/YYYY, where MM is the two-digit month number, DD is the two-digit day of the month, and YYYY is the four-digit year.State – should be in the following form: where XX, which represents the official two-character abbreviation representing a USA state.
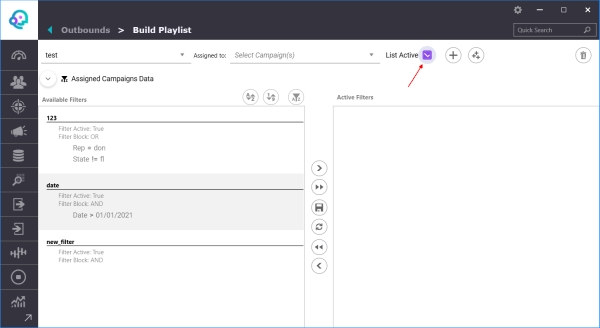
To make a Playlist definition to be available for Campaigns, you must check the List Active checkbox. Refer to the following picture.
You can assign a Playlist definition to a Campaign, which effectively sets the corresponding parameter in Campaign Settings Settings; or you could just do it directly in
You can assign a Playlist definition to a Campaign, which effectively sets the corresponding parameter in Campaign Settings Settings; or you could just do it directly in Campaign Settings at any time, as long as List Active is set.
at any time, as long as List Active is set.
Agent Dial List
Admin users can create and manage special lists of numbers (Contacts) to call, assigning them to specific agents. The agent’s Skill must be enabled to Use Dial Lists; when enabled, the Agent Client GUI will provide the ability to access the assigned lists and call a Contact in one of those lists.
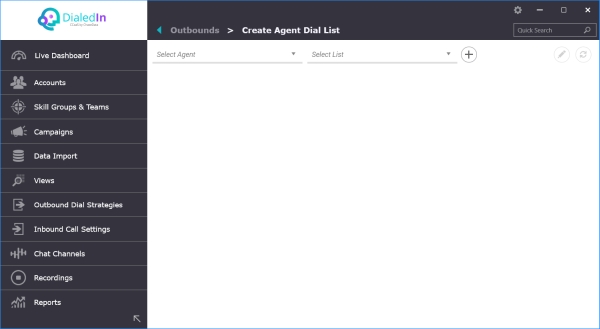
To configure Dial Lists, go to the main menu area on the left and click on Outbound Dial Strategies. On the right, click View in the selection box for Create Agent Dial Lists. Then pull down the Select Agent menu found in the top left of the presentation area and select one of the agents in the menu. Then pull down the Select List menu next to it and select a list, if available. Refer to the following picture.
If the selected list is not empty, it will show the numbers already included in the list; in addition, if a number in the list has already been dialed, it will show a check-mark in its left-most column, as well as the date, time, and duration of the last call; otherwise, it will just show a question-mark.
You can either add a new list by clicking on the Add New List (‘+’) icon, or edit the list by clicking on the Edit Dial List (pen) icon. Refer to the following picture.
After clicking on the Add New List (‘+’) icon you’ll be able to type the name of the new list on the name field; new icons will also appear, Save and Cancel, so you can save the new empty list or cancel the operation. Refer to the following picture.
You are now able to add numbers to the newly created list; you do this, with any list, by clicking on the Edit Dial List (pen) icon. Refer to the following picture.
A text area is now enabled for editing; you can either type phone numbers (one per line) or paste them in. It is recommended that phone numbers are entered without spaces, parenthesis, or dashes; the system will properly format them for display after you save the list.
You can Save Dial List, Cancel, or Clear Dial List by clicking on the appropriate icon (top-right of the window panel). Refer to the following pictures.
Dialing Rules
Sometimes the original number for a Contact is not the best or right number to call, for one reason or another, and a call attempt results in Wrap-up Code indicating some kind of failure reaching out to the Contact; to handle those cases, the DialedIn CCaaS system allows creating and configuring Dialing Rules that go through an alternate progression of numbers, in the case that the disposition or wrap-up code in the Contact record matches one in a corresponding list (Disposition Set).
The alternate phone numbers to progress through are identified by the Phone Fields included in the rule; in other words, the system looks for a match against the value of one of the fields of type Phone listed in the Disposition Set.
The Dialing Rule is defined by creating an ordered list that indicates, with each item in the list, what field value to check in the Contact record, in the case that one of the dispositions (in a Disposition Set) match the Contact’s current disposition.
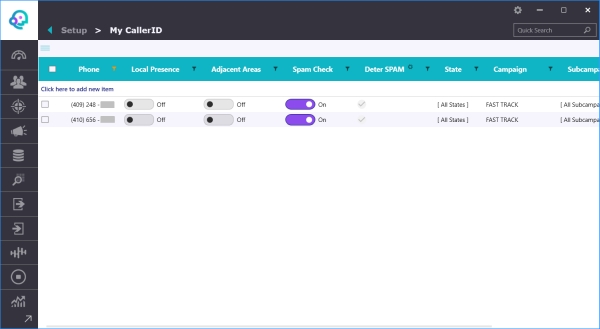
We’ll go through these two steps in more detail, but first, there’s one more step needed, which is to assign the Dialing Rule to the appropriate Campaign; refer to Campaign Profile for that.
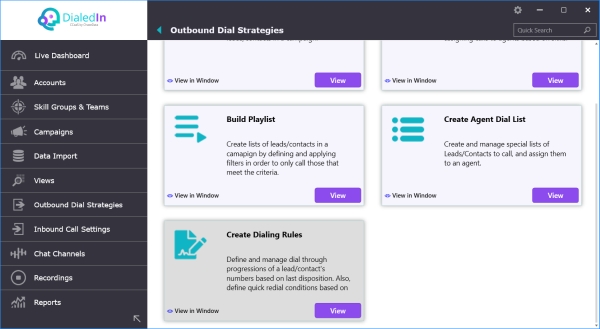
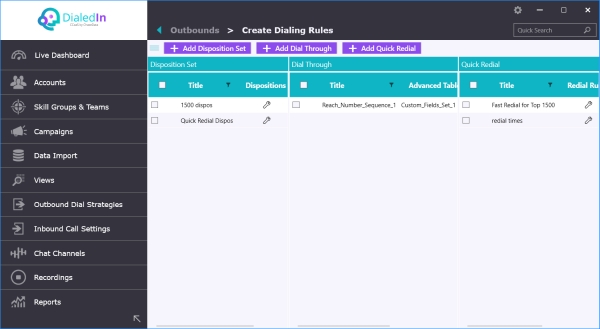
So, first, we need to define a Disposition Set; multiple sets can be used. To do this, go to the main menu area on the left and click on Outbound Dial Strategies. On the right, click View in the selection box for Create Dialing Rules, then look first at the Disposition Sets. You will see a list of disposition sets, if previously defined.
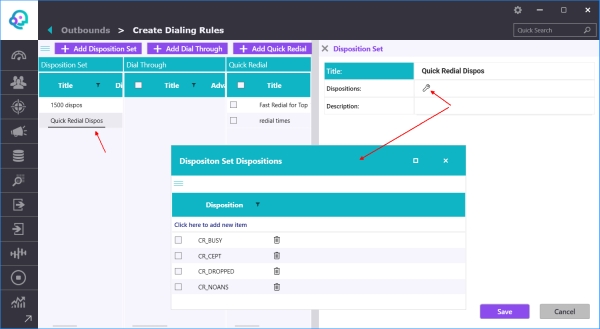
To create a new Disposition Set, click on Add Disposition Set. Then enter name and description, and click on the configuration icon for Dispositions in order to add dispositions to the set. Refer to the following pictures.
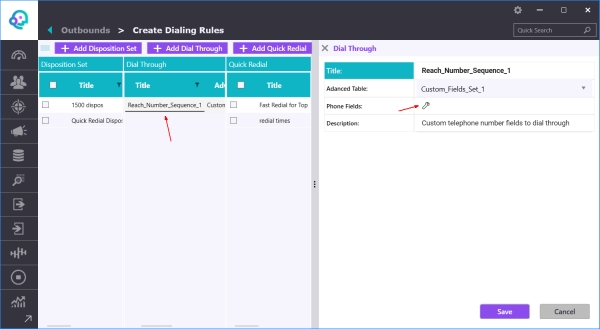
Now, we need to create the other part of the Dialing Rule, which identifies the phone fields to consider (go through). To do this, we work on the Dial Through part of the screen to select or add the list to go through. Refer to the following picture.
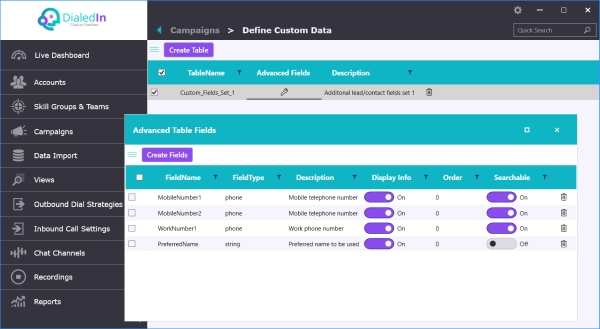
To create a new one, click on Add Dial Through. Then enter title (name) and description, and pull down the Advance Table (Custom Data) menu to select the list that contains the phone fields to be considered. You may need to Save at this point, in order for the next step to be effective.
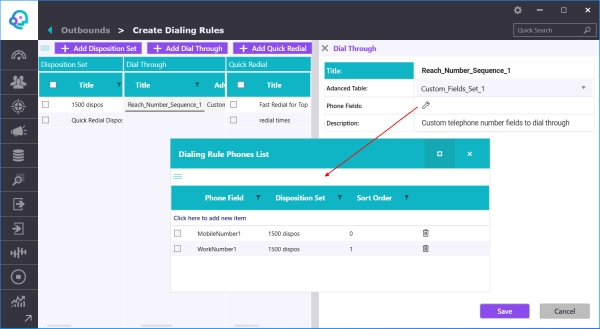
Next is to create the list of phone fields to be referenced and link them to a Disposition Set; click on the Configuration icon next to Phone Fields, which will open a new window where we can add one or more fields of type Phone and couple them with a Disposition Set, indicating that the dispositions on that set trigger the use of that field to determine which number to dial. The set also includes a Sort Order value (larger number dials first). Refer to the following picture.
Quick Redial
With the DialedIn Quick Redial feature you can quickly and automatically call again (redial) numbers that meet certain criteria, for example, -calls that returned a busy signal or went to an answering machine.
Multiple Quick Redial rule-sets can be defined at the system level, and a campaign can be enabled with one of them. A Quick Redial rule-set can have multiple rules, where each rule provides two conditions to meet, attempt number and disposition (call status), and defines how long to wait (delay) before the redial is performed if the conditions are met. For example, if attempt number 1 returns a busy signal (disposition/call status), wait 10 minutes, then redial.
Quick Redial is a prioritization condition, therefore the involved number is put in the priority queue and dialed immediately when the wait time concludes. This, of course, considers time zone, schedules, and callability settings, meaning that other broader settings, like being outside calling hours, will prevent the redial from taking effect.
A Quick Redial rule-set can include multiple rules, which are entirely at the discretion of the administrator implementing them, including whether there is any overlap among them. This is important to understand because overlaps usually cause overflows, since the ChaseData system will apply a rule independently of the other rules. For example, if a rule indicates a Fast Redial after 10 minutes for attempts 1, 3, and 5, while another rule indicates a Fast Redial after 5 minutes for attempt 4, it will execute all of them (10-min delayed fast redial for attempts 1, 3, and 5, AND 5-min delayed fast redial for attempt 4).
Both system and non-system dispositions can be used for a Quick Redial rule. An implication of this is that even manual calls can be fast redialed, if the disposition of that call and the call attempt match a rule.
The number used as Caller ID is unchanged for a redial (same as for the call attempt on which the quick redial is performed).
Let us now go through the process of defining and enabling Quick Redial for a Campaign. You will notice that you need some building blocks before Quick Redial is enabled for a Campaign. But for the purpose of understanding the purpose and end result first, here we present the feature from the top down, starting at the Campaign settings, and then looking at the underlying building blocks as we go along. In some cases, these building blocks will already be available, but in most cases, particularly the first few times, you will need to address them first.
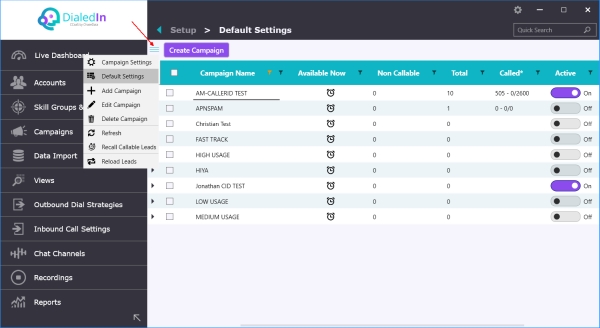
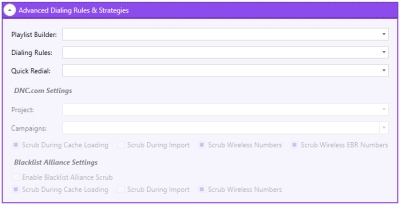
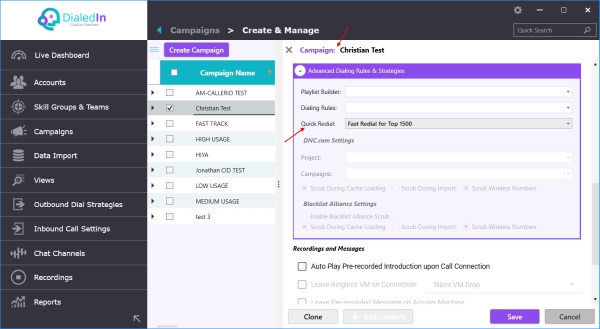
With that in mind, the first thing is to enable the campaign for Quick Redial, which we do in the Advance Dialing Rules & Strategies area of the Outbound Settings of Campaign Settings for the campaign desired (refer to the corresponding Campaign section). Here we pull down the Quick Redial menu and select a previously created Quick Redial rule-set. Refer to the following picture.
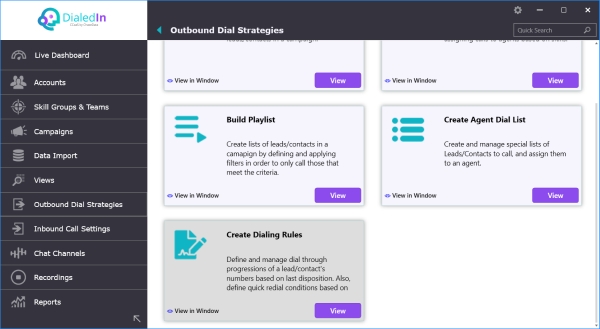
To do this, go to the main menu area on the left and click on Outbound Dial Strategies. On the right, click View in the selection box for Create Dialing Rules,
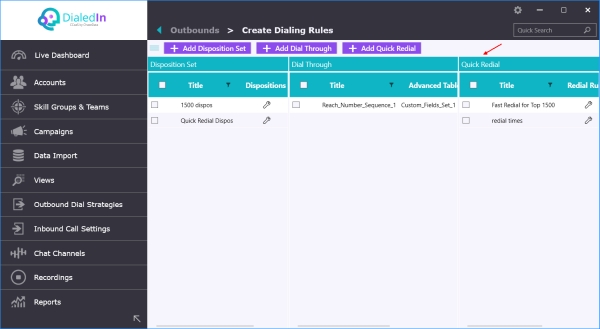
Now, let us review where this Quick Redial rule-set is defined. To do this, go to the main menu area on the left and click on Outbound Dial Strategies. On the right, click View in the selection box for Create Dialing Rules, then move to the Quick Redial area.
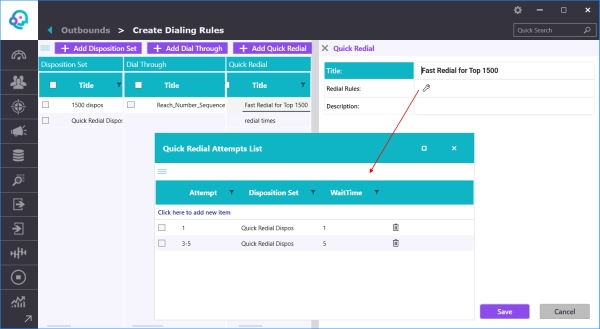
This area lists all Quick Redial rule-sets available. Click on the desired one to review or edit, or add one by clicking on the Add Quick Redial button. This will open a new window showing the title (name), description, and a link to the Redial Rules, which in turn shows the corresponding Attempt List.
Refer to the following pictures.
Each Attempt List is composed of three parts; the call Attempts to be checked against a disposition in the Disposition Set, and the Wait Time (in minutes) of delay after that attempt before executing the quick redial.
These parameters can be edited by clicking on each field (or a new Attempt List can be created); in the case of Attempt and Wait Time, just type the desired values, while for Disposition Set a pull-down menu lists available ones previously defined.
The Attempt parameter can be a single attempt number (e.g., “2”), a range of attempt numbers (e.g., “1-4”), a comma-separated list of attempt numbers (e.g., “2,4,6”), or a combination (e.g., “1-3,5,8”).
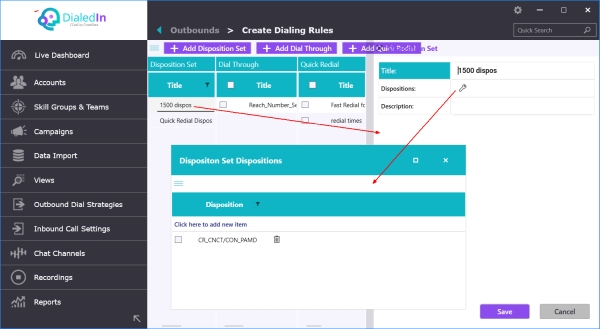
Now, let us move to Disposition Sets. This area lists all disposition sets available, which can be reviewed or edited by clicking on the desired one. This will open a new window with the title (name), description, and a link to all Dispositions included in this Disposition Set, whihc is accessed by clicking on the configuration icon.
A new Disposition can be added, deleted, or seleceted/deselected. Any system and non-system available disposition can be used in the set.
Refer to the following picture.
In summary, based on the examples in this article, the campaign User-Guide-Documentation has Fast Redial enabled using the fast redial test Fast Redial rule-set, which includes two Attempt Lists. One of those lists indicates that on attempts 1 through 3, if the resulting call disposition matches one in the fastredial Disposition Set, wait for 5 minutes and then redial the number (assuming there are no other conditions preventing it, like outside of dialing hours, contact is not callable, etc.).
So, for example, if a corresponding number is called for the first time, which is attempt #1, resulting in a disposition of CR_CNCT/CON_PAMD, the system will wait 5 minutes after which it will immediately redial the number (using the same Caller ID from attempt #1).
Outbound Voice Prompts
Outbound Call Management often requires recordings to be played to the called party, such as when leaving voice mail. These messages can be configured from an audio file (e.g. MP3 upload) or from a TTS audio script (previously defined Script).
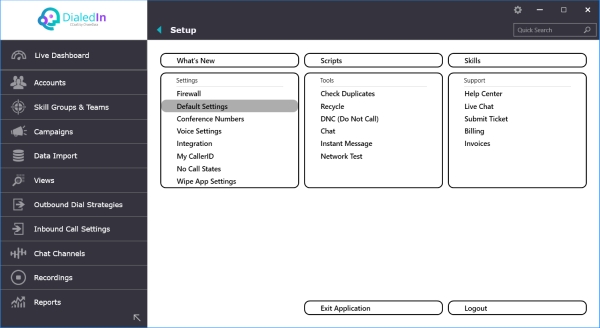
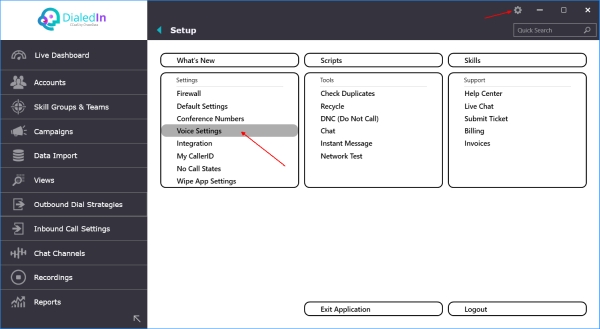
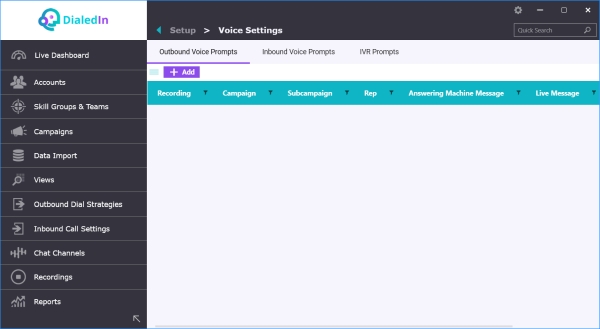
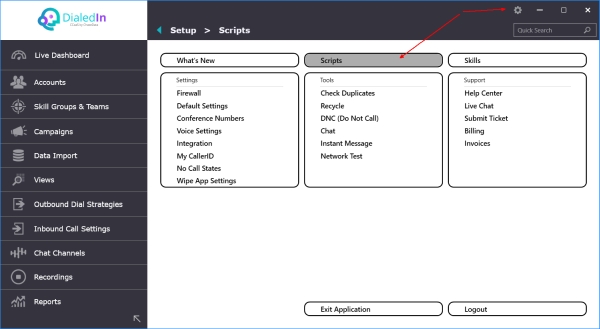
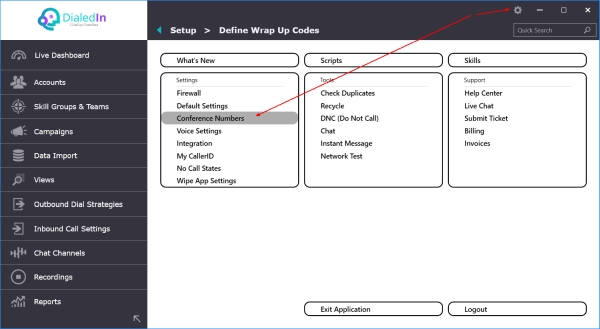
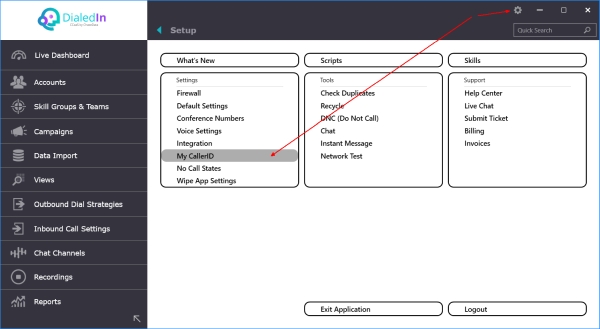
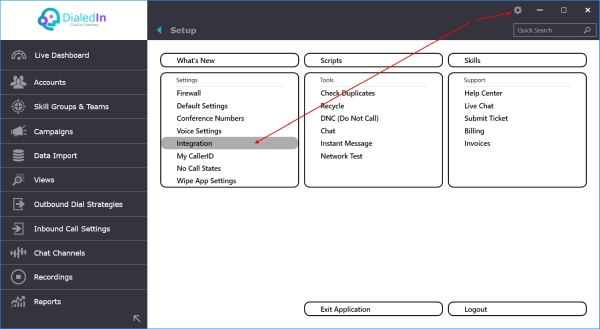
To access the setup area, click on the wheel icon on the right side of the top area of the GUI (a.k.a. the Setup menu), above the Quick Search field, which will disply the Setup menu. Find the Settings section and click on Voice Settings to navigate to Setup › Voice Settings. Refer to the following pictures.
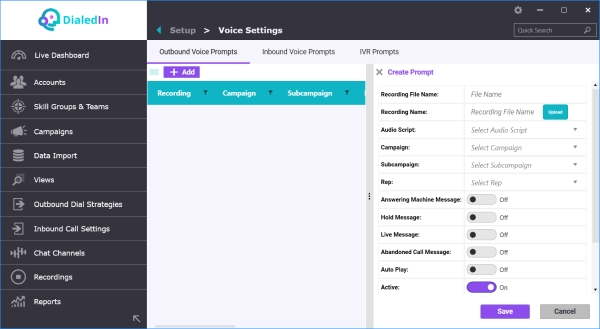
When the Voice Settings panel is displayed, click on the Outbound Voice Prompts tab and the list of voice prompts, if any, is displayed. To add a new one, click on the Add button, whihc will open a configuration panel. To upload an audio file, click on the Upload button; if instead TTS is to be used, pull down the Select Audio Script and select a pre-defined script (refer to Scripts article). Then continue to the next fields to select the applicable Campaign, Sub-campaign, and Rep associated with this voice prompt. Next, select what is the message going to be used for (multiple selections are possible); refer to the table that follows for a description of each option. Finally, use the Active switch to have the voice prompt enabled or disabled.
Refer to the following picture.
Voice Prompt Usage Options:
| Answering Machine Message |
The message will be used for voicemail message actions |
| Hold Message |
The message will be played when the called party is put on hold |
| Live Message |
The message will be available for on-the-fly selection and playback by the agent |
| Abandoned Call Message |
The message will be played when the system is about to drop the call, before disconnecting |
| Auto Play |
The message will be played automatically when the call is connected to an agent. |
There are two special tone notifications that can be customized to utilize a user-provided recording; they are referred to as Custom Outbound Notifications, which are played to the agent when the applicable conditions apply. They are as follows:
_BEEP_ : This is a notification that is played to the agent when the system dials a call automatically (outbound, not including Progressive). The default beep can be modified by creating an Outbound Voice prompt, naming it _BEEP_ (file name of the custom recording)._HANGUP_ : This is a notification that is played to the agent when a call hangs up for any reason. The default beep can be modified by creating an Outbound Voice prompt, naming it _HANGUP_ (file name of the custom recording).

