In this section we’ll see how to import and manage data that is used by the DialedIn CCaaS solution. That includes Contact information, Do-Not-Call (DNC) information, call records, and recordings.
Some of this information, like Contacts, is fed into the system, which then may process it and aggregate it during the course of call center activities. Other information, like call records, is generated by the system based on actions and activity.
Contact information is always imported into the system. For Outbound Call Management its’ usually referred to as Leads, and the Leads source could be an internal organization or an external vendor. What it’s important is that the information is properly formatted in a comma-delimited file (of type CSV).
The rules are simple:
Important guidelines to consider:
Refer to the following picture for an example.

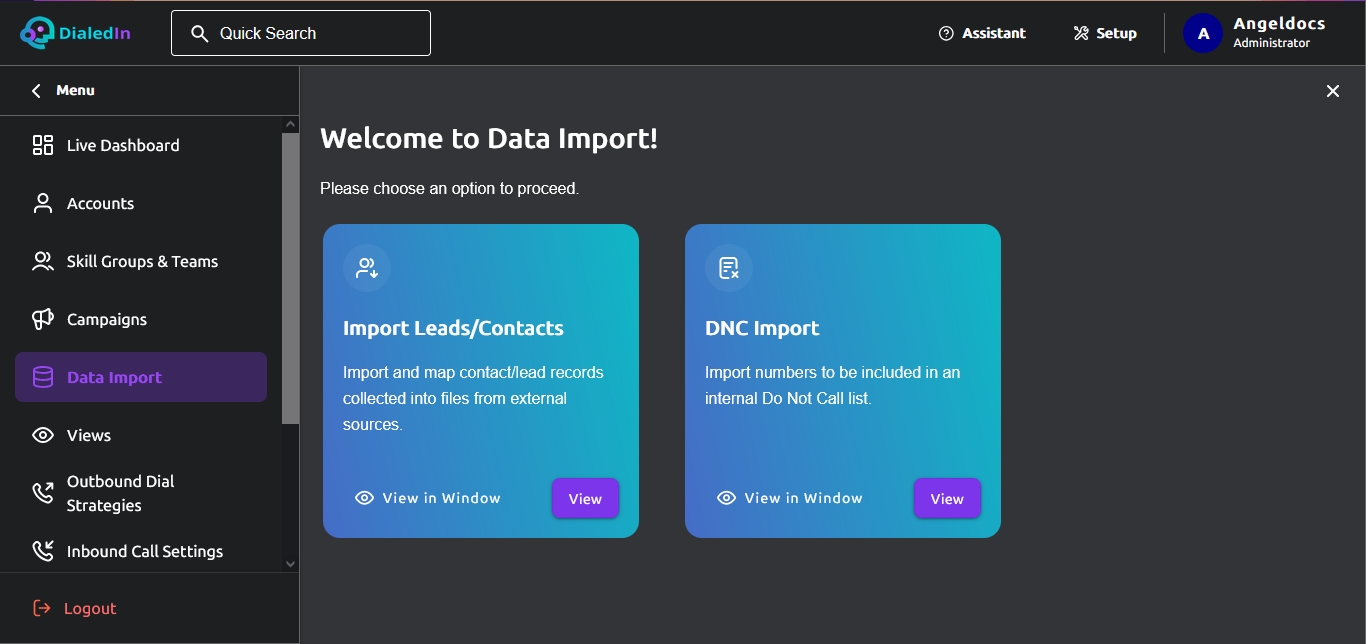
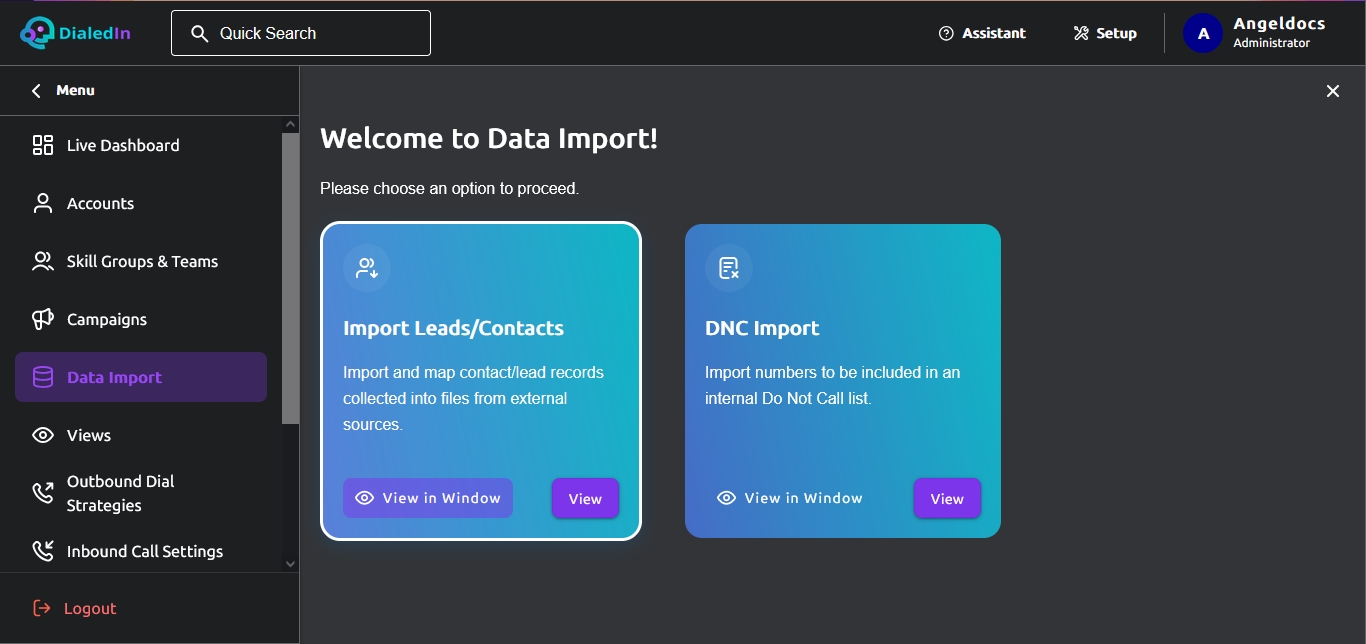
Now, let’s go through the steps to import a set of Contact records. Go to the main menu area on the left and click on Data Import. On the right, click View in the selection box for Import Leads/Contacts. Refer to the following picture.
It will take you to the first step for File Upload, where you need to Select Files and CSV Reading Settings, which is the first step of the process to import Contact information from a CSV file. As a matter of fact, the system will guide you to the next steps as parameters are entered and you subsequently click on the navigation to next step button on the bottom right. Refer to the following picture.
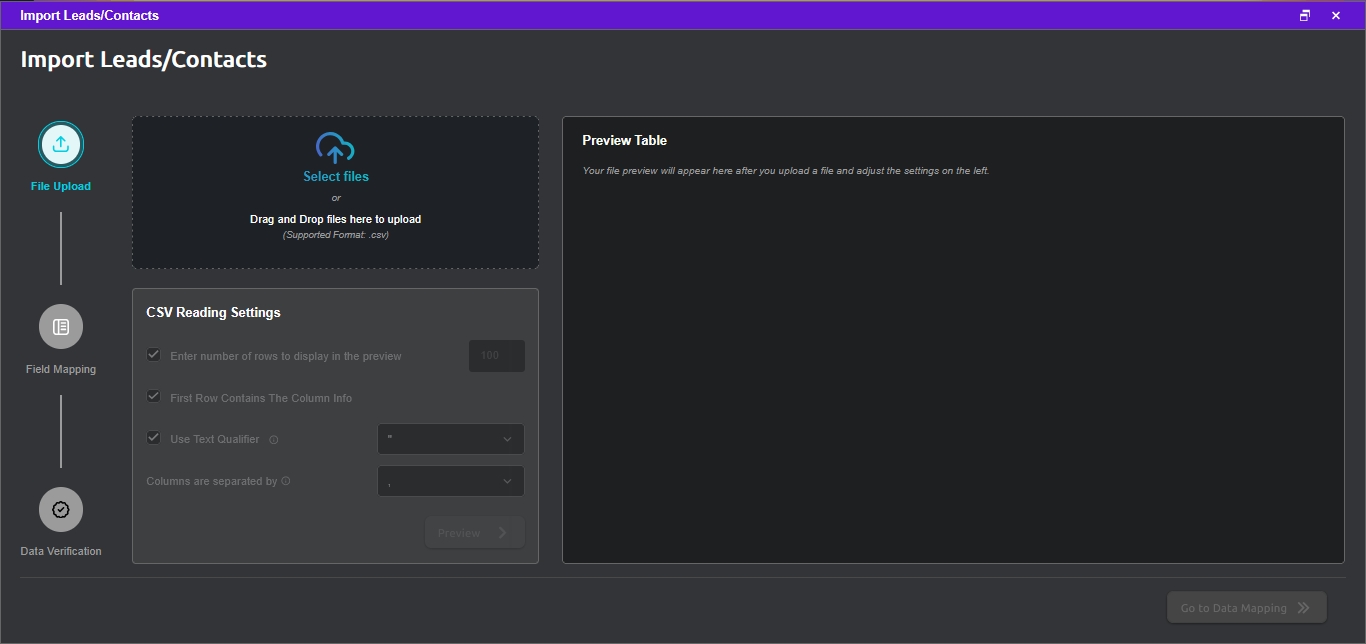
The most important option to consider in this part is the checkbox for First Row Contains The Column Info because it tells the system how to interpret the first row; if selected, it will use that row to determine what Field, whether Default or Custom, the column corresponds to, trying to find the most relevant match. Ideally and highly recommended, the Column Info will be an identical match to one of the Field labels; if not, the system will make a best effort to find a corresponding match.
Do note that, although a CSV file is usually opened with MS Excel, it actually is a text file of records (rows) containing comma-delimited fields. If a character within a field in a row could create confusion (e.g. a comma), a Text Qualifier (one of the options) can be used (e.g. double-quotes).
When ready, click on Select Files, or drag and drop one, and proceed to select your file; when done, the system will analyze and interpret its contents, and when you hit Preview it will display the results on the Preview Table area. Refer to the following picture.
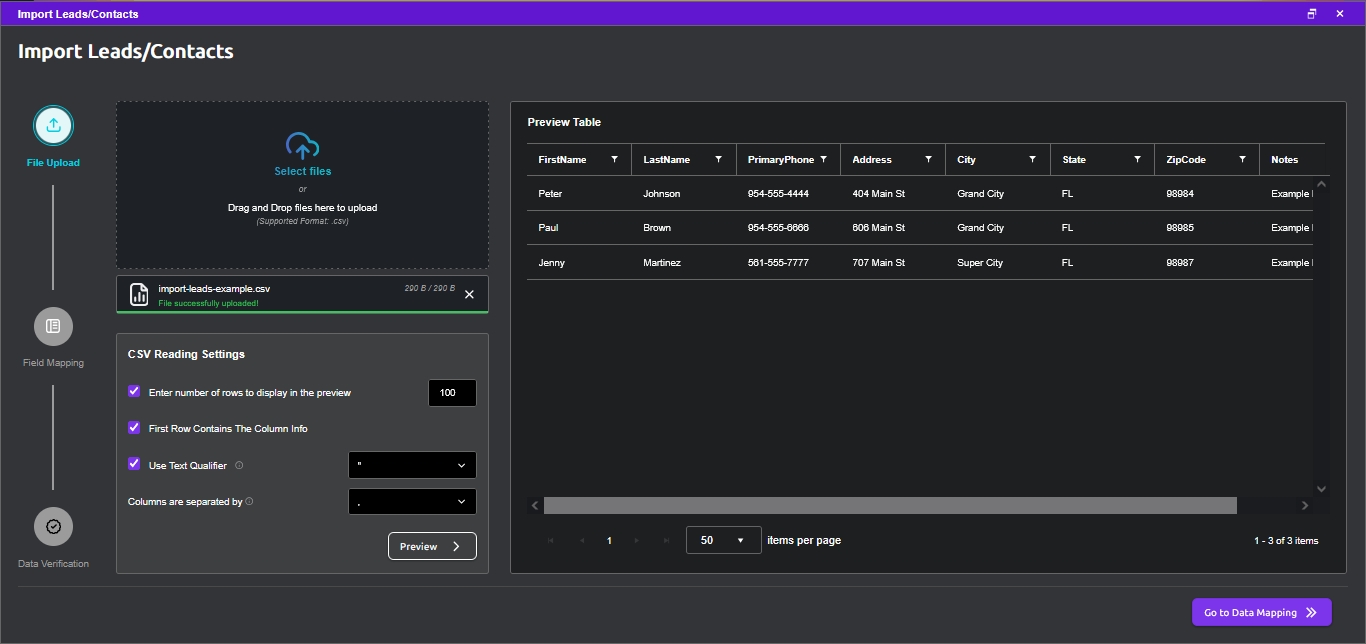
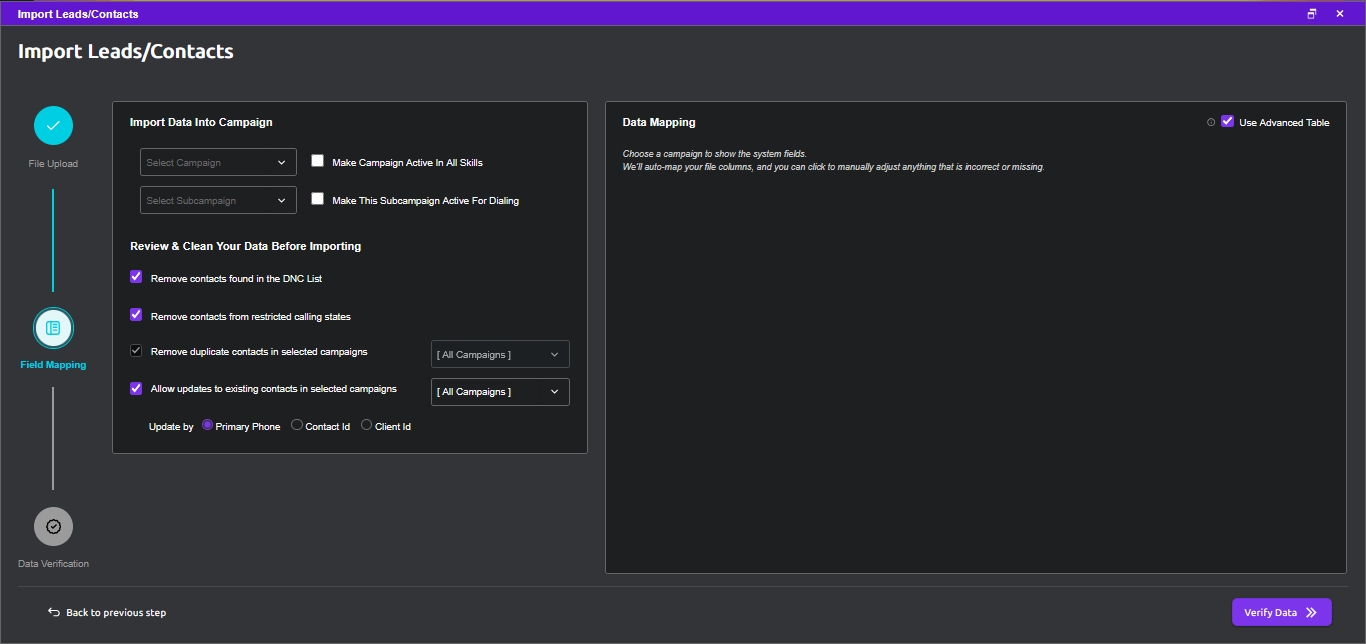
After you review the results, you may click on Go to Data Mapping to move to the Field Mapping tab; there, you’ll have the opportunity to make some adjustments after you select the Campaign, and optionally a Sub-campaign (note that here you can select an existing Sub-campaign or create a new one) so the system can now try to map the data from the file to the fields defined for your campaign (Default or Custom Fields). Refer to the following pictures.
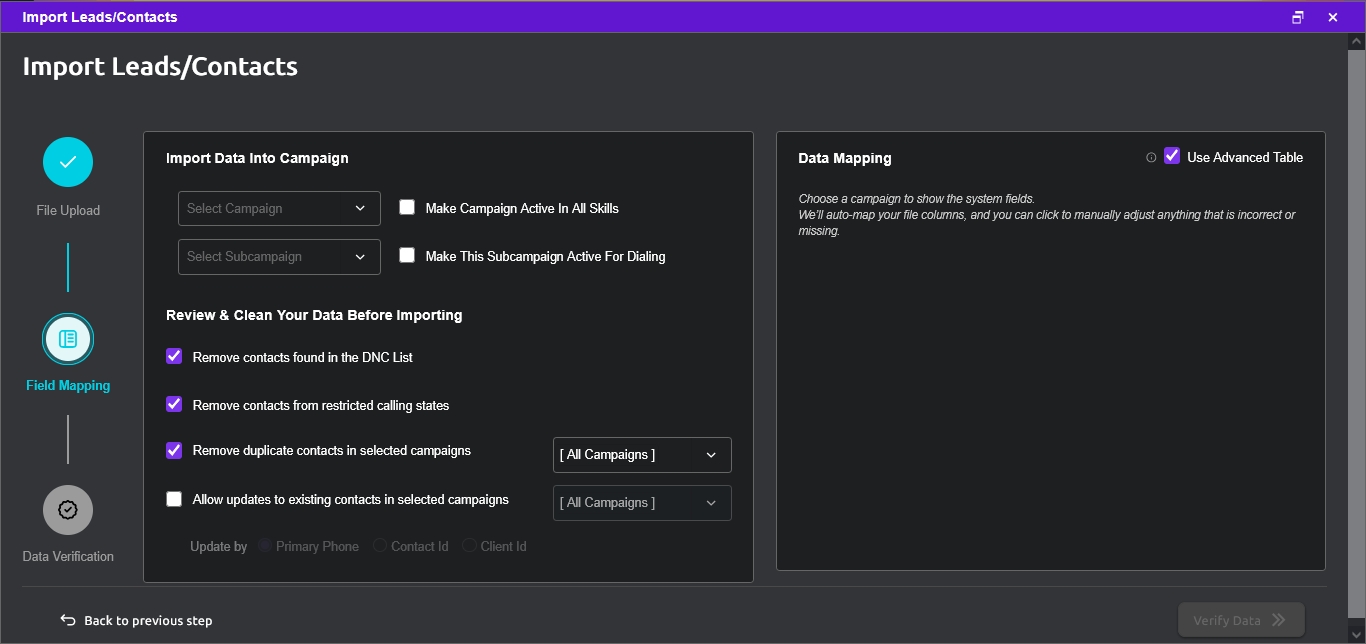
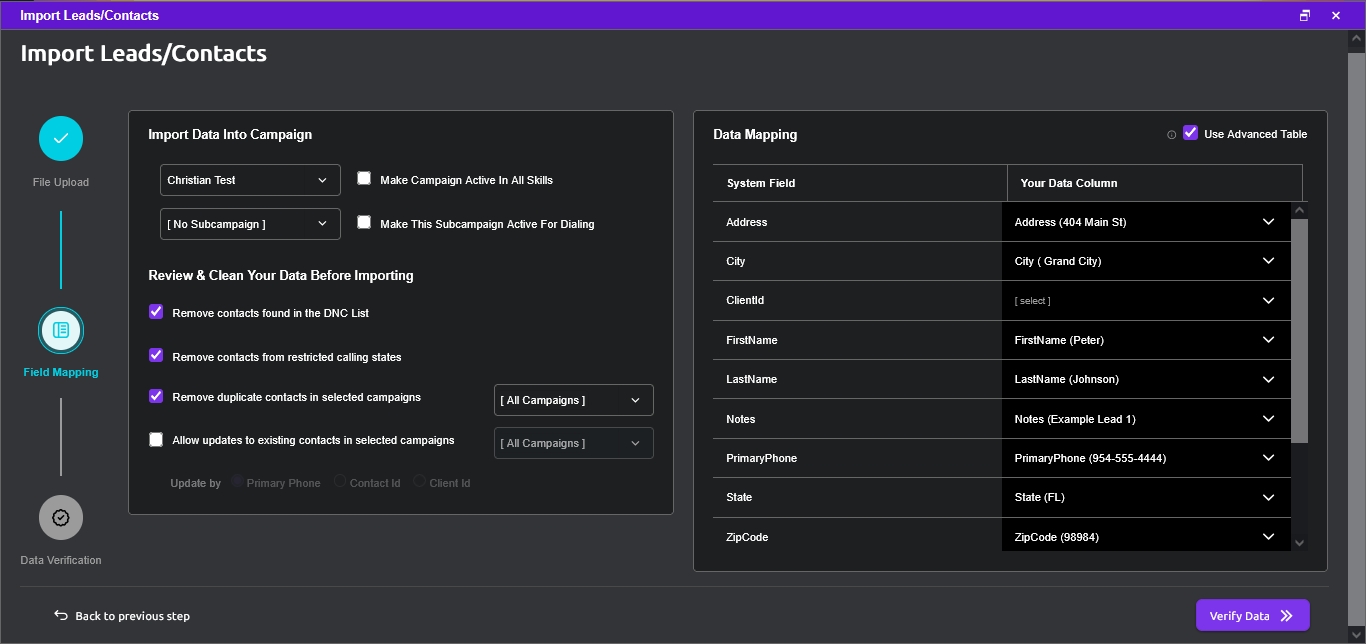
Note a few things. First, it will show all Campaign Fields, and next to them the Data Column from the import file that the system has matched to each field. If it could not determine a Data Column for a particular Campaign Field, it allows you to manually ‘select’ one via a pull-down menu (menu shows up when clicking on ‘select’). If the system has not found a field match for a Data Column in the file, it will not include it (unless you manually assign it to a non-matched Campaign Field).
There are a few other options available in the Field Mapping tab, as follows.
| Make Campaign Active In All Skills | Checkbox to activate the associated Campaign for all Skills once the import operation is completed. |
|---|---|
| Make This Subcampaign Active For Dialing | Checkbox to activate the associated Campaign for all Skills once the import operation is completed. |
| Use Advanced Table | Checkbox to include Custom Fields in the analysis and corresponding import operation; this is highly recommended, although there may be some very special circumstances where those custom fields are never intended to be imported (all-or-nothing). |
| Remove contacts found in the DNC list | Checkbox to indicate that records to be imported be checked against the internal DNC lists; if a DNC list has not been generated, the system attempts to check against existing Contacts that have been dispositioned as “Do Not Call”. |
| Remove contacts from restricted calling states | Checkbox to prevent including records that correspond to US states that have been included in the No-Call States list, if any, and the list applies to the Campaign to which the imported record is to be associated; if this option is not selected, the record is imported, but the No-Call rules still apply. |
| Remove duplicate contacts in selected campaigns | Checkbox to check if a record represents a Contact that already exists, and disallow the import operation in that case; if not Campaign is selected (through corresponding pull-down menu), the check is performed system-wide, otherwise just against the selected Campaigns; it is highly recommended to avoid duplicate records. |
| Allow updates to existing contacts in selected campaigns | Checkbox to indicate that the import operation is actually an update operation, expecting records in the file to correspond to existing Contacts in the system; although records that represent non-existing (new) Contacts are allowed, it is recommended to separate the activities of importing new Contacts from the activities of updating Contacts. When enabling this, you specify wther to identify the record by Primary Phone, Contact Id, or Client Id. |
Click on Verify Data when ready; before the actual import operation is performed, the system presents its findings and offers to execute the operation. Refer to the following picture.
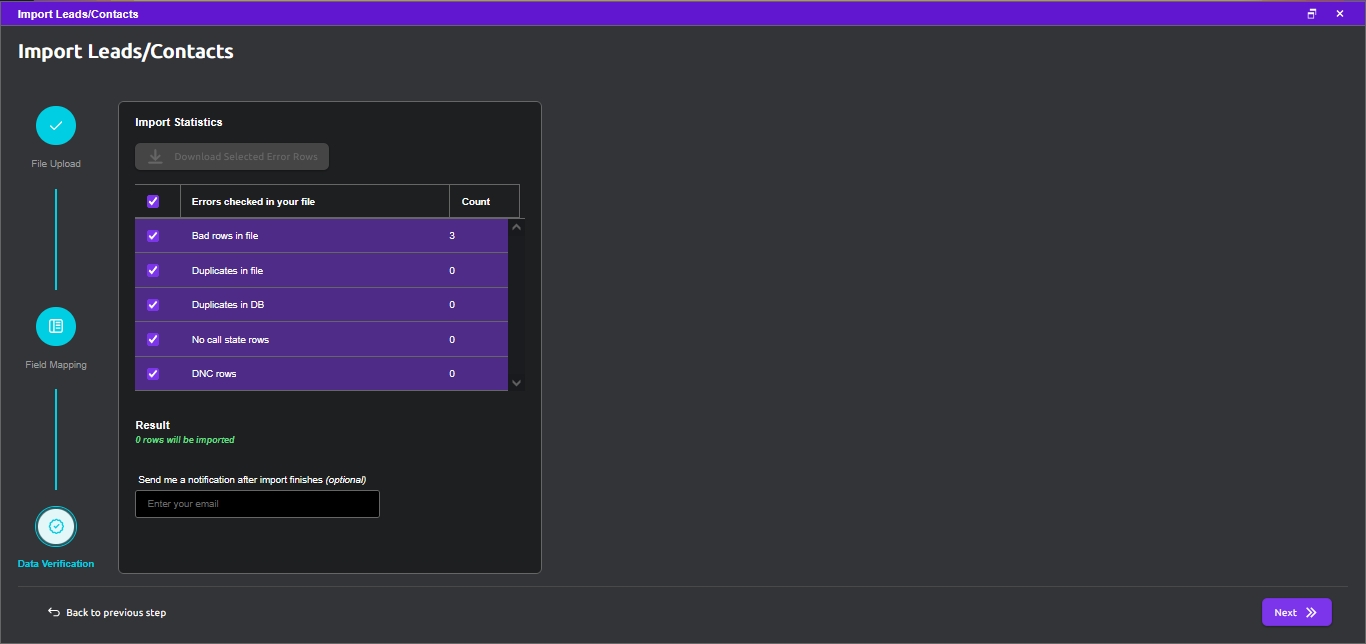
You may select to import, or not, records that have been flagged. This is done through the following checkboxes: Bad Rows in File, Duplicates in File, Duplicates in DB, No call states rows, and DNC rows; you may click on Download Selected Error Rows to save these records into a file.
Next, either click on Back to adjust settings, or click on Import to proceed with the record import operation; the system then presents a message indicating the completion of the operation. Refer to the following picture.
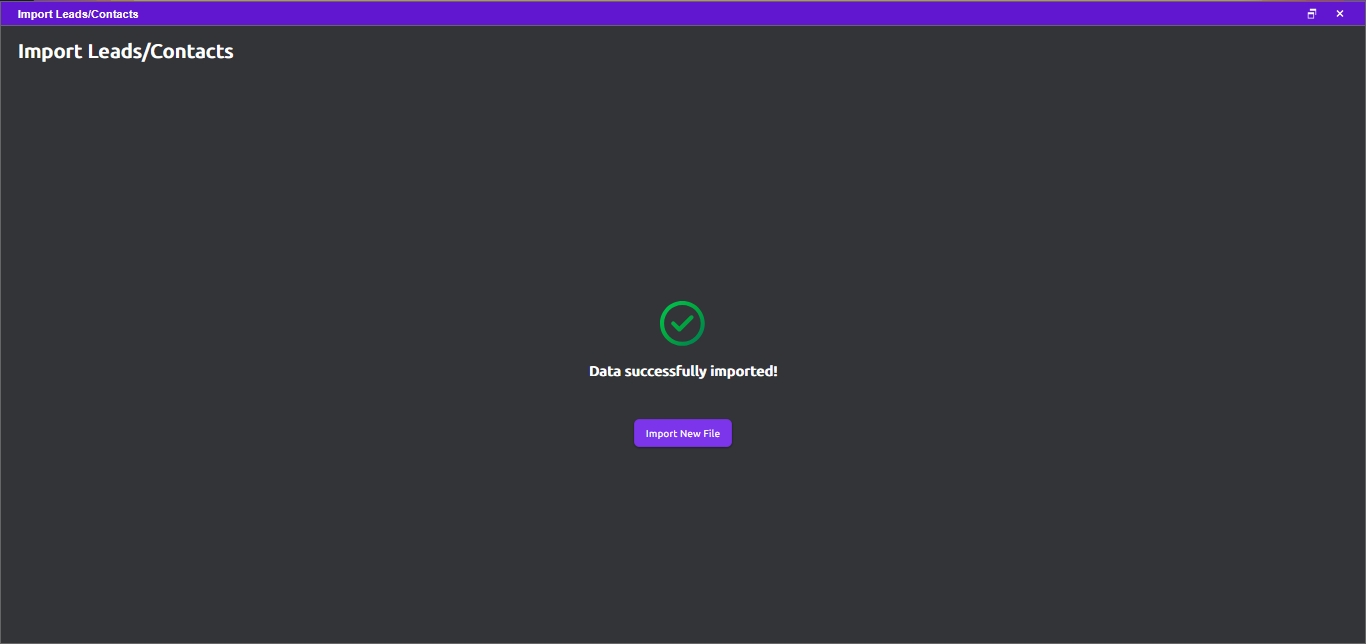
If instead an update operation was performed, the system will show the number of records to be updated. Refer to the following pictures.
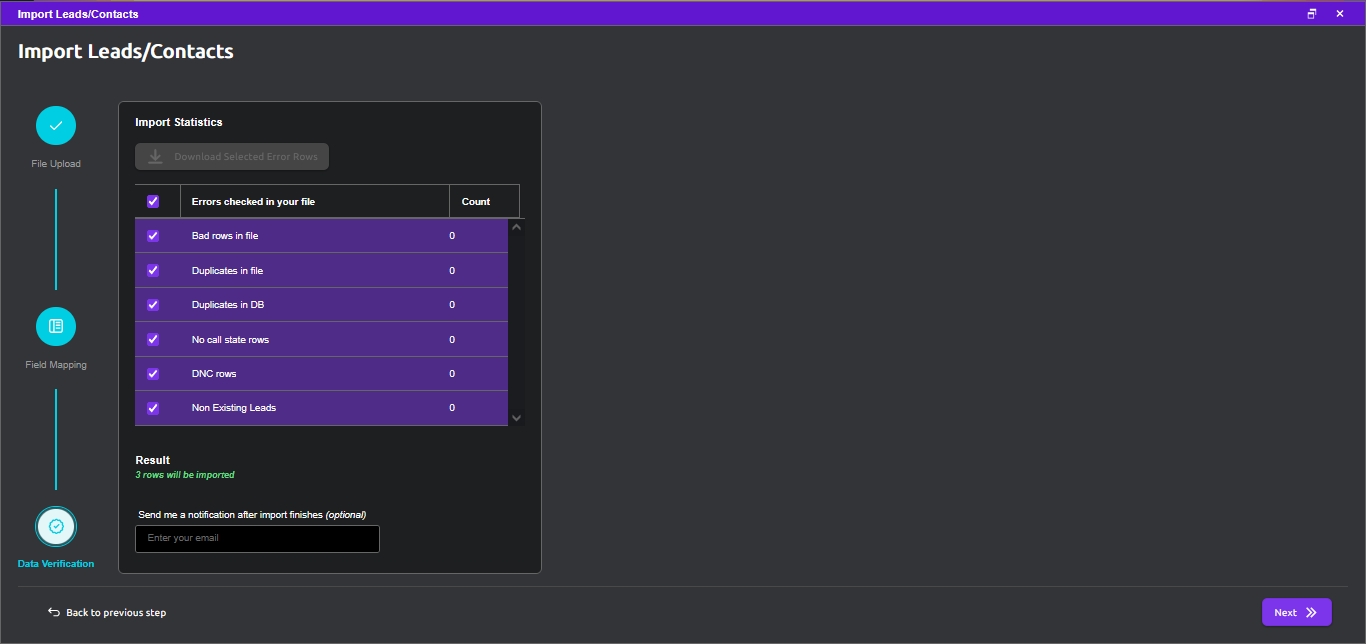
The DialedIn CCaaS system can be used to keep an internal list of Do-Not-Call (DNC) telephone numbers, and this list can be populated via an import operation.
The information can be imported from a simple, but properly formatted, comma-delimited file (of type CSV). The rules are simple:
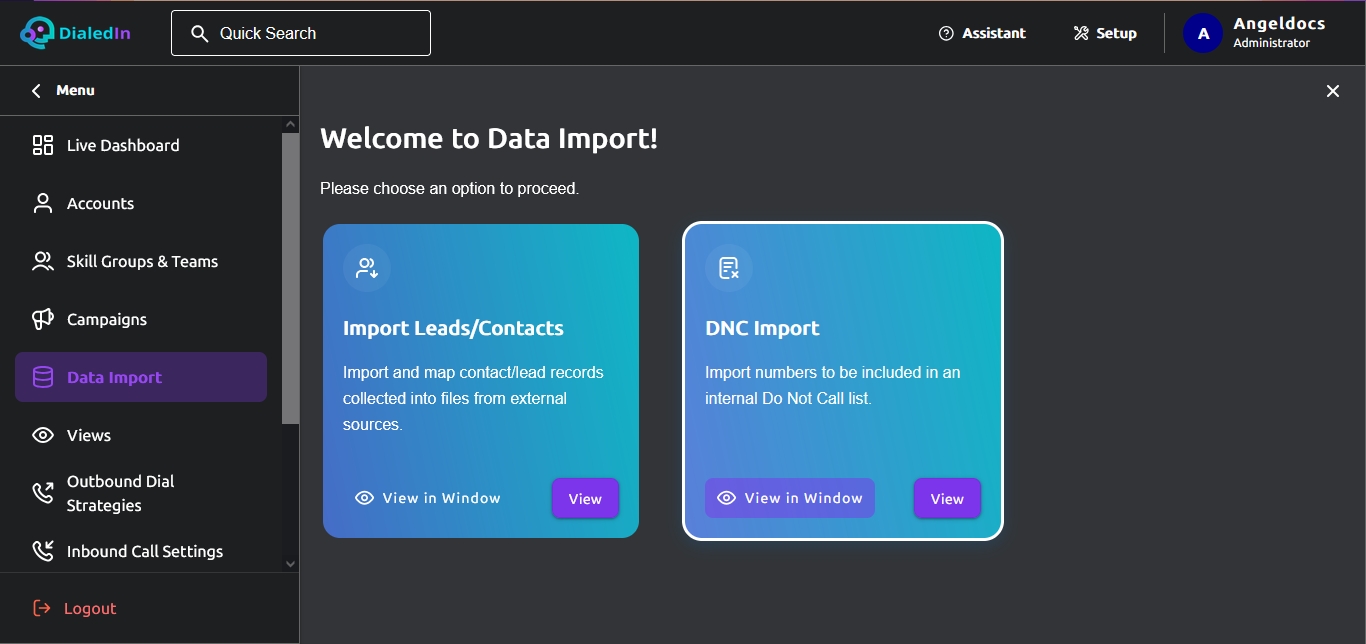
The steps to import a set of DNC records is as follows. Go to the main menu area on the left and click on Data Import. On the right, click View in the selection box for DNC Import. Refer to the following picture.
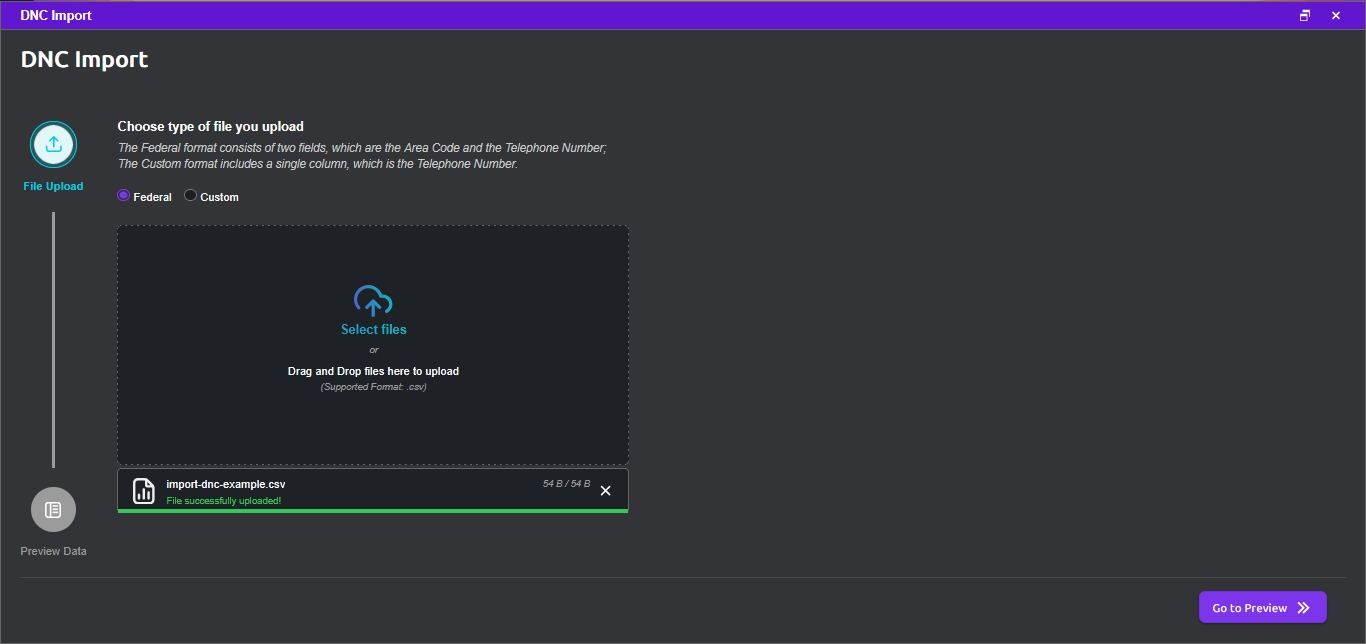
Click on Select Files, or drag and drop one, and proceed to select your file. Befpre you continue you need to indicate whether the data in the file follows the Federal (USA) format or the Custom format. Refer to the following picture.
The system will analyze and interpret its contents, and when you hit Preview it will display the results on the Preview Table area. Refer to the following picture.
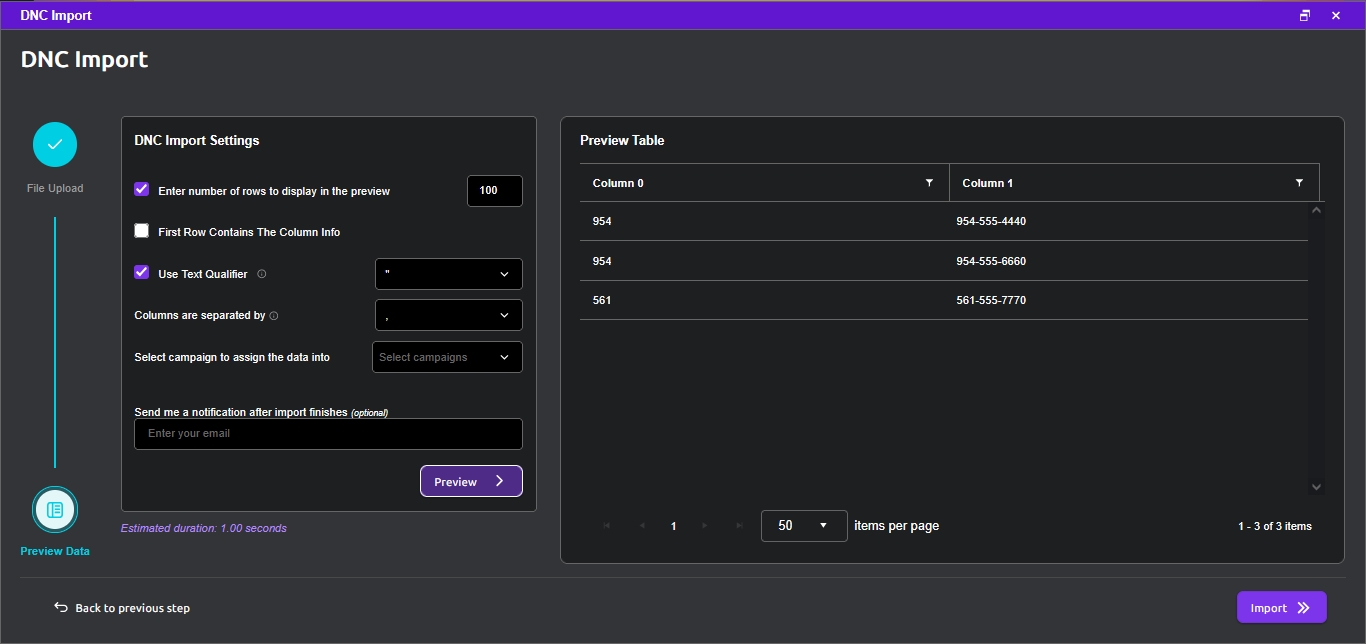
Once again, the most important option to consider in this part is the checkbox for First Row Contains The Column Info because it tells the system how to interpret the first row. Do note that, although a CSV file is usually opened with MS Excel, it actually is a text file of records (rows) containing comma-delimited fields. If a character within a field in a row could create confusion (e.g. a comma), a Text Qualifier can be used (e.g. double-quotes).
After you review the results, you may click on Import and wait for a success confirmation.
As we have discussed, the DialedIn CCaaS system revolves around Contact information, which is stored as Contact records in the database. We first import this information through a comma-delimited (CSV) file, often as leads, and then the system appropriately updates each record every time there’s a corresponding activity (e.g. a call).
In order to access this information, DialedIn CCaaS provides a search tool named Views, which we discuss here.
To access it, go to the main menu area on the left and click on Views; you will be presented with the standard search panel and options. You can either perform a standard Search or proceed to an Advanced Search. Refer to the following picture.
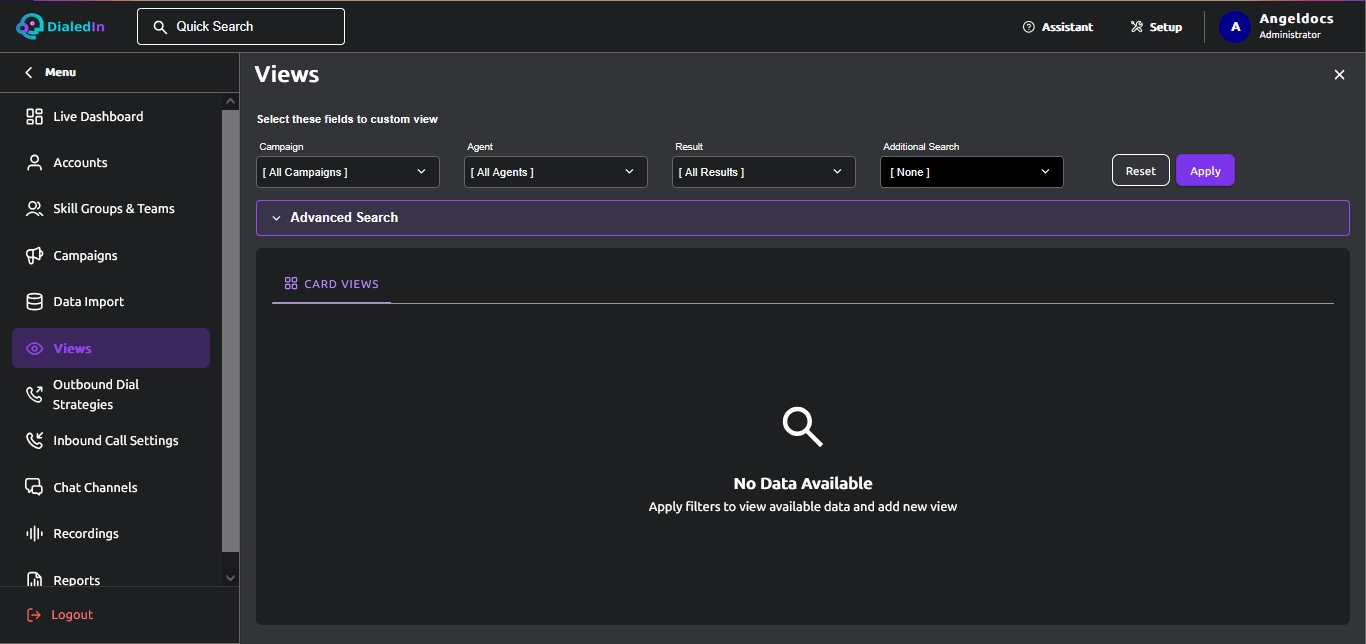
A standard search is a quick way to search Contact records based on common filters; certainly, you could not include any filters and get back the whole database, but that’s not recommended for obvious reasons. Refer to the following picture.
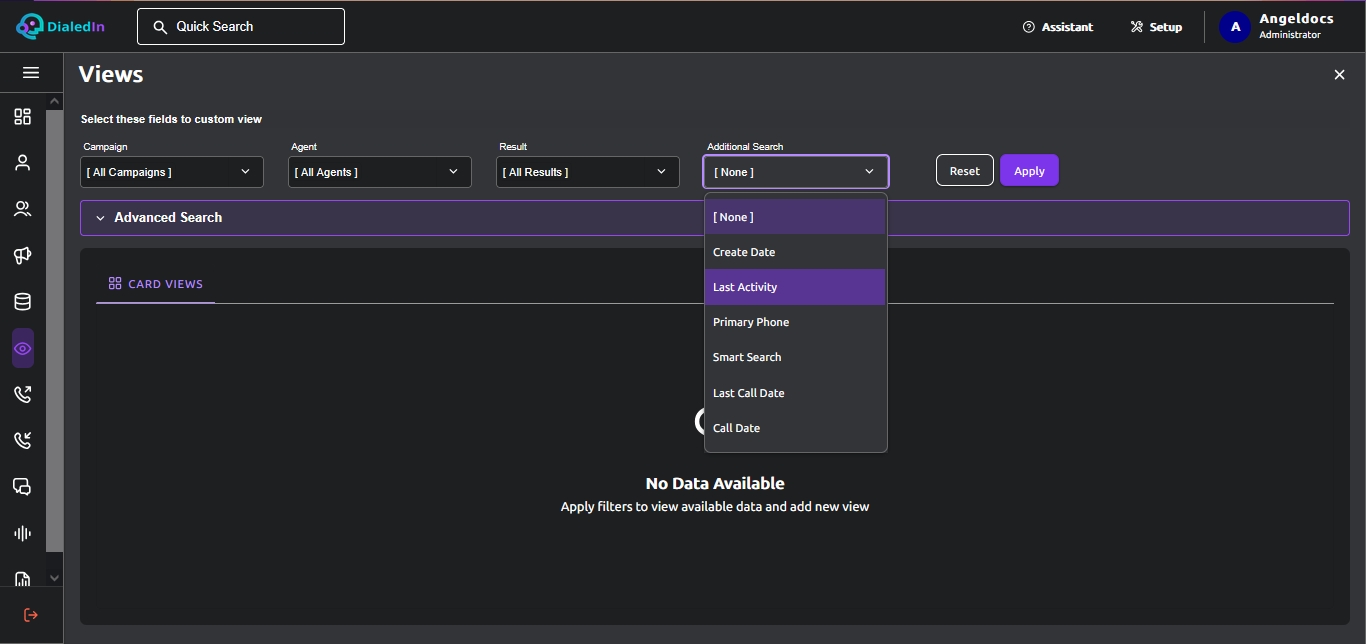
The following filter options are presented when you first access the Views panel, allowing you to select one or more as described in the following table.
| Campaigns | Pull-down menu to select one or more Campaigns so only Contact records from those campaigns are searched; by default, All Campaigns is selected. |
|---|---|
| Agents | Pull-down menu to select one or more Agents so only Contact records that have last been dispositioned by those agents are searched; by default, All Agents is selected. |
| Results | Pull-down menu to select one or more System Dispositions or Wrap-up Codes so only Contact records that were dispositioned with them are searched; by default, All Results is selected. |
| Additional Search | Pull-down menu to use additional criteria for Contact record search filtering; by default, it is set to None; a selection brings up additional elements to define corresponding search values; most of these Additional Search options are types of date ranges, but not all; they are: Create Date, Last Activity, Primary Phone, Smart Search, Last Call Date, and Call Date. |
If the Additional Search option selected is a date range (Create Date, Last Activity, Last Call Date, and Call Date), two new entry fields are presented in order to select the start-date and end-date (i.e. date range) to satisfy the search criteria.
If the Additional Search option selected is Primary Phone, a new input field is presented in order to specify a telephone number; the search will look into the system-provided PrimaryPhone field for any record that matches the value provided.
If the Additional Search option selected is Smart Search, a new input field is presented in order to enter a value that will be used as ‘keyword’; any indexable/searchable field will be looked upon for a match.
Refer to the following picture.
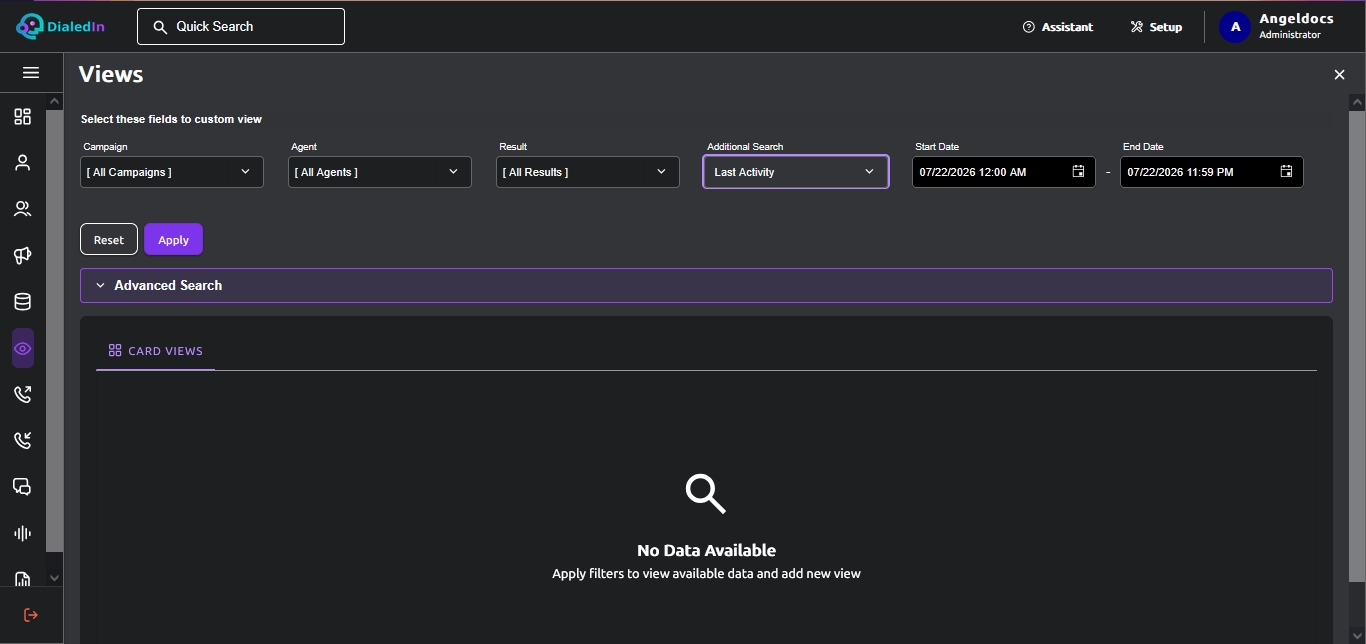
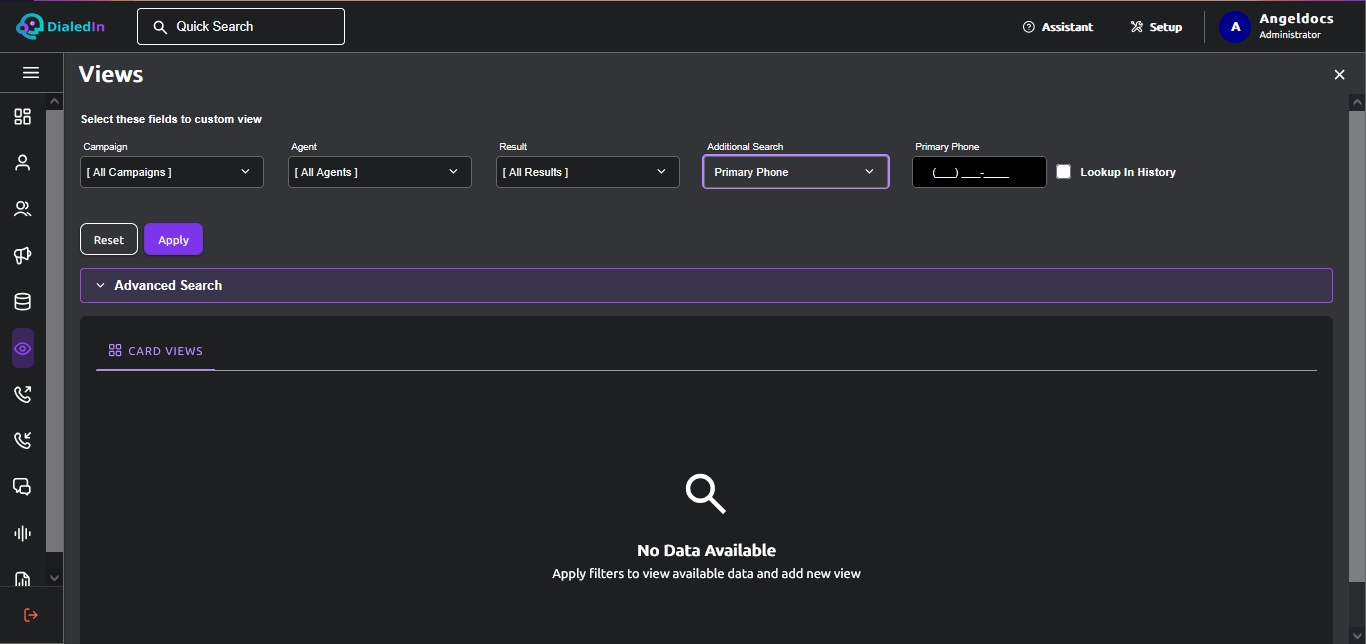
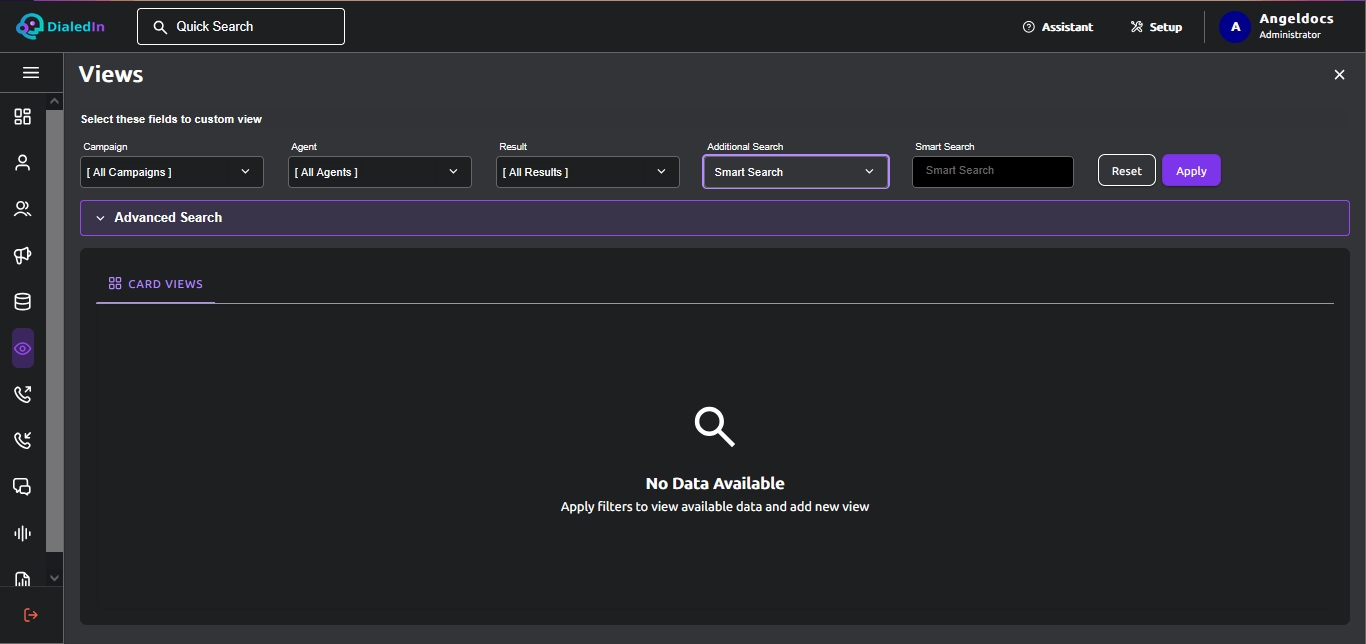
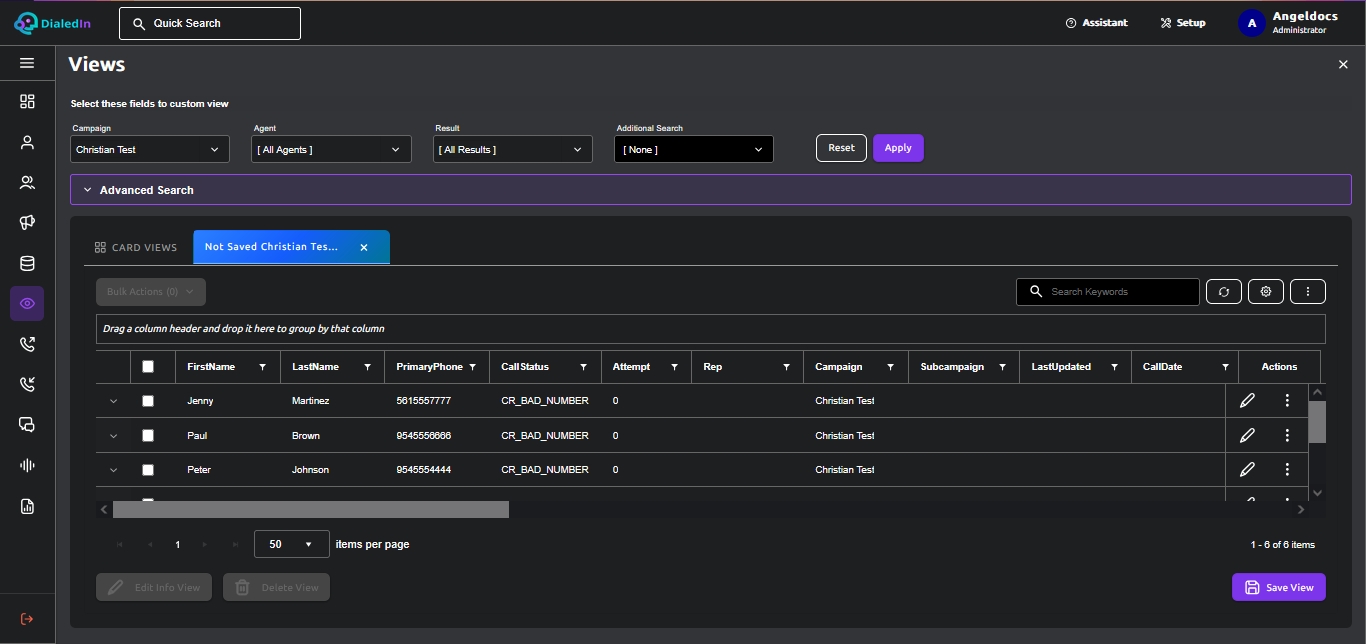
In any case, after specifying the search parameters and clicking on Apply, the search results are presented. Refer to the following picture.
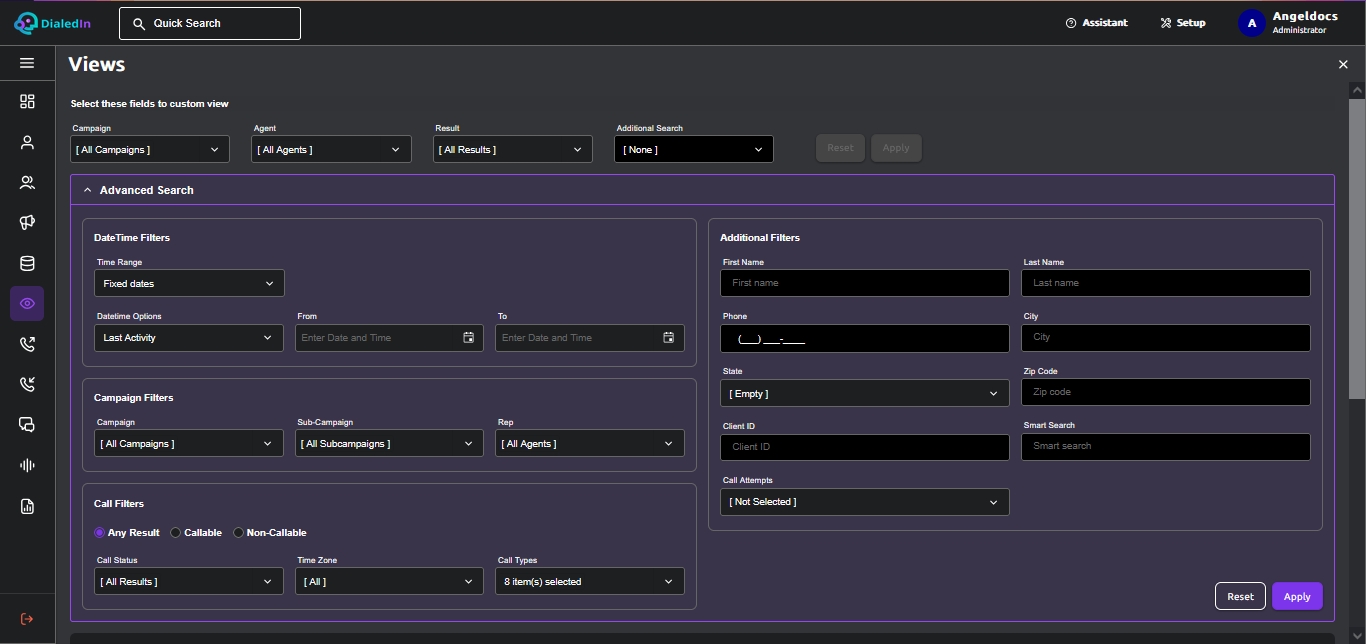
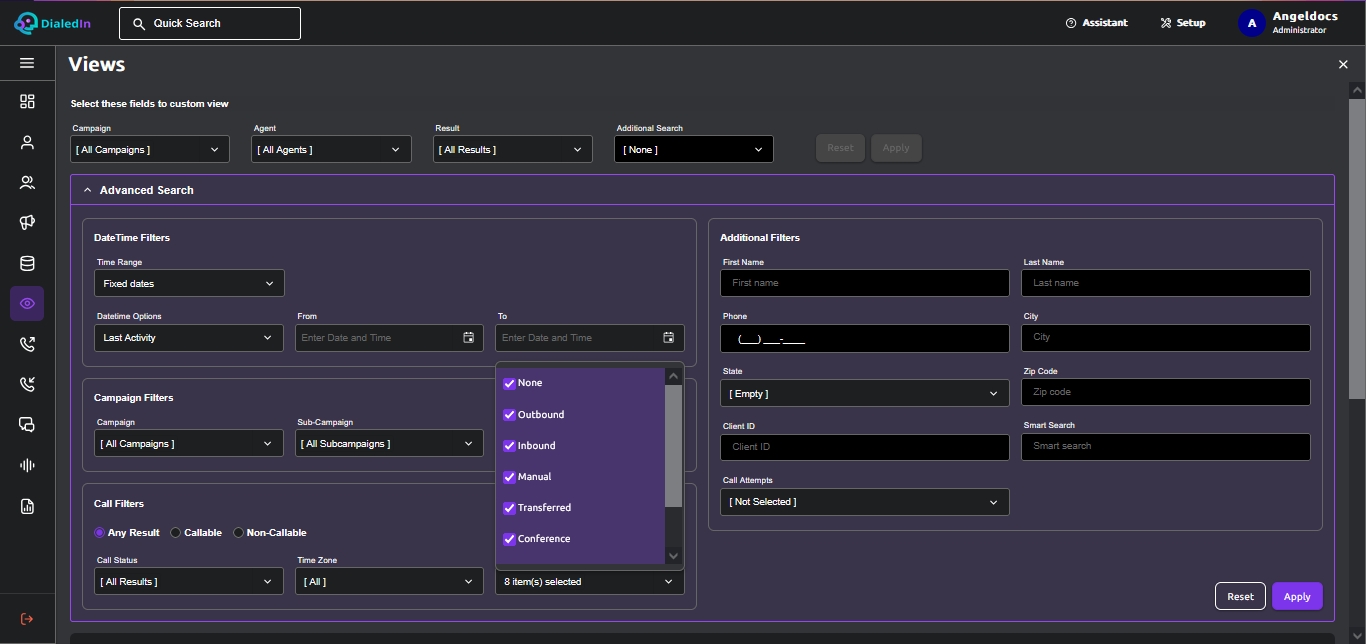
If instead we expand Advanced Search, the search parameters add a more complex set of options. Refer to the following picture.
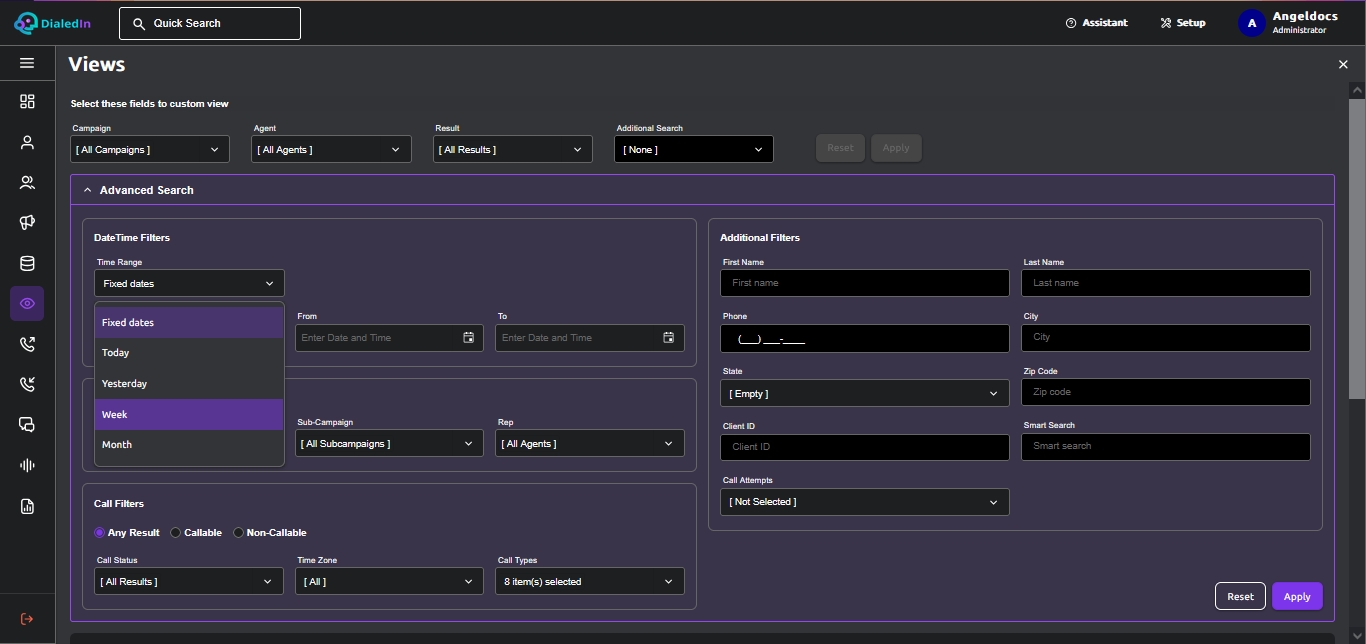
There many options and filters that you can use to focus your search; let's look at a few. For example, instead of using a specific date range (Fixed Dates) for Time Range, you could use date shortcuts in that menu for Today, Yesterday, the last Week, or the last Month; the date fields are disabled when selecting one of these shortcuts. Refer to the following picture.
Just like with dates, it also provides shortcuts via radio buttons to only show Call Status of types other than Any Result : Callable and Non-Callable.
The Additional Filters part of Advanced Search area can also be used to search specific Contacts by specifying one or more of First name, Last name, Phone, City, State, Zip Code, or Client Id, which correspond to the FirstName, LastName, Phone, City, State, ZipCode, or ClientId system-provided fields.
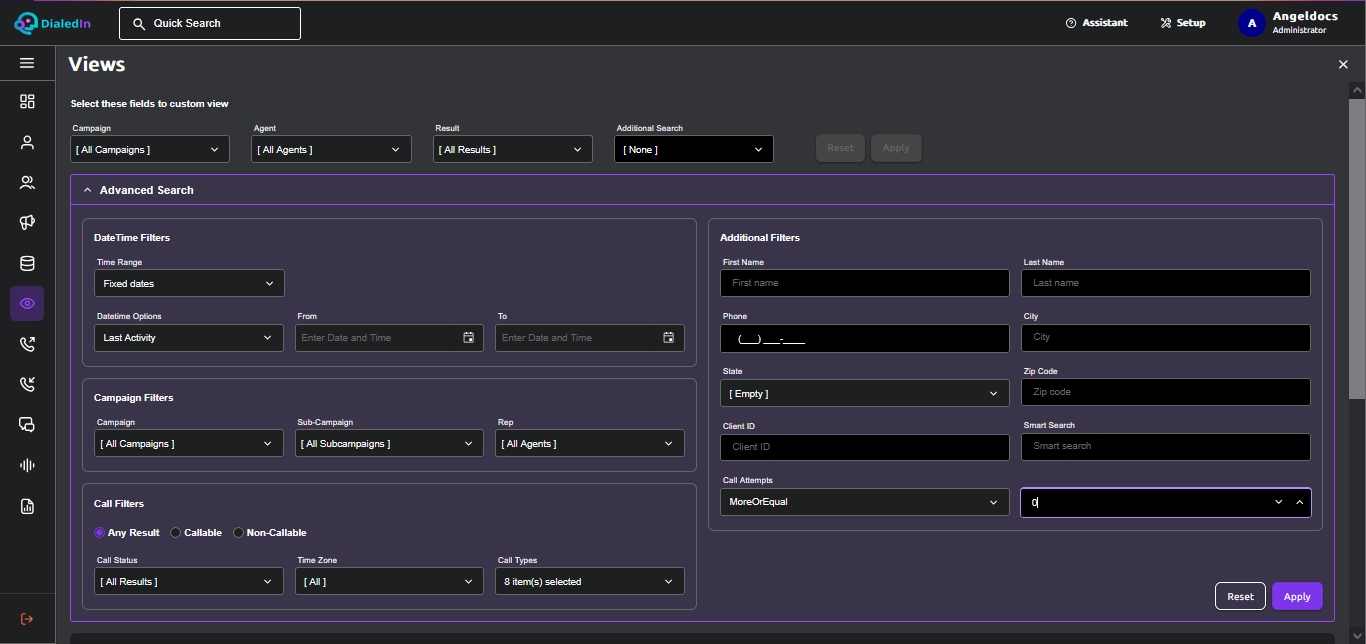
In Additional Filters,it’s also possible to filter the search based on the number of Call attempts; select a logical comparison option from the pull-down menu (default is Not Selected), and then enter a value in the box that appears next to it after selecting a comparison option. The logical comparison options are MoreOrEqual, LessOrEqual, and Between (non-inclusive).
Refer to the following picture.
Finally, in Call Filters you can ask for search results to only include specific Call Type, one or more selected from the pull-down menu; the options are None, Outbound, Inbound, Manual, Transferred, Conference, Progressive, and TextMessage, and they refer to the last call type of the corresponding Contact.
Being voice calls a key aspect of the DialedIn CCaaS solution, it is important to a access audio recordings; this is facilitated by the Recordings module.
The Recordings module allows you to play back recordings, save recordings, rate recordings (5-star rating system), and add notes to a recording (for agents to view).
To access it, go to the main menu area on the left and click on Recordings. The recordings panel will be displayed, with multiple options for filtering and for directing a search, which is highly recommended due to the potential large number of recordings available.
The top row provides context filters for Campaigns, Agents (Reps), Call Status (disposition / wrap-up code), and a Phone number to search. Refer to the following picture.
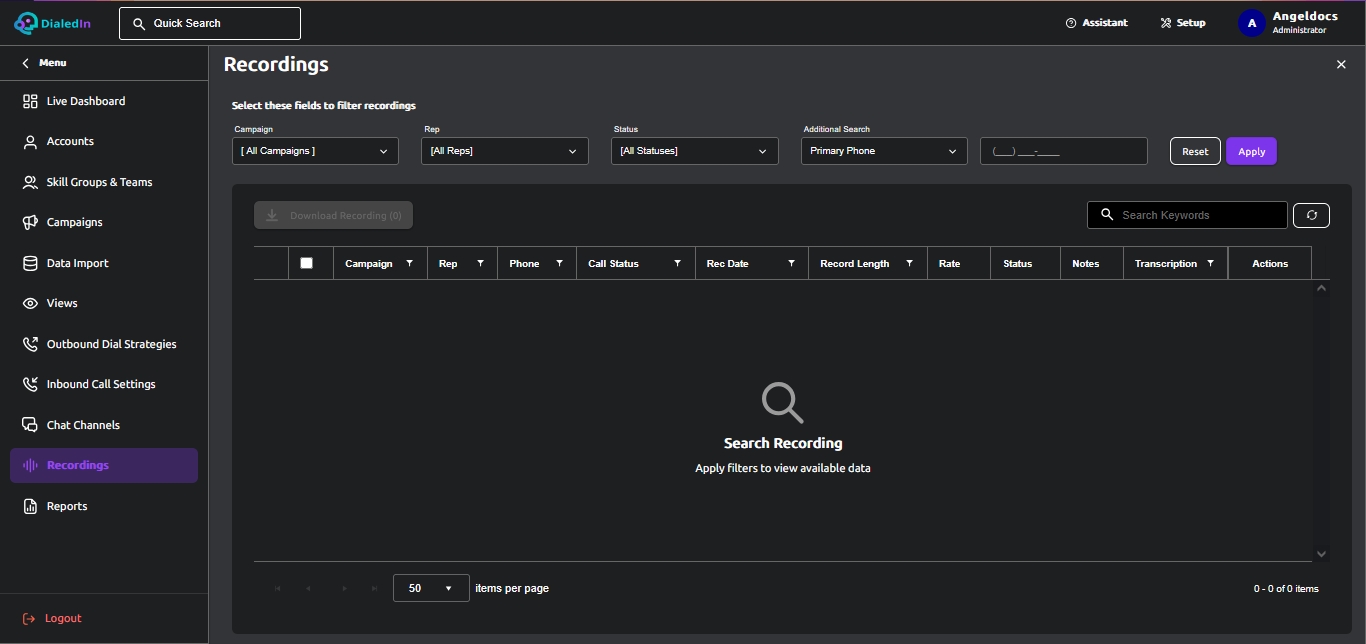
By default, the context filters are set to search everything (All Campaigns, All Reps, All Statuses); pull-down a corresponding menu to instead limit the search accordingly.
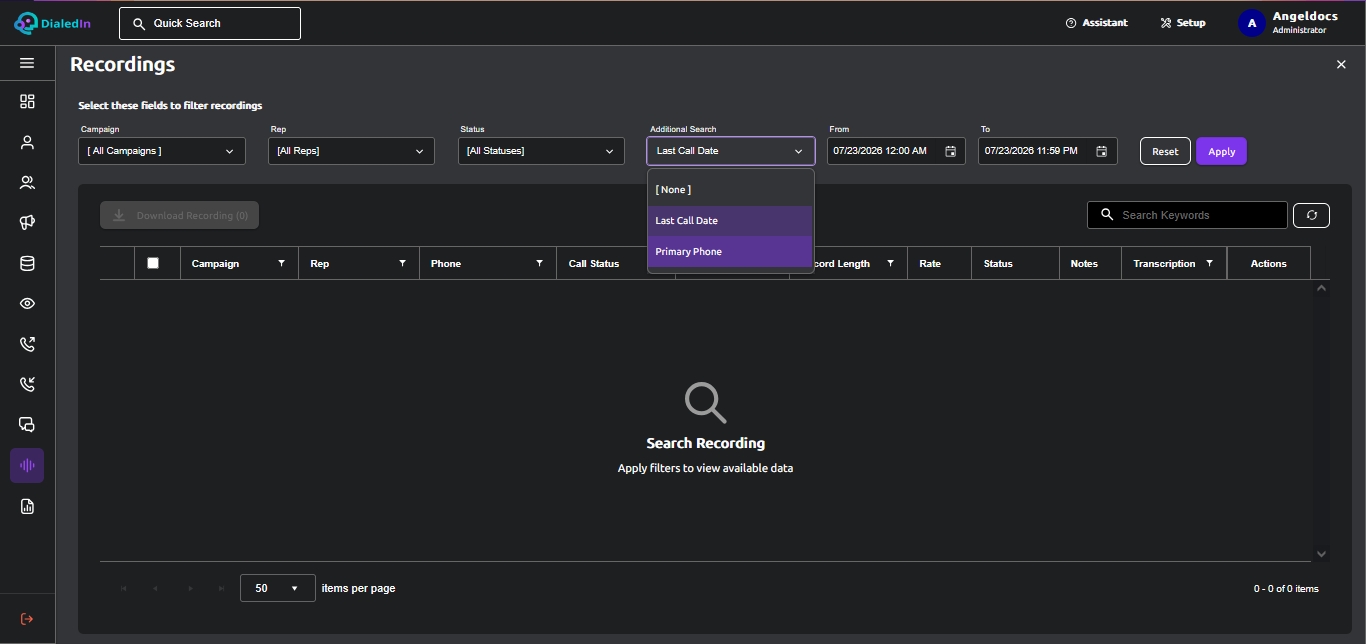
On top of filtering a search, we can search for specific recordings based on a telephone number (PrimaryPhone field) or last call date (CallDate field). This is done through a pull-down menu, which allows you to select Primary Phone or Last Call Date; if you select Primary Phone, the field to the right allows you to enter a telephone number; if you select Last Call Date, two fields to the right are presented to select a date range. Refer to the following picture.
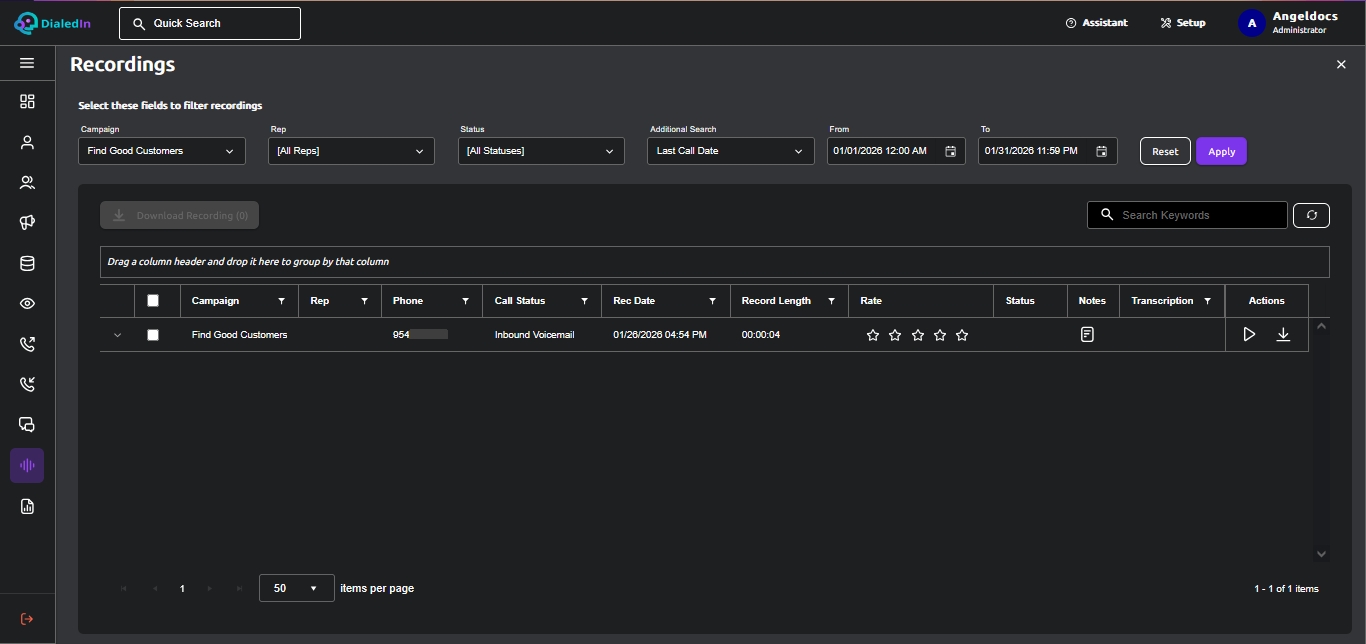
After selecting filter and search options, click on Apply; on the right side, a Record count will display the number of recordings satisfying the filter and search parameters; below, a list of all those recordings is presented.
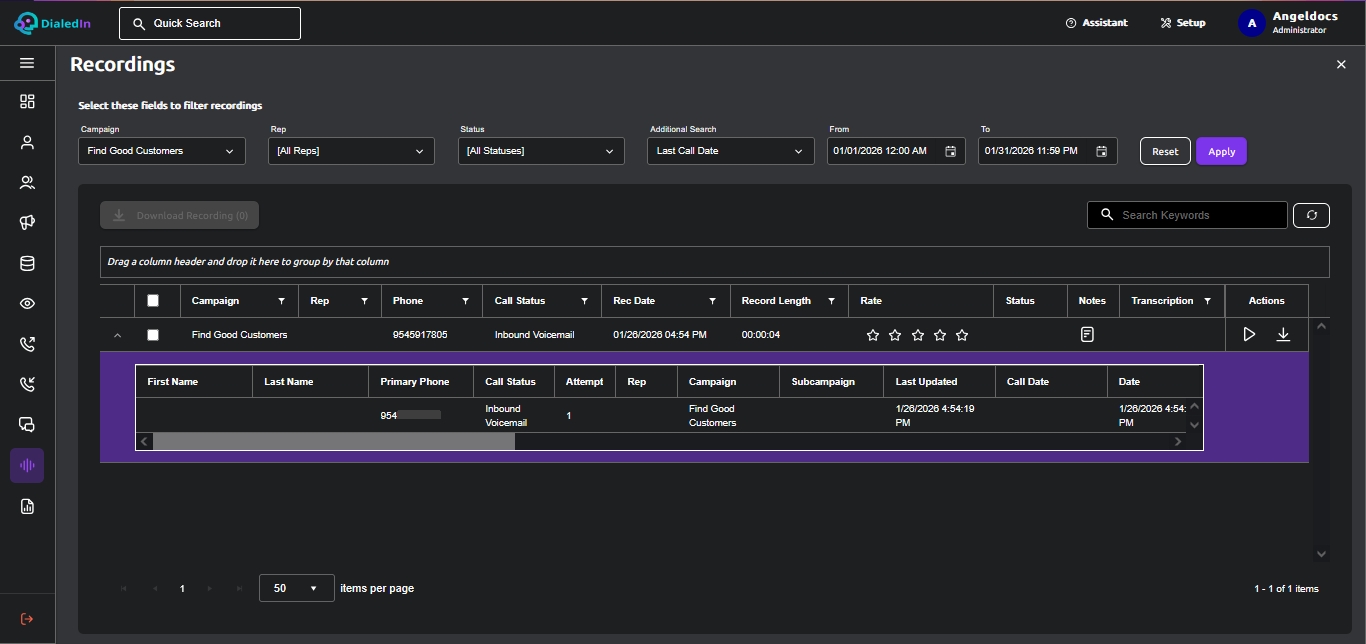
You can expand a row (recording) to show additional details, as well as using the Actions to Play Audio Record or Save Audio Record (download).
Refer to the following pictures.
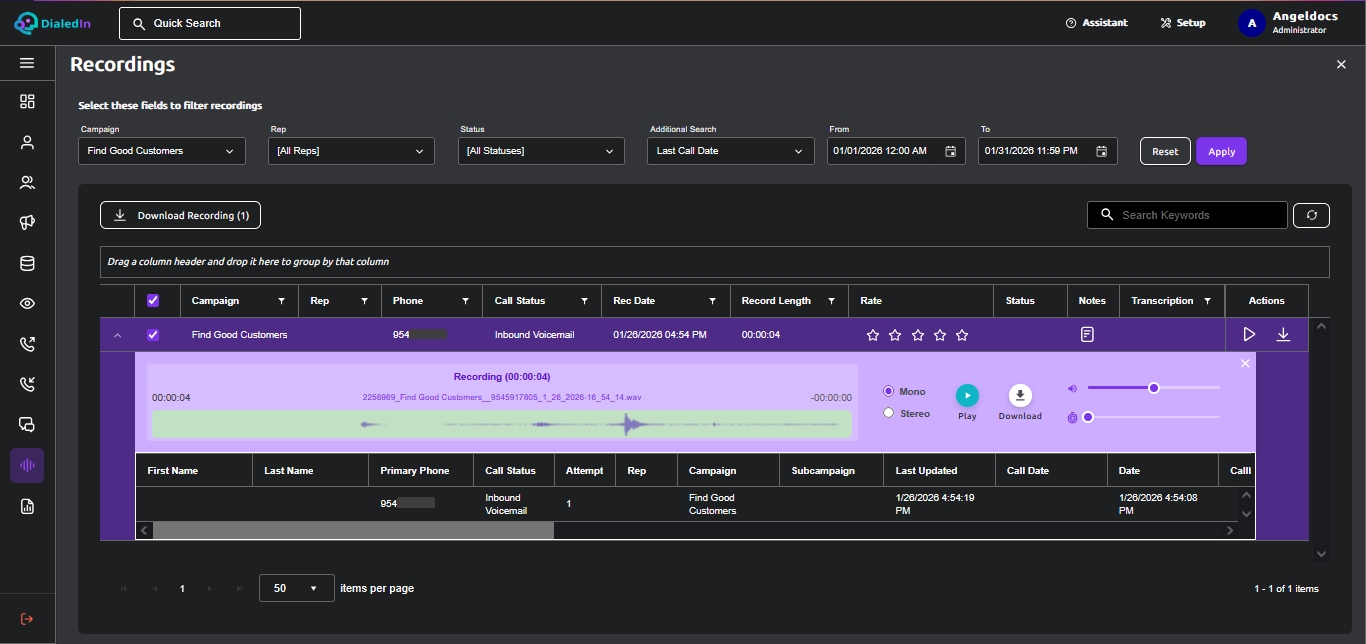
Selecting to Play the message will start an audio player and show corresponding controls, while selecting Save will open a dialog box to save the file externally. Refer to the following picture.
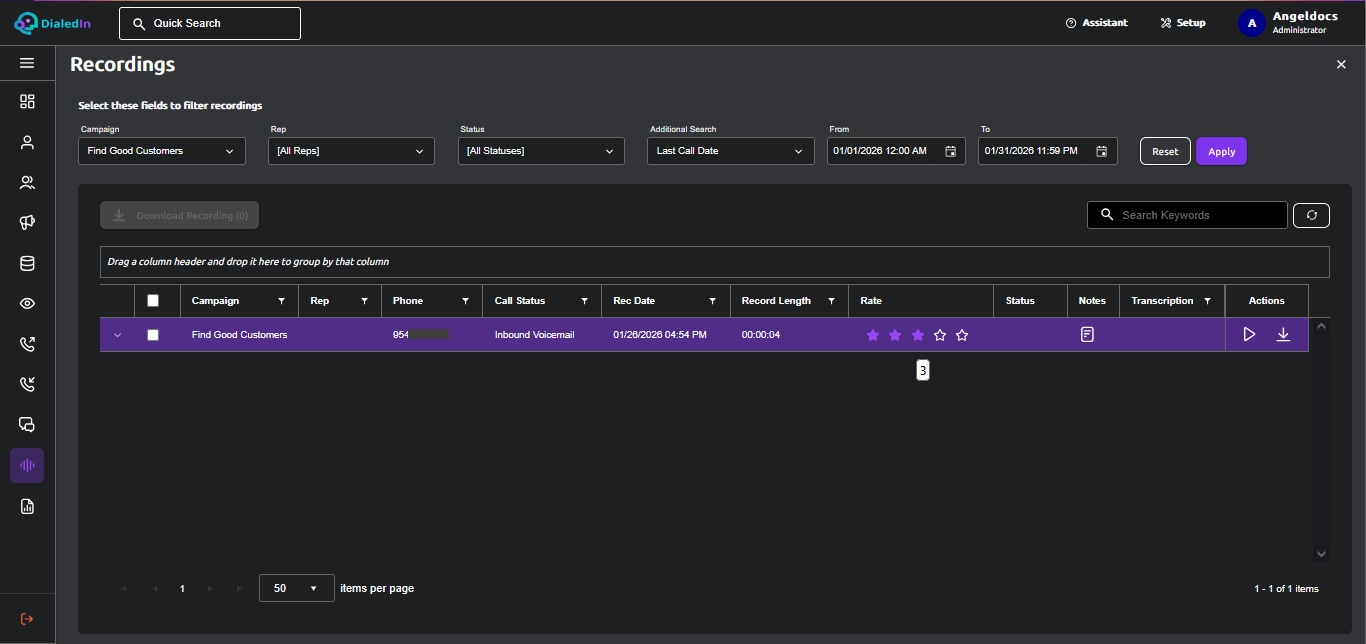
The Audio Recordings module also allows you to rate recordings using a 5-star system; this could be useful to let agents know of good, or not so good, call handling. Refer to the following picture.
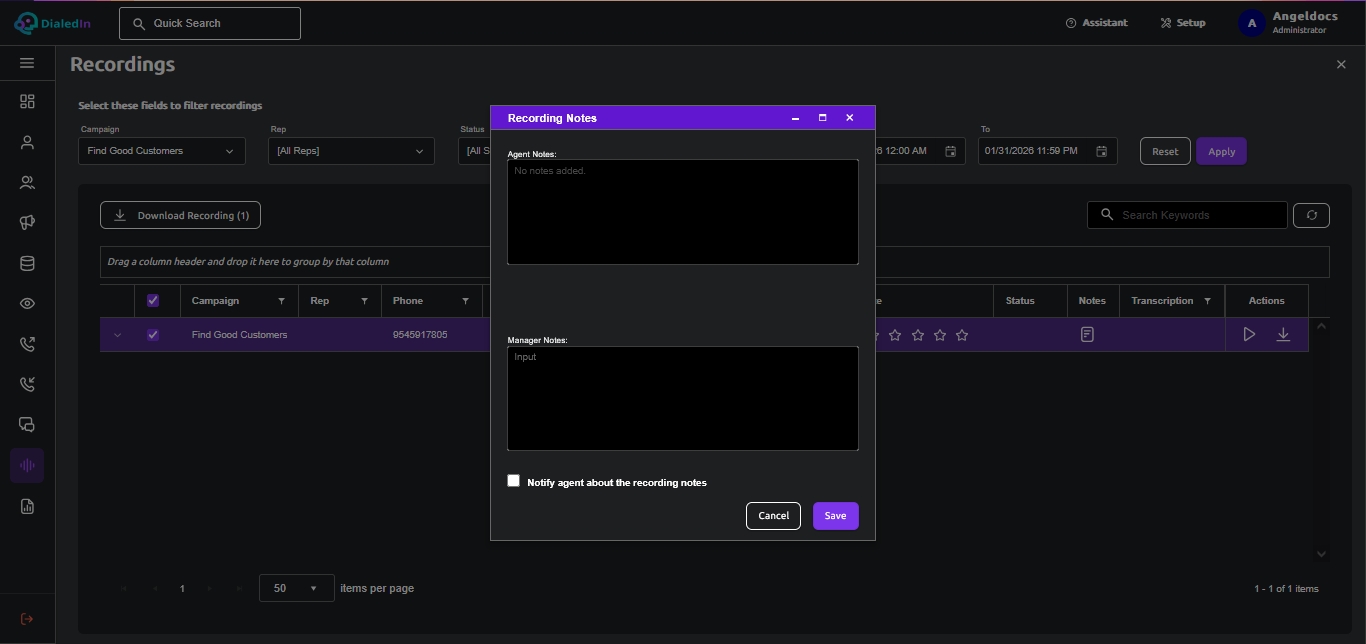
Hand in hand with rating a recording goes adding notes to it, which the ChaseData CCaaS solution allows you to do by clicking on the Note icon, which will pop up a window to enter your notes (Manager Notes); notice that Agent Notes are also shown, which could have been added by the Agent through the Agent Client app. Refer to the following picture.
In addition, the DialedIn CCaaS system includes the ability to enable, generate, and make available Transcriptions of Agents' Voicemail for Missed Inbound Calls. When enabled, corresponding voice messages are transcribed from voice to text for easy access and review.
You can also configure the DialedIn CCaaS system to send those VM Transcriptions to the corresponding Agents via SMS, which is enabled at the Skill level; refer to Agent Skills under Accounts. And the Agent must have a valid telephone number configured for SMS Notifications; refer to Agent Accounts.
Note that access to VM Transcriptions must be enabled by DialedIn (Group Settings).
When enabled, VM Transcriptions are available with Voice Recordings for Inbound Voicemail records. Refer to the following picture.
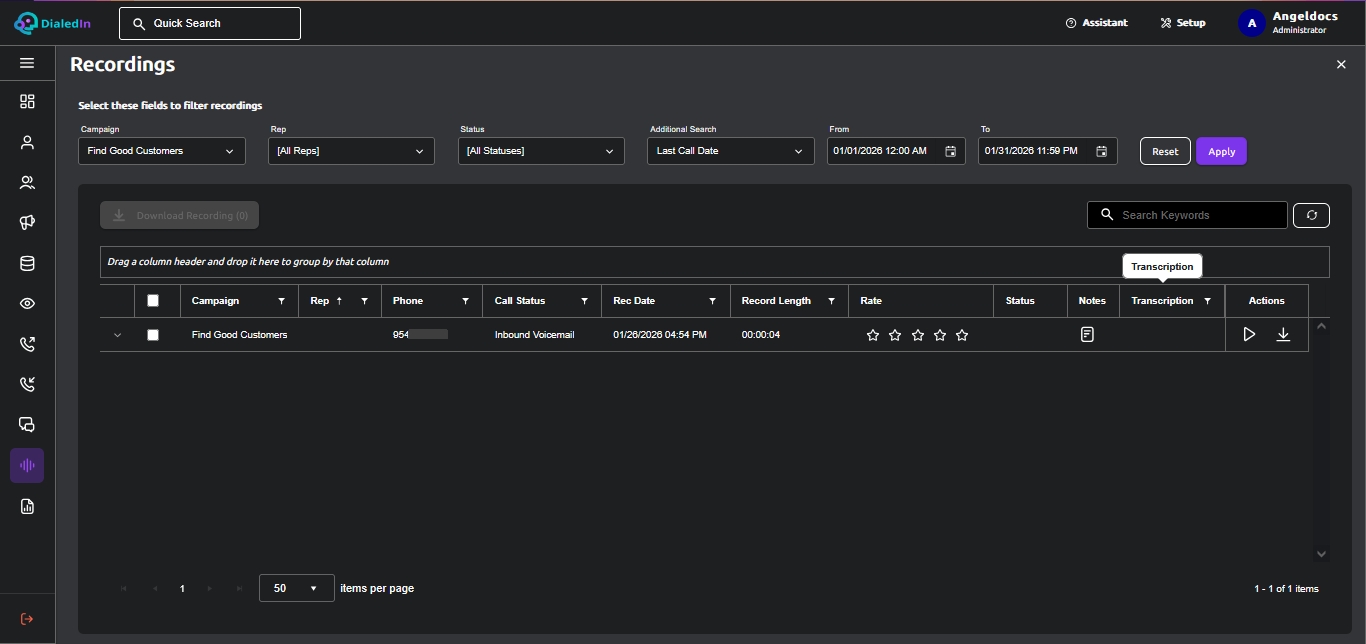
Clicking on the Transcription icon for an applicable Voice Recording pops up the Recording Transcription window with the text of the transcribed voice message.
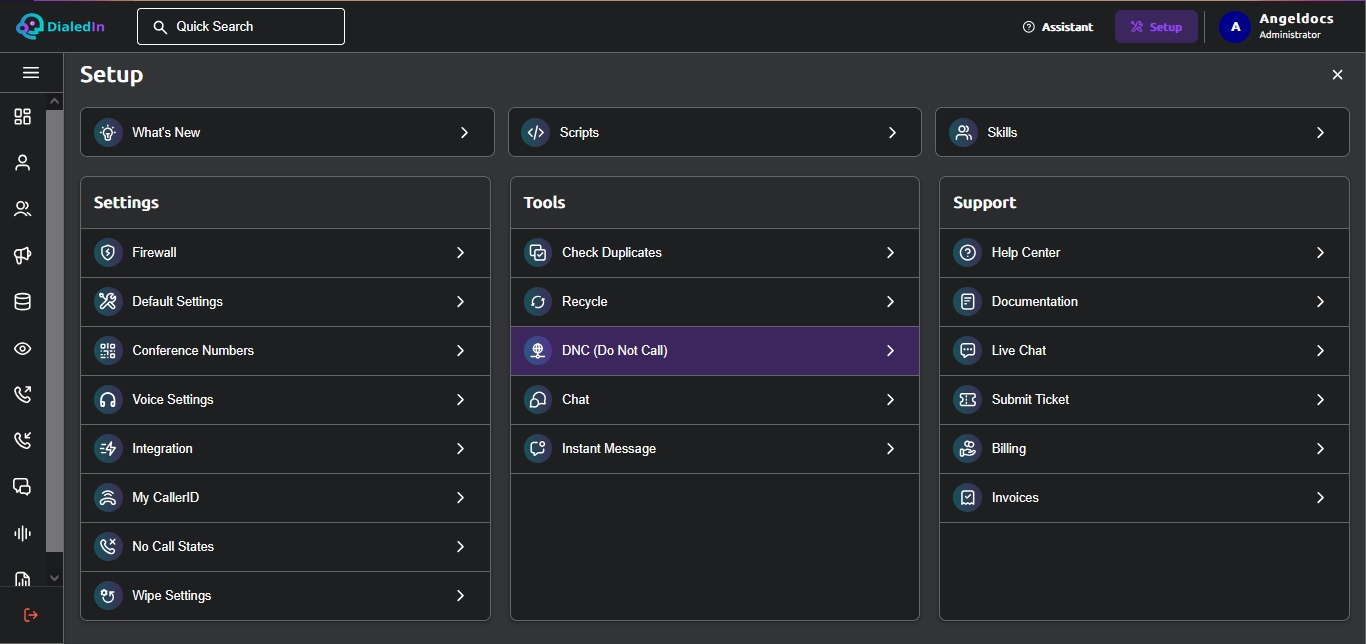
The DialedIn CCaaS solution allows maintaining an internal DNC (Do-Not-Call) database, and a tool to search telephone numbers in that database. To access the setup area, click on the Setup button on the right side of the top area of the GUI, which will disply the Setup menu. Find the Tools section and click on DNC (Do Not Call). Refer to the following picture.
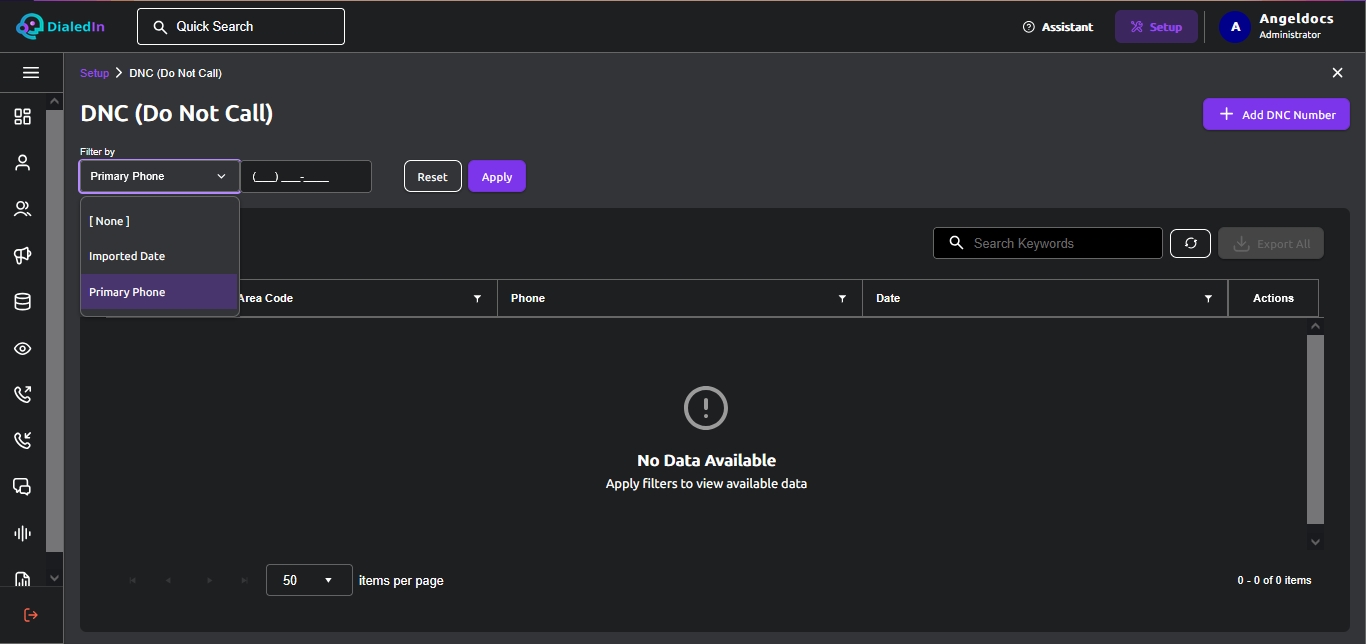
You can either search the entire internal DNC database, or just search for a particular telephone number; to do so, select Primary Phone from the pull-down menu, and enter the number in the input field next to it. Refer to the following picture.
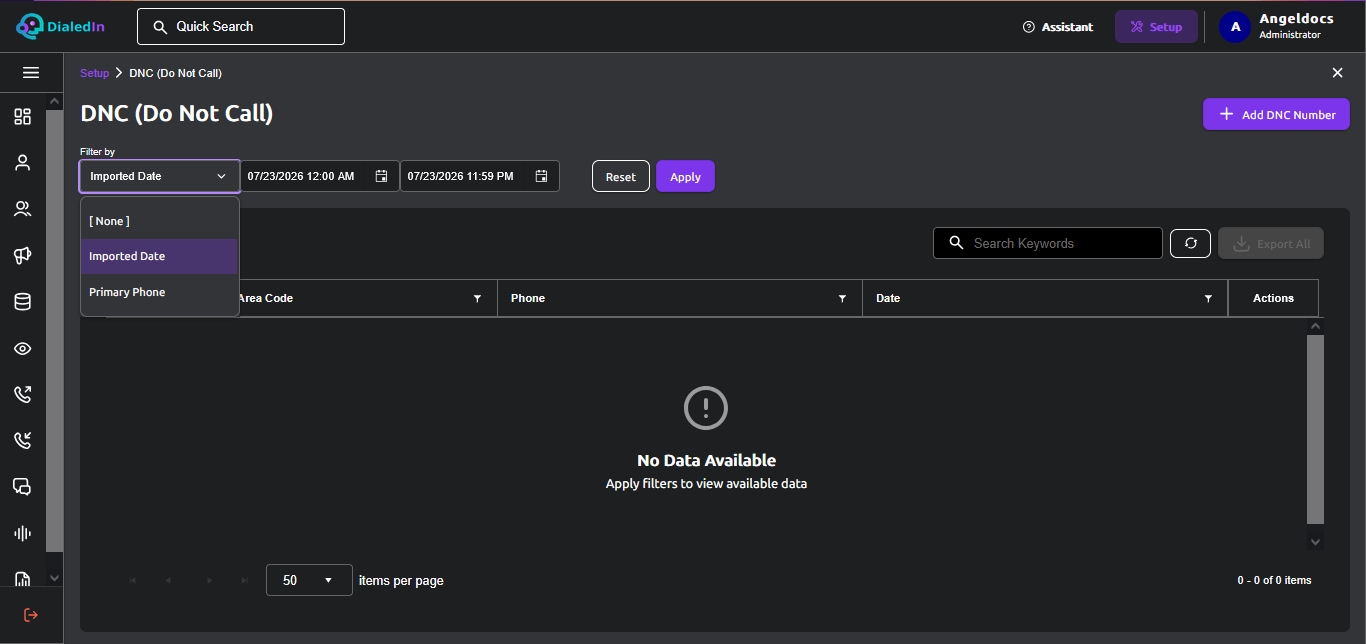
You could also search for telephone numbers inserted in a specific date range; to do so, select Imported Date from the pull-down menu, and enter the dates that define the range in the fields next to it. Refer to the following picture.
Several actions can be performed by clicking on a corresponding button or icon, as follows:
Refer to the following picture.
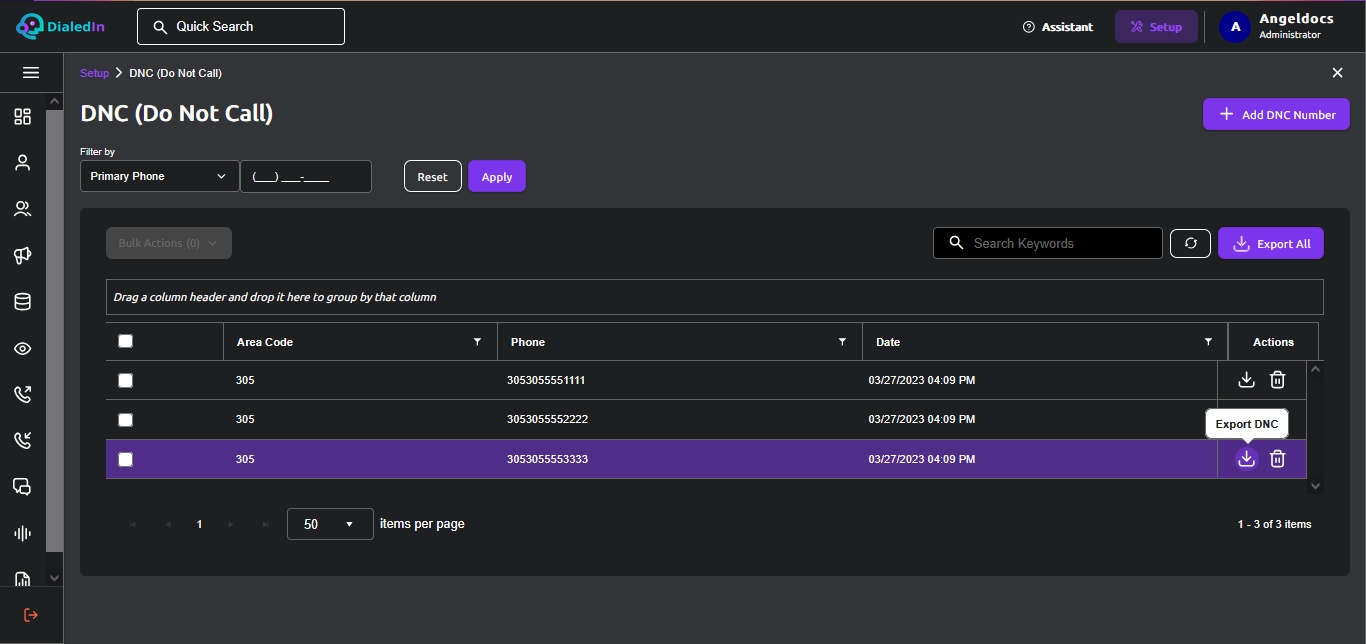
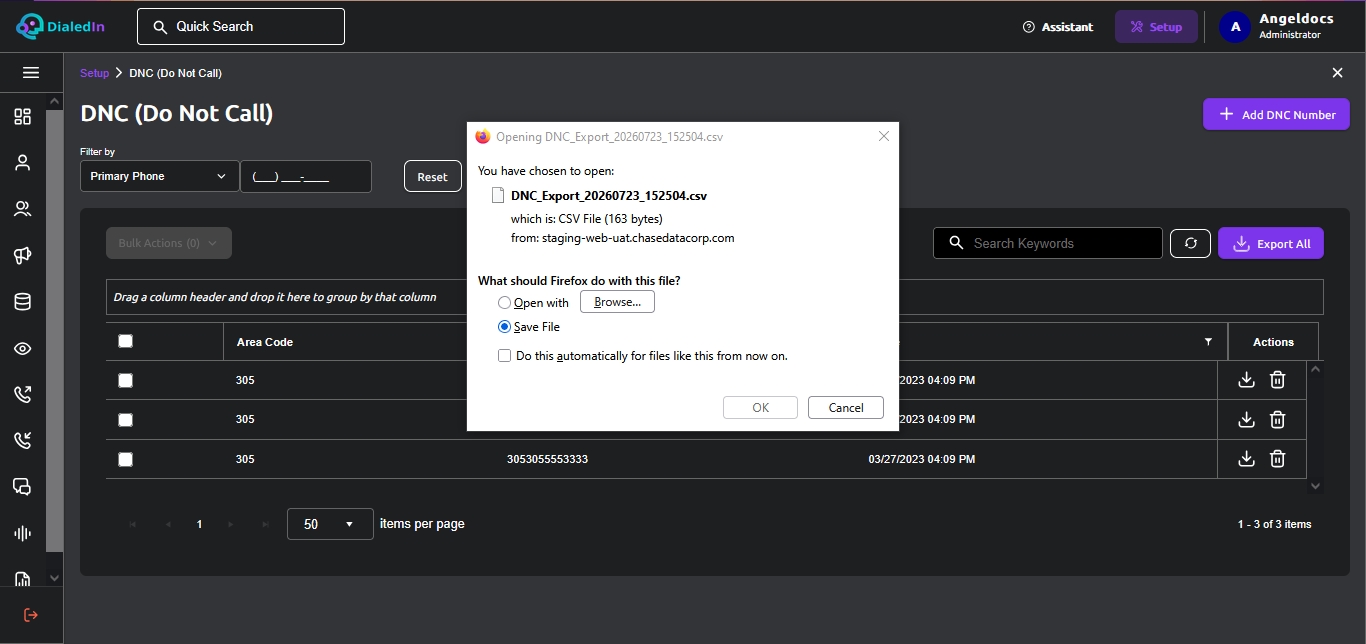
You can use Export All to export all numbers from the DNC list — all numbers in the DNC list will be considered, then follow the file dialog to export the numbers to CSV (comma-separated-values) file.. Refer to the following picture.
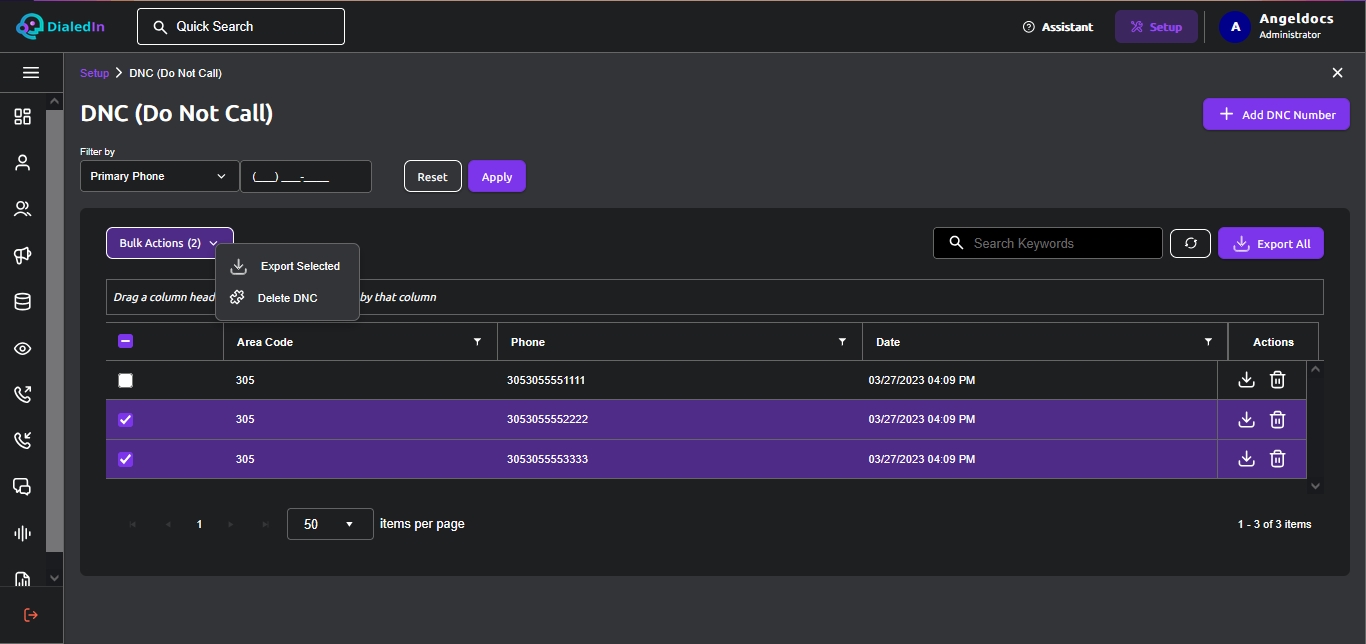
You can also select multiple rows and use Bulk Actions to either Export Selected or Delete DNC selected. Refer to the following picture.
Under certain circumstances, the system allows for creating duplicate records of telephone numbers (Contacts); for example, when duplicates are allowed with import operations, or when a Contact may be handled by multiple Campaigns.
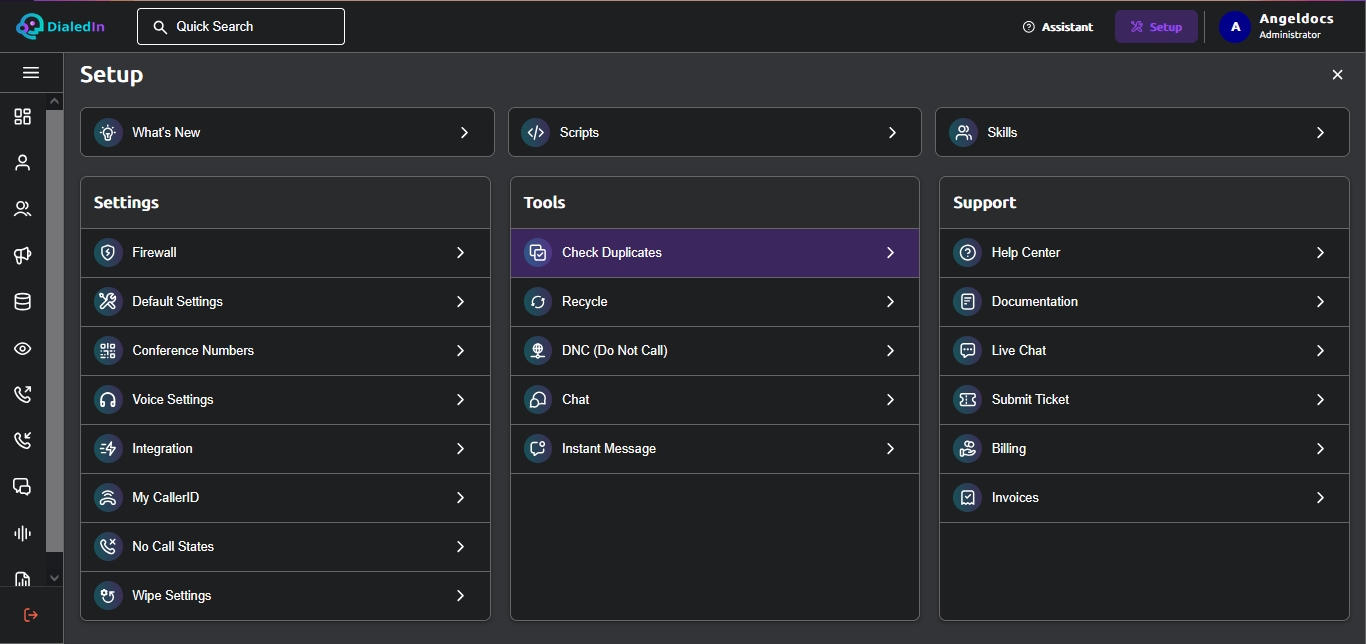
A tool is therefore provided to search and review duplicate Contact records. To access the setup area, click on the Setup button on the right side of the top area of the GUI, which will disply the Setup menu. Find the Tools section and click on Check Duplicates. This will display the basic search filter options, which includes Campaign, Agent, Result (disposition / wrap-up code). Refer to the following picture.
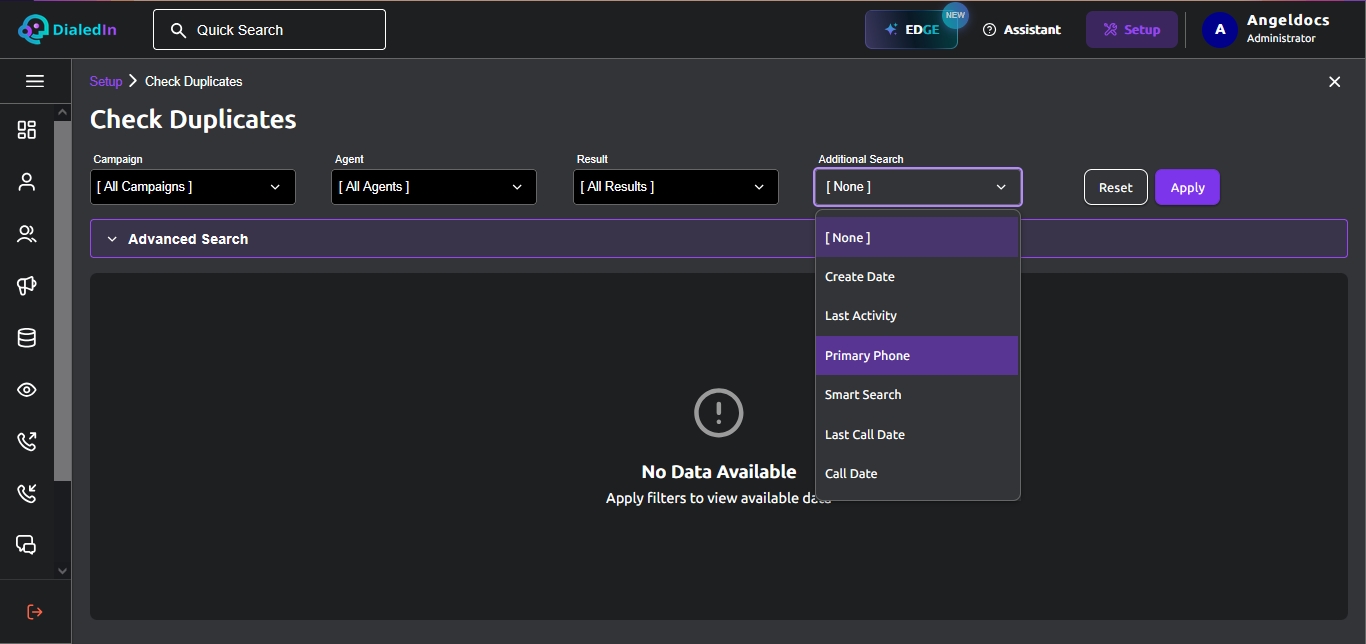
You could also add an additional search filter by expanding the Additional Search pull-down menu and select one of the following criteria: Create Date, Last Activity, Primary Phone, Smart Search, Last Call Date, Call Date. Additional selection fields are displayed to specify the corresponding filter values. Refer to the following picture.
Or, you could click on Advanced Search to specify a number of filter and search criteria. Refer to the following pictures.
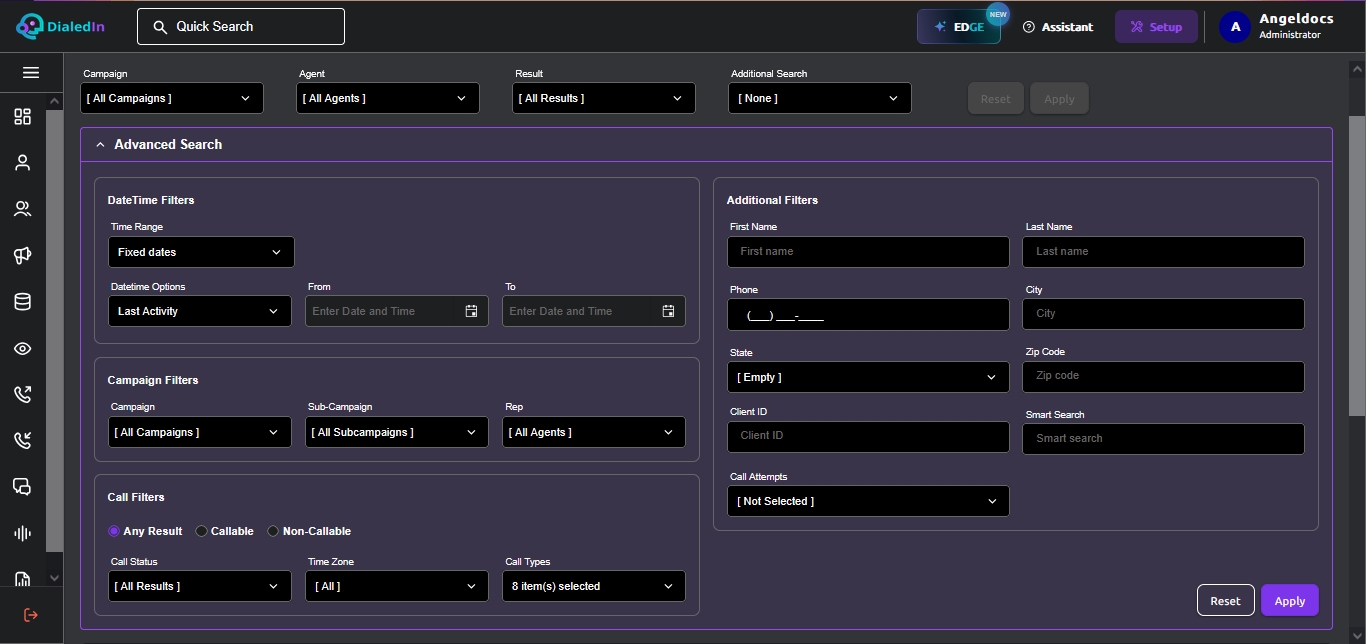
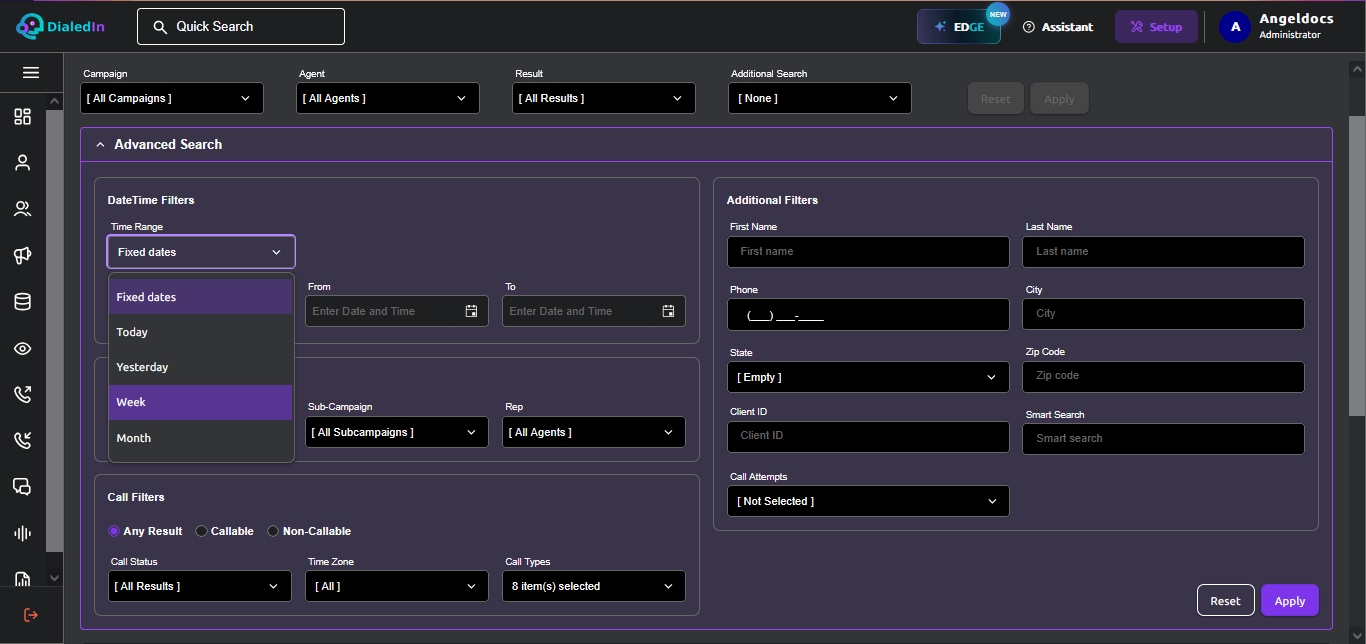
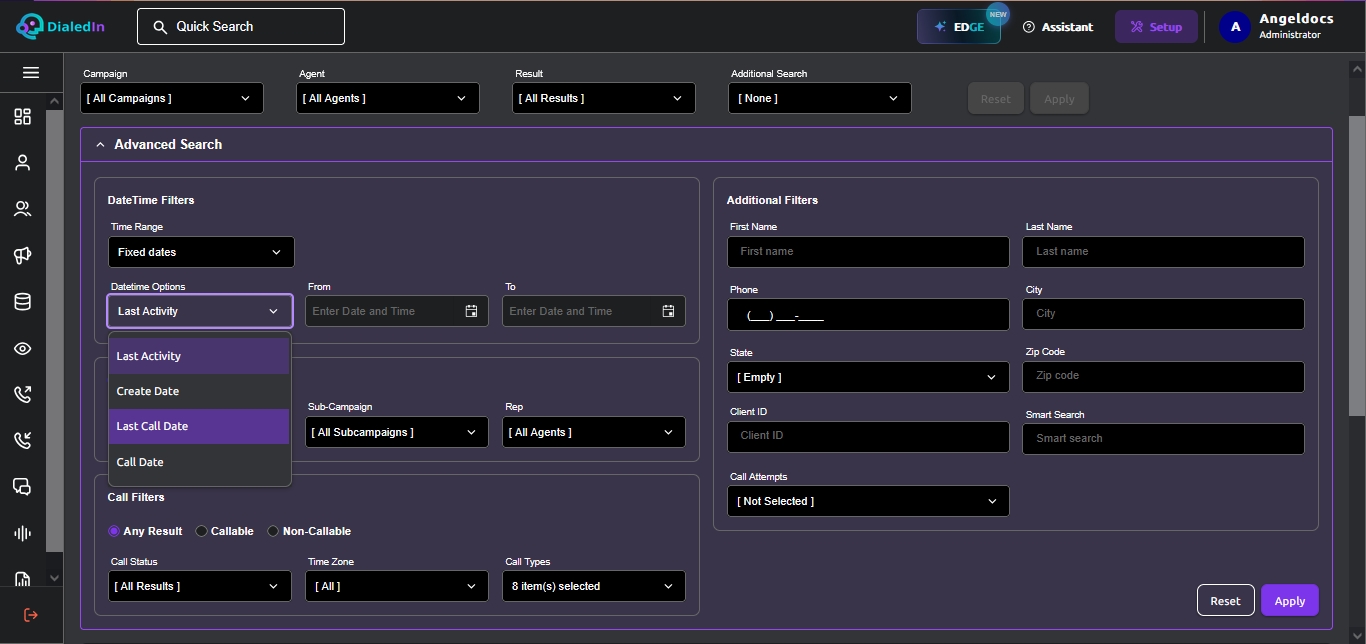
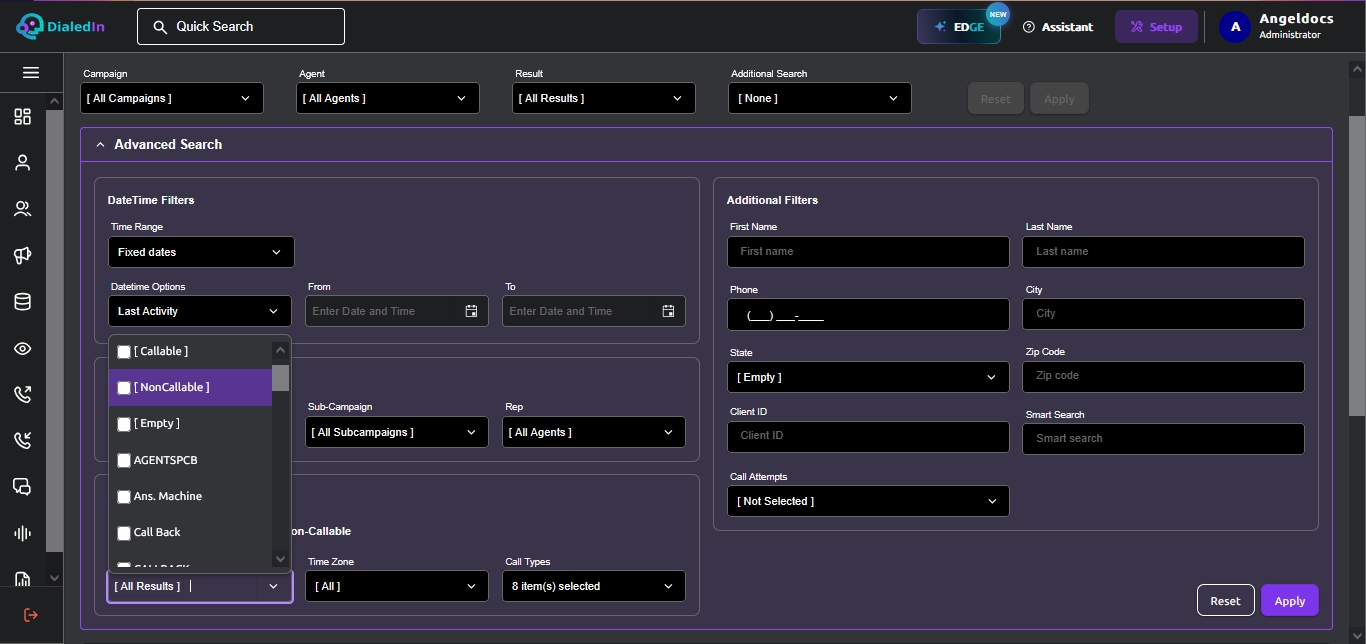
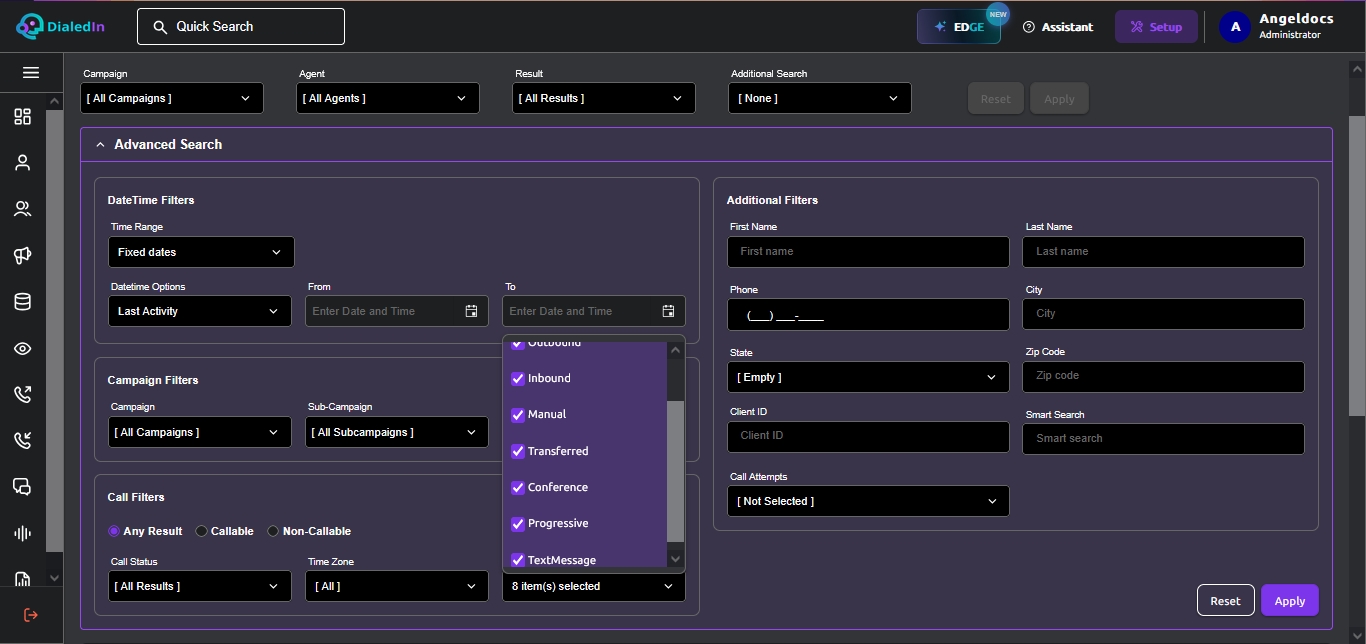
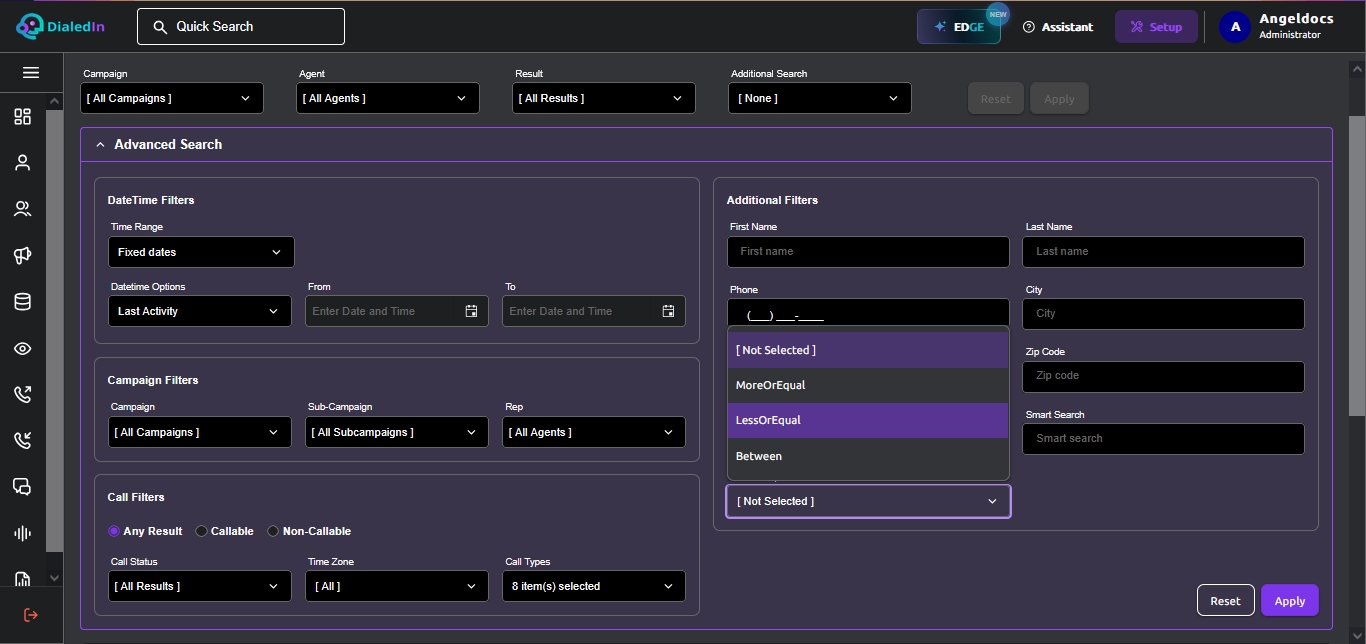
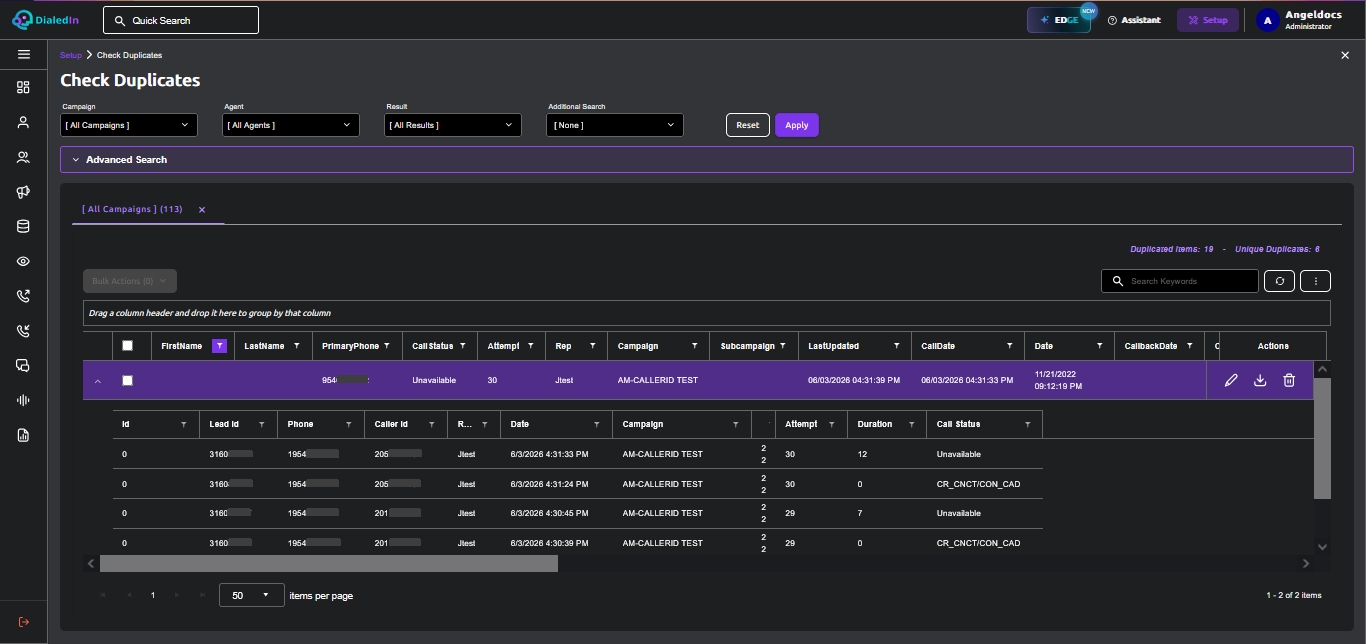
After you entered all the search and filter parameters, click on Search and the results will display all corresponding Contact phone numbers that have a duplicate record. The record count will indicate how many total Contact records have been identified to be a duplicate or have a duplicate, out of the total Contact records that satisfy the filter and search parameters; next to it, how many Contact records are unique (i.e., if we count one duplicate per number). Refer to the following picture.
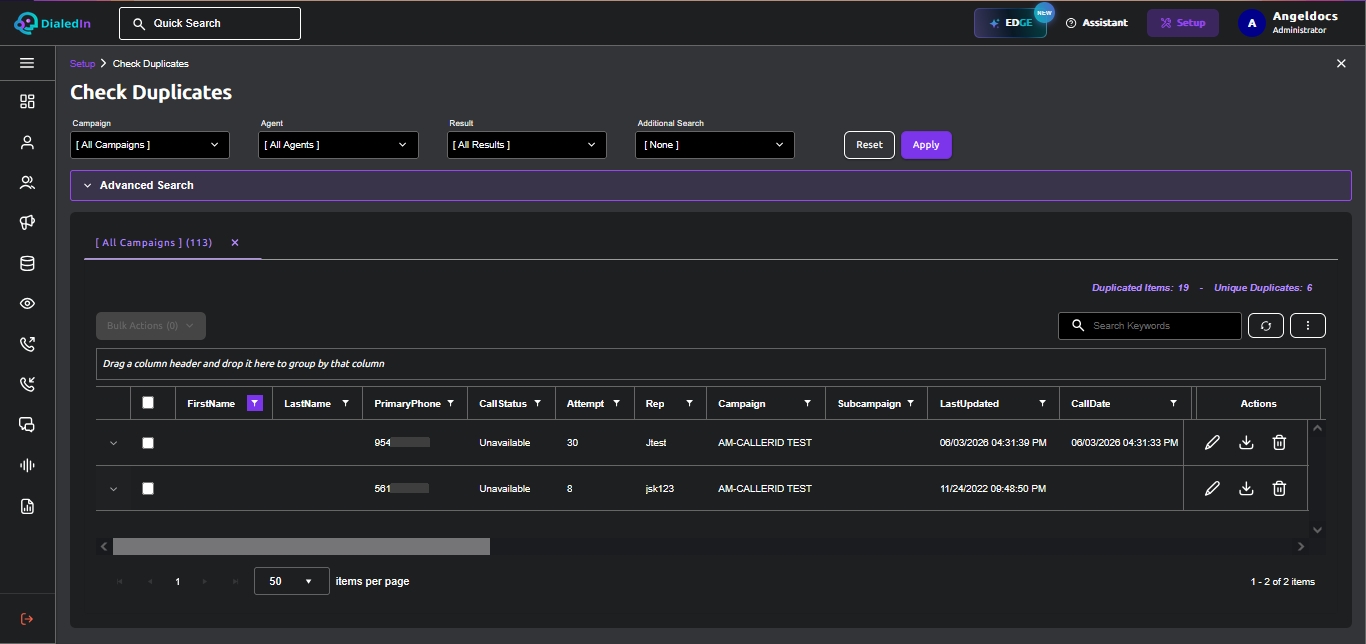
You can expand Contact records that have one or more call Attempts on them, which will show the call history (i.e. call attempts), from latest to earliest.
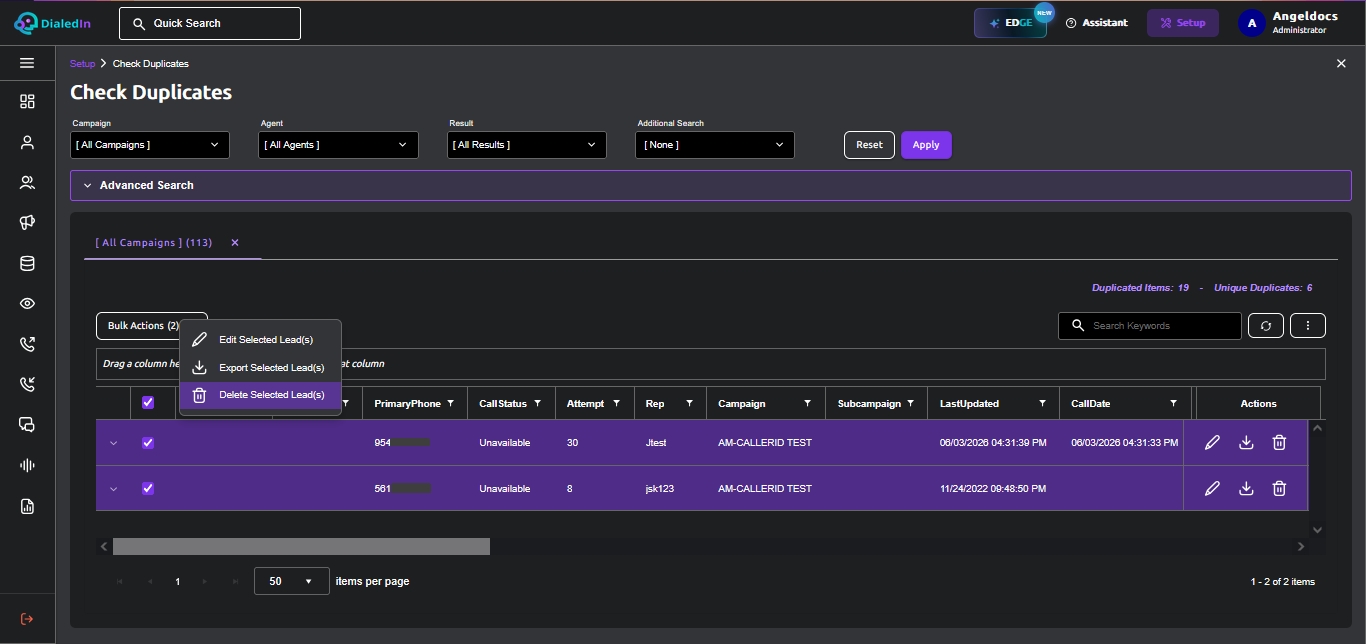
You can perform Bulk Actions on multiple records. Refer to the following pictures.
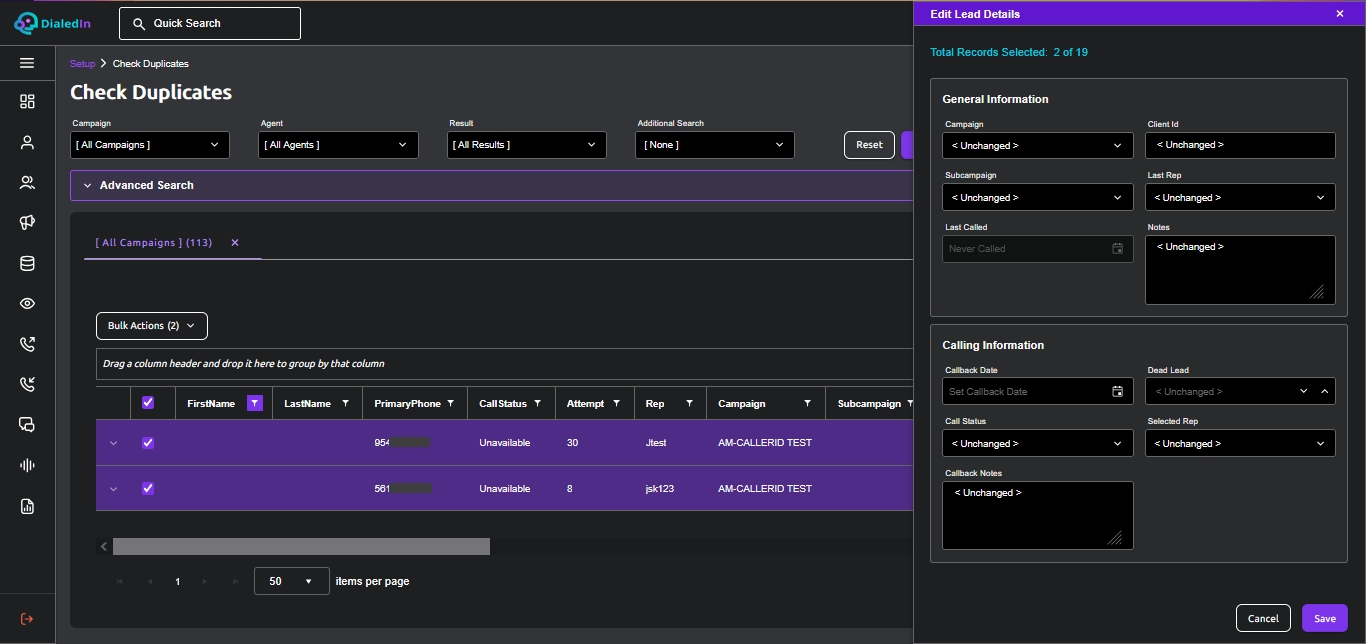
The DialedIn CCaaS solution includes a tool to help recycle Contact records (leads) so they can be reused; it resets the call status (disposition / wrap-up code) to blank (no status) and the number of call attempts to zero (0), which effectively makes the record fresh and callable (it does not change the original import date).
To access the setup area, click on the Setup button on the right side of the top area of the GUI, which will disply the Setup menu. Find the Tools section and click on Recycle. This will display a number of filter and search criteria, which includes Campaign, Sub-Campaign, Rep (Agent), Result Type (callable/non-callable dispositions), specific Call Status (disposition / wrap-up code), Call attempts, and other more specific search parameters. Refer to the following pictures.
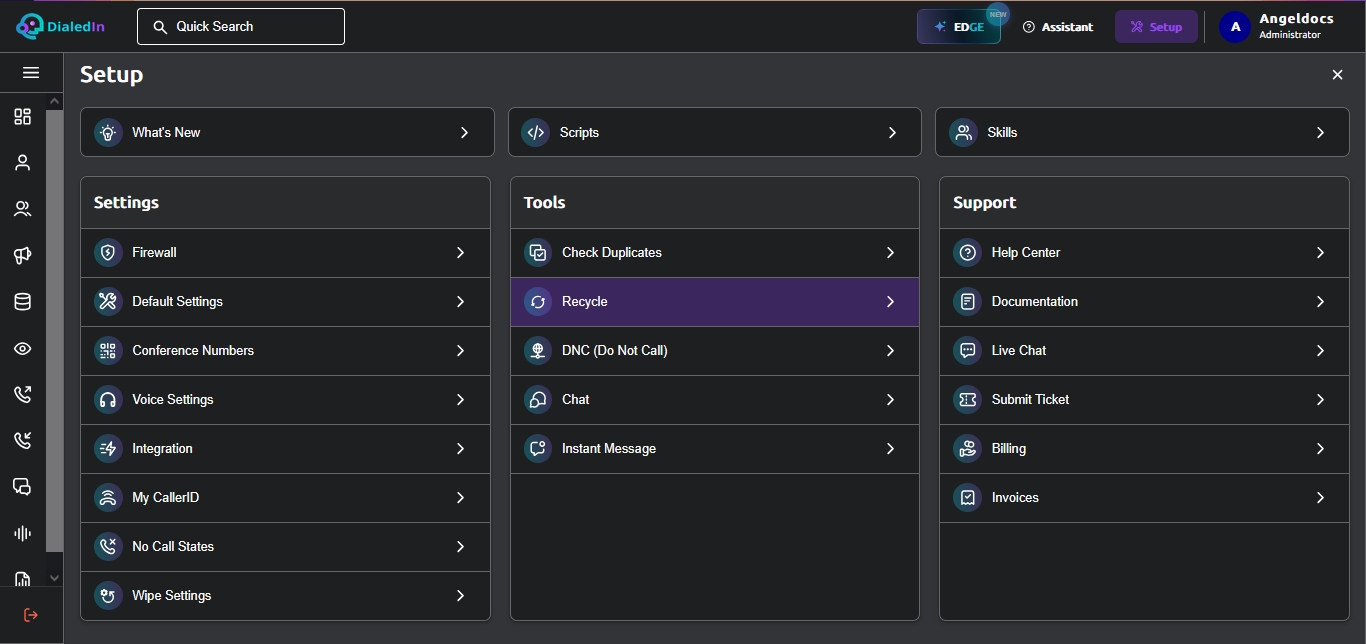
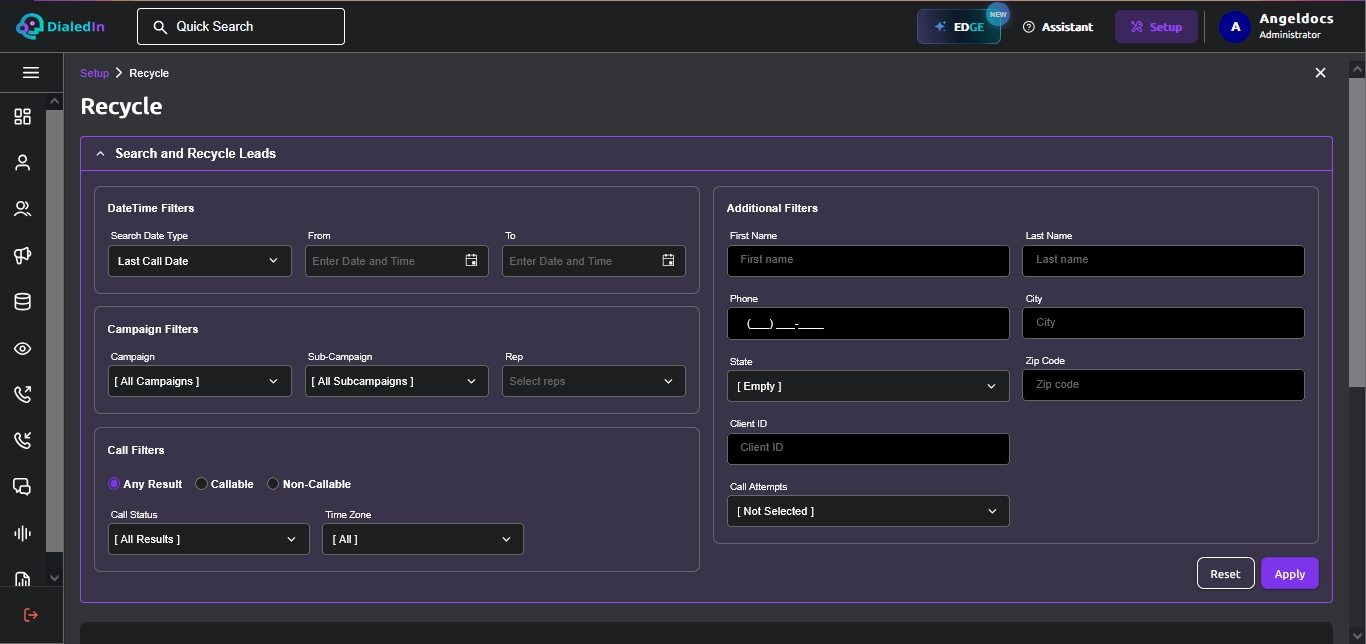
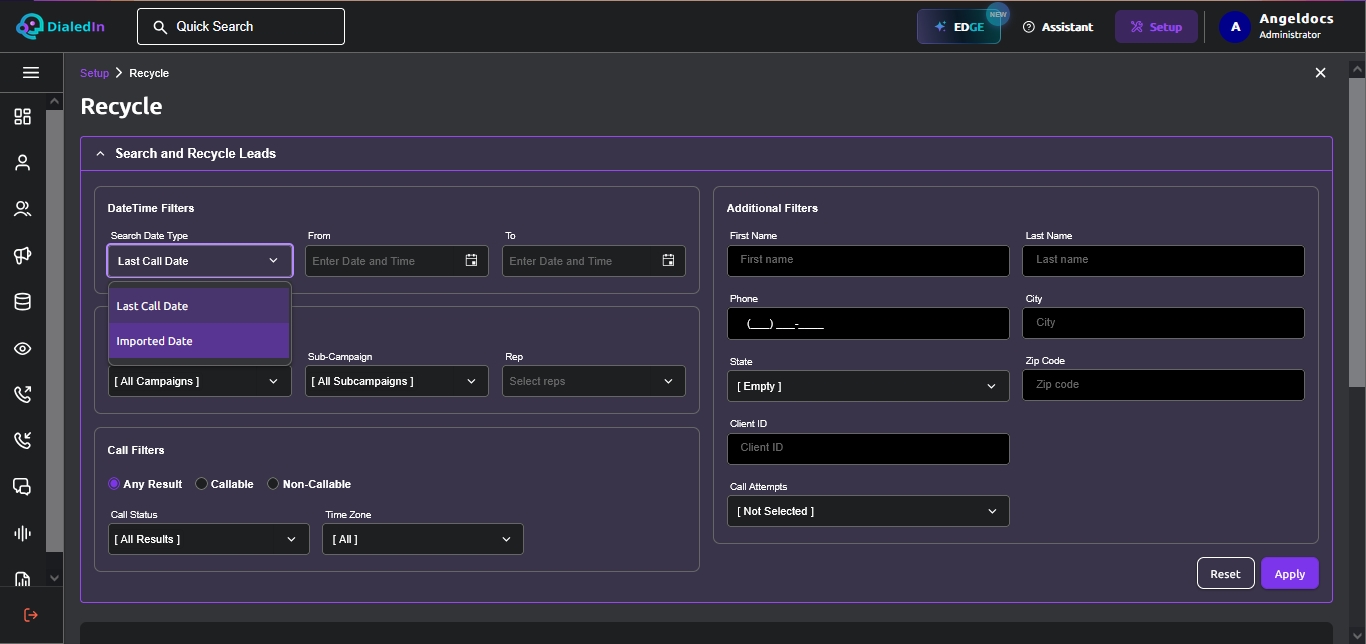
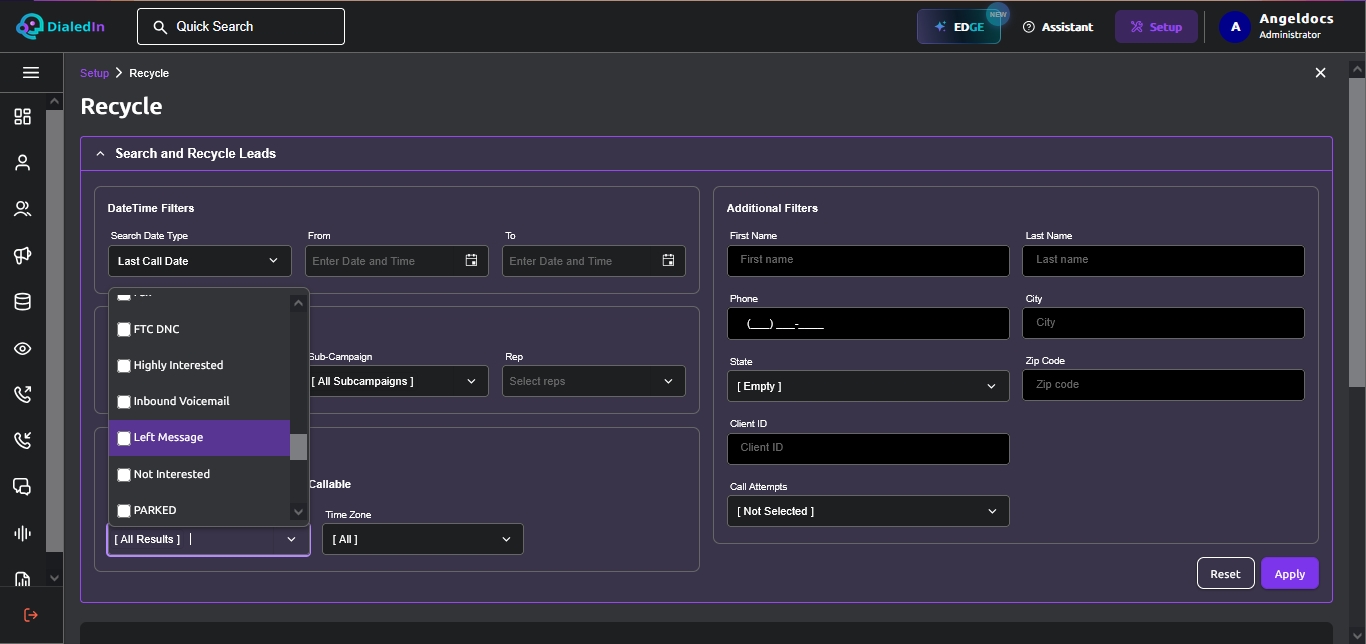
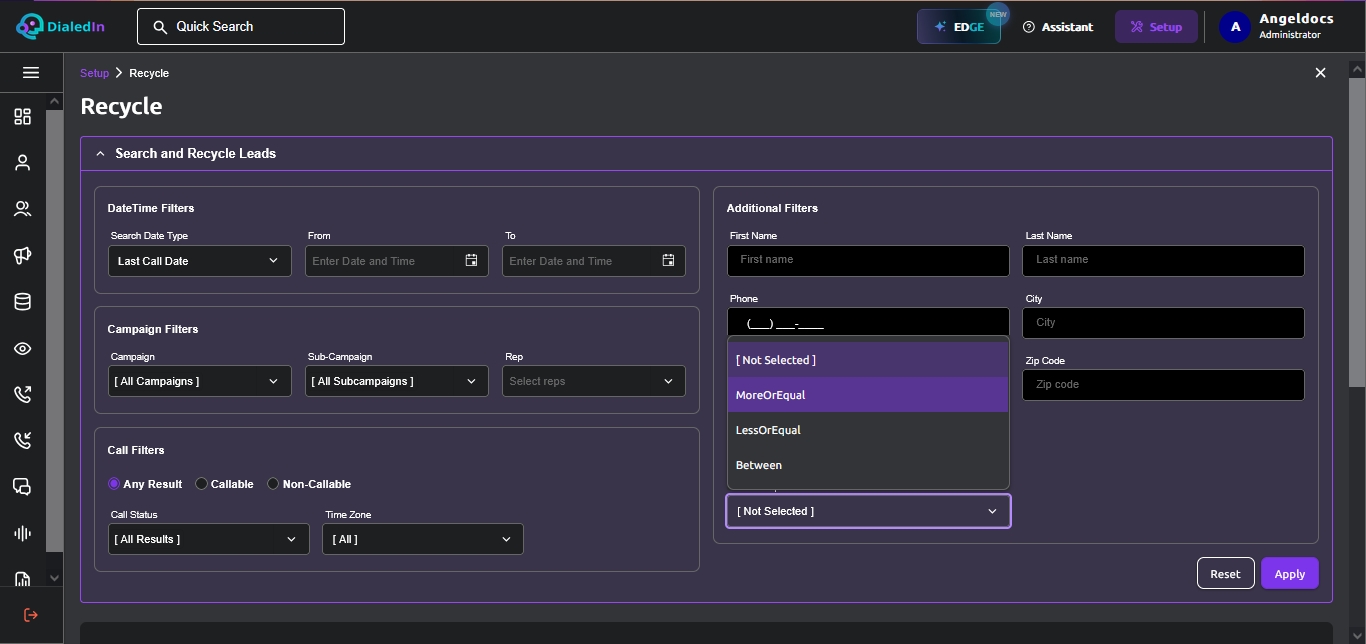
After you entered all the search and filter parameters, click on Search and the results will display all corresponding Contact records. The information will include a record count and provide options to Recycle All found Contact records, as well as Bulk Actions to Recycle Selected Leads. Refer to the following pictures.
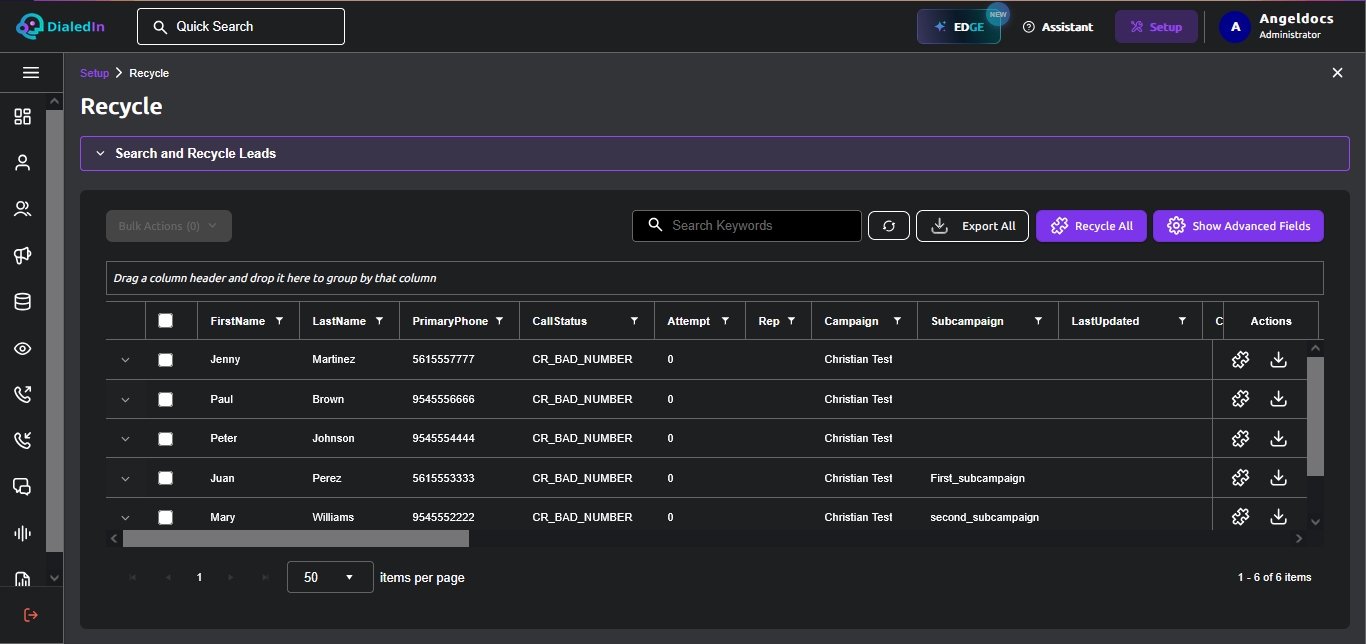
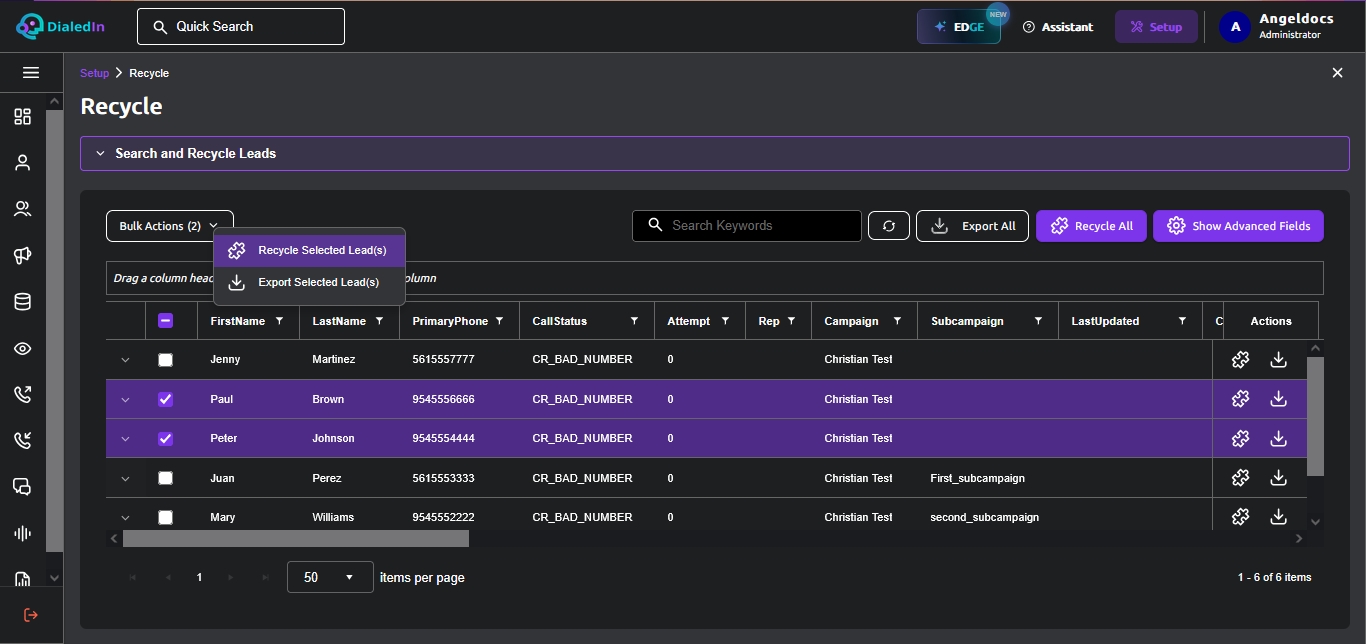
If you select an action to recycle leads (Contact records), you will be presented with a dialog box to confirm. Refer to the following picture.
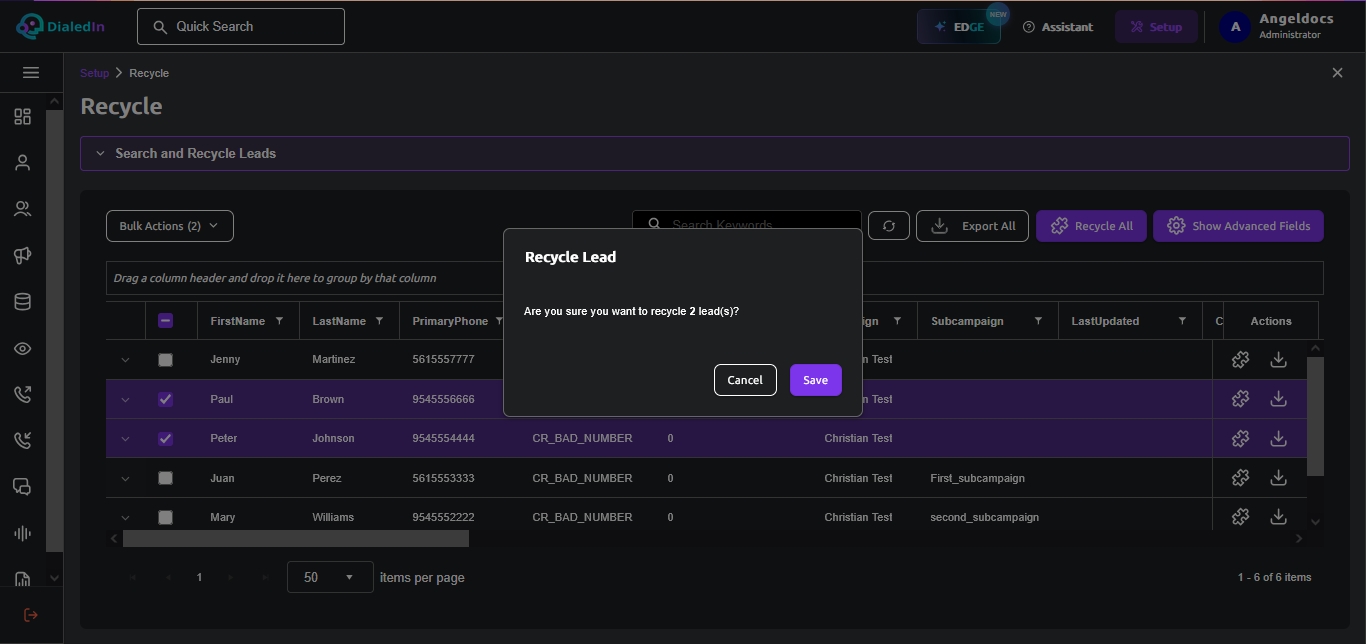
After requesting to recycle leads (Contact records), click on Search again to see the updates on the records.
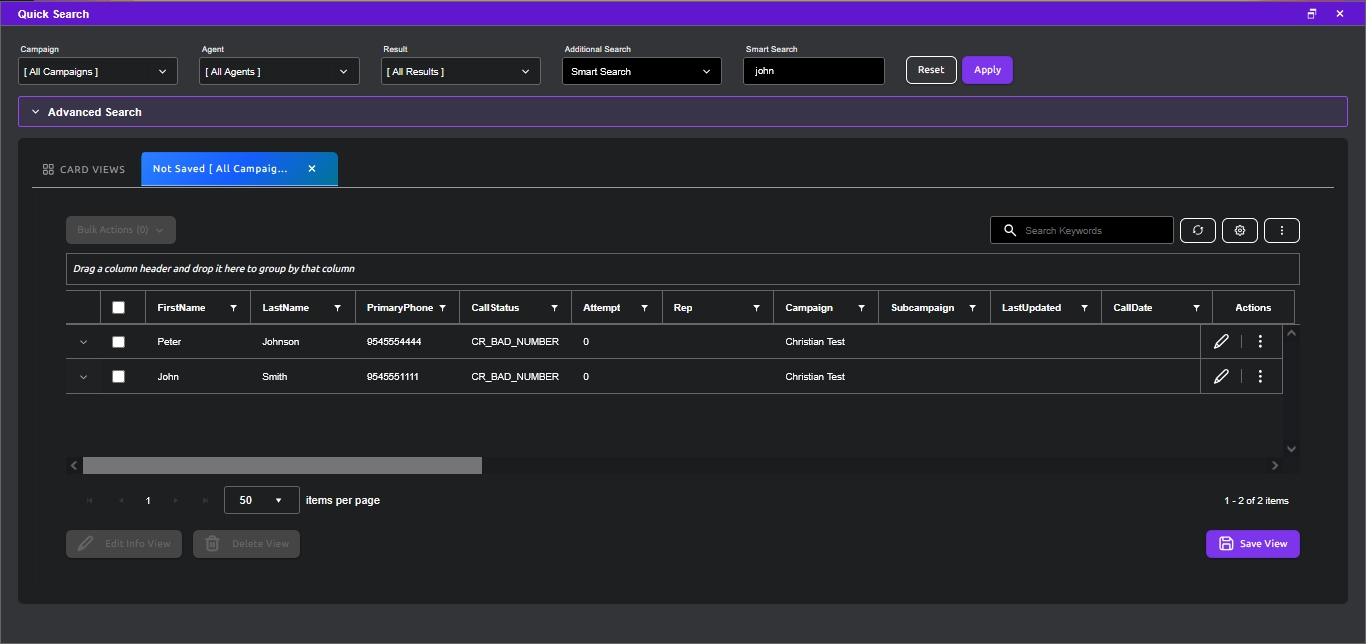
The DialedIn CCaaS Management Console provides a Quick Search tool on the top of the main screen area, to quickly search for Contact records in all Campaigns. Refer to the following picture.

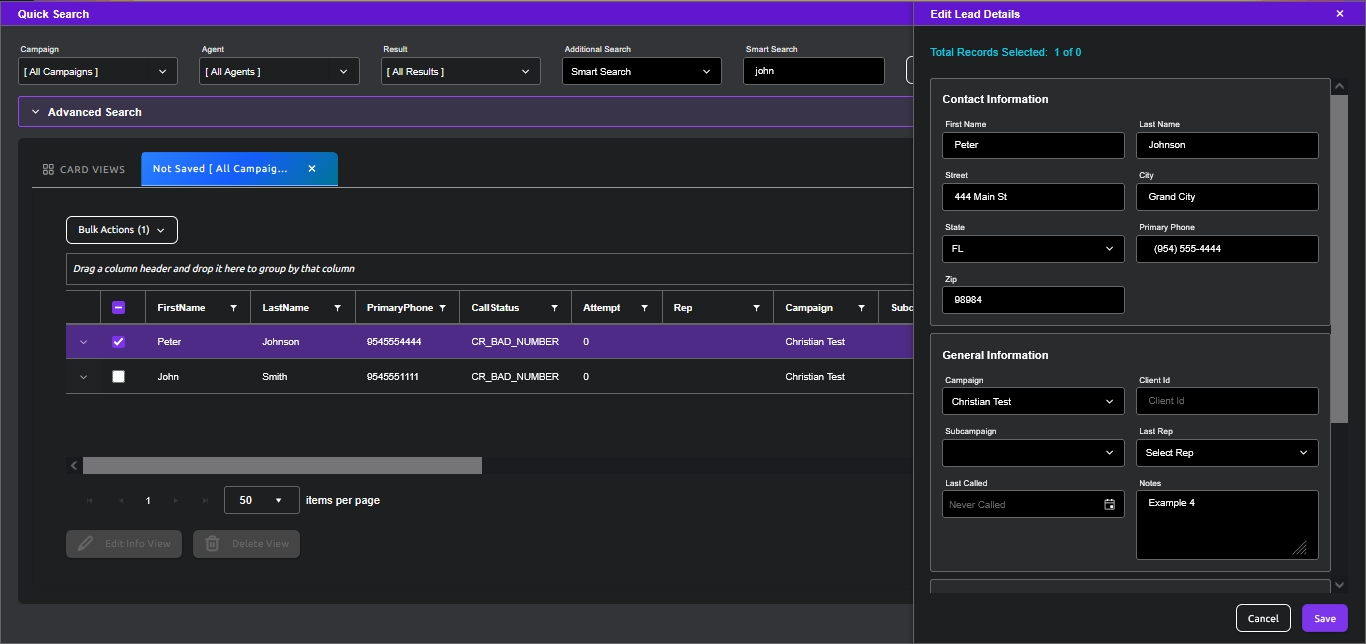
The Quick Search tool is not intended to replace the other more specific and elaborate search tools in the system, but rather to look for a keyword in the demographics (e.g. FirstName, LastName, address fields, notes, etc.) and call history fields of Contact records. It will only search default (built-in) demographics and call history fields; it will not search every field. And it will only present the first 10 matches for the search. The results are shown in a Smart Search window that opens up after search is started. You can double-click on a search result to expand the record information on the right panel. Refer to the following pictures.